
I started Love Notions from the standpoint of a consumer first. For almost 10 years I ran a children’s custom clothing company using patterns from around the web, Ottobre, “Big 4” patterns, as well as some of my own designs. Some patterns were awesome and some… not so much. When I started Love Notions I wanted my designs to be a pleasurable experience for the consumer. And I’ve found yet another way to make that experience even better! I’m so happy to introduce trimless pattern assembly to the Love Notions brand. That’s right, now our patterns have hyper links, layers AND are trimless! It’s like the trifecta of pdf sewing and assembling. I’m pretty excited about this and I hope you are too.
What does ‘trimless’ mean exactly? After printing off your pattern you’ll be layering and taping them together instead of trimming off one side and bottom. Here is a quick tutorial on how to assemble a trimless Love Notions pattern.
First things first
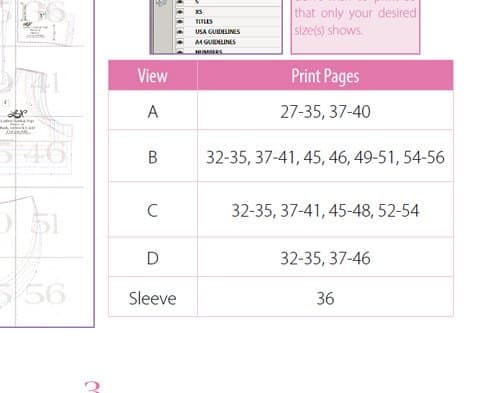
If your selected pattern has more than one view then you’ll need to decide which view you’ll be sewing. On page 3 you’ll find a print chart so you can print just your selected view’s pages.
Adobe Reader is the only option
Before printing be sure you are opening directly from Adobe Reader and that it is up to date. If you open and print the pattern directly from the web preview Adobe app you will not be able to use the layers feature and you run the risk of your pattern not printing to scale. Adobe Acrobat can be downloaded here for free.
Layers
Almost from the beginning Love Notions patterns have included the layers printing functionality. When the pattern is opened from Adobe Reader you’ll see several icons down the left hand side. The icon that looks like two sheets of paper stacked is the one that deals with layers. Click on that and a menu will pop out. Click on the + sign on the menu and all the sizes included will appear. Simply select the size(s) you’d like to print.

US or A4 printing
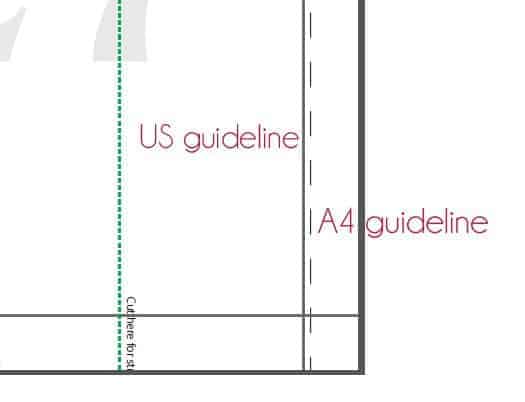
One last thing to select in the layers menu is your paper size. If you’re a US printer then your guideline is automatically selected. If you happen to be one of my lovely international customers I have included a special guideline just for your A4 paper. Un-select the USA guidelines button and select the A4 guidelines. One of these guidelines must remain on so the pattern can be lined up correctly. Once printed you’ll notice that the A4 is a dotted line and the USA guideline is solid. The horizontal line is the same for both types.
Ready to print
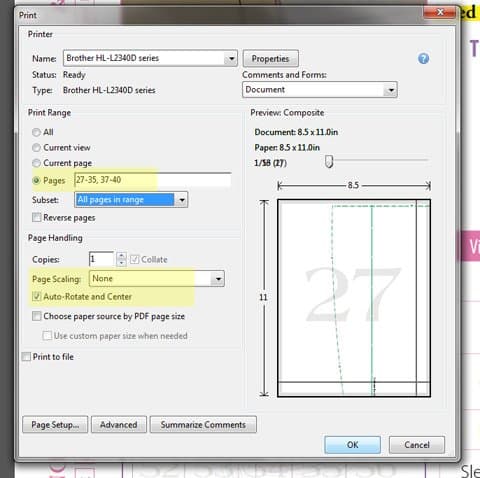
After you’ve selected your size(s) and paper size in the layers menu the only thing left to do print. In the printer menu input your selected pages, be sure page scaling is set to none and that the auto-rotate and center button is selected. Love Notions patterns print beautifully in black & white to save on ink so go ahead and make that selection as well if desired.
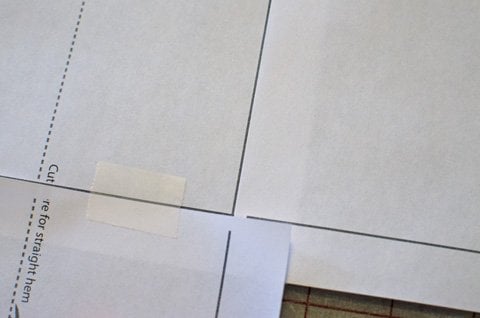
Now what
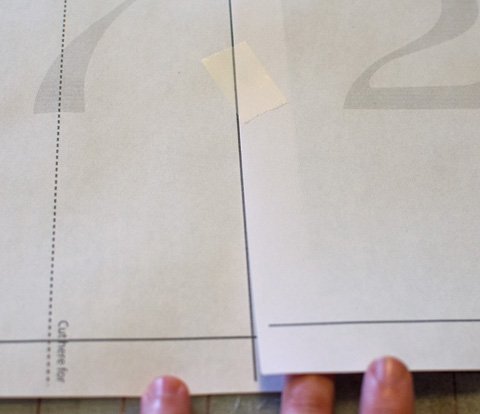
Now take your printed pattern to a clear area and begin assembling. Lay the second page on top of the first butting the edge of page 2 up to the guideline on page 1 but not covering guideline. Continue on for that row. For the second row, lay the first page on top of the bottom of the first, again right up to but not over the line. Continue on that row as you did row 1. You will notice there is a small piece of line that won’t print. Just cut like normal and fill in the line if you wish.
Get sewing!
Your pattern is now assembled and ready to cut out. If you have any questions or need further help I’m only an email away. Feel free to contact me or post in the Facebook group for help. And a huge shout out to Kymy of Everything Your Mama Made and More (EYMM), she let me bug her several times with my questions on the best way to implement trimless patterns. <3
UPDATE 3/2020
Here is a video on how to assemble the patterns using A4 (international) sized paper. The key difference with A4 paper is a solid line prints 1/4″ from the top of A4 paper. You can either trim off this small section of just overlap as usual. It is easier to see the pattern lines if you do trim that section.


Fabulous! Thank you for making your designs even more fantastic!
Thanks Pat, I thought there must be a better way
Oh my goodness I have never known that function existed, I just bought my first of your patterns and this has made it so much more value than even getting the pattern on sale.
Thank you so much.
Love your patterns! You’ve taken such care in your pattern production and it’s made the pdf process a pleasure to use. Thank you!
I know xxxx is the pass word but still no pattern for Ltd top
Hi Carolyn,
I edited your comment to take the code out since it’s for group members. You should be able to log into your account and go to downloads to access all your patterns. Let me know if you’re having trouble: tami@lovenotions.com.
I do not know how to go just to account to redownload the LDT as I previously ordered it but I know want it refined. Will also be ordering a few more so I can get on with my sewing spree. Thank you so much for your help.
Go to http://www.lovenotions.com/my-account. You’ll see several links down the left side. Click on ‘downloads’. There you will find all your pattern purchases and can click on the purple box next to each one to download. Hope that helps!
Just sort of placed a partial order but never completed the pay part but it got late and wanted to finish it today but I could never get the two parts together but could not reorder the first ones either. Do not know where it went and the first part was the more important. Please help before the sale ends. There must be something I’m not doing right as there has to be an easier way.
My printer died. Is PDF the only way to get your patterns?
Hi Marilyn, yes all our patterns are digital only. Most patterns do include a large format file that you can send to a copy shop (I recommend pdfplotting.com) where they will print the pattern out on large sheets of paper so you don’t have to piece them together.
I taped a pattern from another company yesterday and it took hours. Looking forward to using your patterns.
do you have wide format printing available? I got a 36″ plotter printer for my 50th birthday and am trying to print on it where I can.
Thanks!
Rhonda
Wow – the trimless pattern and ability to print only the size I want has made life so much easier – thanks!
I want to send my LN patterns to a large print facility and it is asking me to determine the size/type of paper/tyvex. Any suggestions?
Many thanks,
Annie
650-861-1852
HI Annie,
What pattern are you printing? If you look on the product listing it says in the last paragraph what size the large format file is (usually 33″ x 46″- A0) and how many pages it is.
Hi! I have successfully printed my pattern (sonata) in A4 size. I have also managed the joining side-to -side with no problems but now I come to the horizontal join I notice a solid black line along the top as well as the bottom. In order to get the cutting lines to join it seems like I have to trim this off the top. I’m rather confused by this as the pictures in the guide don’t show this line and I was not expecting to have to trim anything!
regards, Lorna
Hi Lorna,
It doesn’t sound like it printed correctly. There shouldn’t be a line across the top. I would try printing again and make sure the settings are correct.
Hi Tami
thanks for a quick reply! I have reprinted, and again double checked settings, but the same thing has happened. Now I look closer I can see pages 21-26, 38-39 and 53-56 have no top line and pages 27-37 and 40-41 have the lines. Any clues there?
I have reprinted three times now and still have the lines. I have followed your instructions carefully to no avail. Can I simply trim off the top where the line is or will that make the pattern pieces too short?I had planned to make this dress on Wednesday but will now have to wait till next Wednesday before I get another chance. I thought downloading a pattern would save time…. I have taken photos along the way but cannot find a way to add these? Please, please help!
I’m not sure why you’re still getting those phantom lines, it seems like your printer doesn’t want to corporate. If the pattern lines still line up correctly I think you can trim away the top without issue.
fourth copy was done on a different printer, still got lines on some of the pages…
I just reprinted the pattern myself to be sure there wasn’t something wrong with the file and I didn’t get the lines across the top on mine. I think this is your printer. I had A4 testers as well as 8.5″x11″ and they didn’t get the lines either. In any case, if the pattern lines still line up you can trim away the excess.
Do you have a US or A4 printer? I have to change the setting on the printer to remove that line on top of the sheet 🙂
I have all those lines on my pages as well. First time I printed I printed without the US line, and only had the A4 selection checked in the layers. But I got the dotted lines and the solid lines on the pages and that confused me. So I printed the pages with both and I’m still getting lines as well as the lines for US and A4 Printing. I”m on my 4th print job here and still don’t get it. Did you ever get this solved?
Regarding the printing of patterns, I too have a line across the top of each page. If the page is trimmed down to this line won’t it make the pattern shorter? if you cut off above this line on the front or back it is taking off 1cm of length for each page. sorry but am a bit confused.
Just wondering where other ladies with this problem live, I am in Australia.
Hello! I just updated the post with more info on how to use A4 sized paper. If you scroll to the end of the post you’ll find more info and a video. Hope that helps! 🙂
Hi Please can I print patterns on an iPad. I don’t seem able to find a menu to alter the lines.
Yes, you can Barb. Just be sure to open with the Adobe Reader app. One thing to note when opening and printing from a mobile device- layers do not work. So if you want to print just your size you’ll need to open and print from a computer.
If I print from my iPad is it very hard to follow the line for my size?
If you’re familiar with the ‘big 4’ pattern companies, it’s not any harder than cutting or tracing like those. The sizes are nested together but you can definitely see where the sizes depart. I don’t think it’s hard but it is harder than using layers if that makes sense.
I would love to see back views of the patterns.
Hi Bara,
All pattern listings include a back view in the product listing. Just scroll through the images and you’ll be sure to find a few! 🙂
You say to check the 1″ x 1″ box but I don’t seem to see it. Is it meant to be the “Love Notions” box? If so none of my print off’s are 1×1″ What am I doing wrong?
Also do I jion the pages up on the dotted lines or the solid lines
What pattern are you working on? If you’re using regular letter paper you butt up to the solid line. If you’re international and using A4 sized paper you butt up to the dashed line.
Tami, It seems the left third of your replies are covered by your picture. Its not that I don’t enjoy seeing you, but I have to imagine what you are saying. Is there some way the reply or text can be moved over?
Hum, I can see them. What browser are you using? Maybe try using a different one. In the meantime, I will see what I can do to fix this issue.
Was there a response to the 1″ x 1″ box that I missed? I can’t seem to find it either….
Which pattern are you working on? The box is different for each one. 🙂
I’m printing the Laundry Day tee. Also having trouble finding the 1″x1″ test box. Usually I print just the test box page on PDF patterns first to check scaling before I print the rest of the pattern – would be useful to have a test page at the beginning of the pattern pieces
Oh, found it!! Page 21 on the LDT 🙂
PS Thanks for your awesome patterns.
Also just an fyi that some of my A4 patterns have the line across the top, some don’t. Some have the dotted guide on the right, some don’t. I’m about to assemble it and assume that’s not a problem. Here goes!!
Hi, I’m printing in the UK on A4 paper. I also have these two solid lines when lining up top and bottom, a lighter line at the top and a heavy line at the bottom. My test squares are fine and it’s a pretty new PC with a fairly recent copy of adobe. I’ve figured out that curved lines and shoulder slopes only match up when I cut off the little strip at the top of the page, so I am trimming them. It’s trimless side by side to the dotted lines ok. Hmmm.
I also have this issue, so it seems to be happening on A4 printing on this side of the atlantic, but will trim the top of the page accordingly. I also noticed on the Constellation hoodie that it missed of printing section 33 in the instructions for the curved band option. Just a tiny error, but worth sorting maybe?
Hello! I just updated the post with more info on how to use A4 sized paper. If you scroll to the end of the post you’ll find more info and a video. Hope that helps! 🙂
Love the style but wish it had the option for short sleeves, not everyone likes bare arms even in summer!
Can’t please everyone! Luckily I have a variety of patterns, most of which have sleeves. 🙂
Hi Tami, I love your patterns, but I have a question, when I print the Sunny Day Dress pattern I get a pink line at each side of the page when printing A4, do I overlap these lines or butt the edge of the paper to the pink line on the previous page and ignore the line on the left hand side. Thanks
Carol
Hi Tami, I still love your patterns but have to confess that I made a huge error. The pattern I referred to in previous comment is not yours at all. I apologise for my stupid error and put it down to the hot weather here in Cyprus. Thanks
Carol
No worries Carol!
I think one of my previous orders was Julianne Hill same address but email was midnightsewer0326@gmail.com. could this be the culprit? You were going to combine them but may not have done so. HTH
Hi Julianne,
Send Kelly an email with what’s going on and she’ll help you out- help@lovenotions.com
I had been using my phone to print, but now I haven’t been able to print using my phone. How do I get my patterns on my computer? Thank you.
Hi Felicia, all you need to do is log into your account from your computer. From there you will be able to download your pattern purchases.
Hi:
Is there a way to view entire LDT pattern with the numbered pieces on them for the correct placement? I’m having difficulty placing the pieces together that make sense to me. You mentioned placing them in rows but I can’t figure out where the row starts/stops. If I could see a picture of how they go together, I’d have better success. Thanks so much for this pattern.
Pat
Yes, there’s a layout on page 3 of the tutorial that shows you how it’s laid out. 🙂
Which pattern pieces belong to View A? Which pattern pieces belong to View B? etc. What is View A? Is it the shirt? What is View B? Also, instructions say that page 36 is for the sleeve. I am looking at page 36. It is not a sleeve pattern at all. Is it missing some pages? Also, although the tutorial demonstrates how to put the printed pages together using tape, I cannot find any pages that indicate they are border pages (in other words, when will I know when to stop taping pages together?). Thank you in advance for your reply.
Jennifer, see page 3 of the pattern. It will give you a print chart so you know what pages to print for each view. If you’re not showing any borders it sounds like you have turned off those layers. You need to keep at least one of the guideline layers on. There are two, one is for US letter and the other for A4 paper.
Hello, I’ve just bought the Classic Tee Shirt pattern and it doesn’t seem possible to print off the A4 version as trimless for the columns, ie vertical rows. It works trimless for the long sides of the horizontal rows no problem, however a solid line must be cut off AT THE TOP of subsequent horizontal rows to make it match the pattern lines. I clicked on the recommended link provided for the Adobe program and downloaded the pattern using this program so I can only assume there must be a glitch in the software of the pattern. It could be I’m doing something wrong but the comments here show that 4 other customers using A4 paper size seem to have experienced the same issue…Perhaps you are working on an update or could tell me where I am going wrong. Thanks.
Hello! I just updated the post with more info on how to use A4 sized paper. If you scroll to the end of the post you’ll find more info and a video. Hope that helps! 🙂
Hi,
I had the same problem as you using A4 in uk. I have solved it now and it is trimless. You need to select “Letter” or “u.s. letter” on your printer. (I know it sounds wierd but have faith). then in Adobe Reader layers turn off ‘Guidelines’ leaving just “A4 Guidelines” selected.
Now when you print your pattern it will be as it should ‘trimless’.
Good luck. 🙂
Hi,
I have just bought the Vivace pattern and can’t find the 1″ x 1″ box! Please help 🙂
Regards.
Hi Nicola,
It’s on page 32 & 56. 🙂
Hi Tami,
I only have an iPad Pro and just tried to print out my first pattern and the 1 inch square isn’t 1inch. I wondered if there was any way of me printing true to size without buying a computer or going to a copy shop as at the moment that’s not possible..
Regards Sally Stapleton
Hi my name is Betty Engel I bought a few patterns from you and now I can’t download them. I’m not sure how to go about it. I have adobe reader but now sure what to do? I haven’t sewn in years and thought I would start with one of your patterns.
Thank you for any and all help you can give me.
Betty Engel
Hi Betty,
Shoot us an email and we can better help you- help@lovenotions.com.
Hi, I am new to sewing and a senior and probably need someones help if I need to print it over again.
I printed everything for the Laundry Day T and did it in 100 full scale, proud of myself I could figure this out..
I do not understand adobe so I just printed it and didn’t see size to pick either or what I need for US. Will the pattern be O-K to use or do I have to print it again? I am trying to sew the tunic top but printed out everything. Now I see only need part of the pages. I will take out the pages and see if it goes together. I have tried to put down page 1 then page 2 over it and so forth but didn’t work out. Will it work if I use pages I need only or will I need to print out the pages I need over again differently. What did I miss. Thanks
Hello! You can definitely just leave out the pages you don’t need and only assemble the ones you need for the tunic based on the print chart. And then just trace or cut your size. Here is a link to our post about printing and assembly: https://www.lovenotions.com/trimless-assembly We also have a Youtube video showing you how to use the size layers in Adobe: https://www.youtube.com/watch?v=S3C7DzjCH8A&feature=youtu.be&ab_channel=LoveNotionsSewingPatterns%2CLLC I hope these resources are helpful. Let us know how it goes! Happy Sewing! ~K
i am having problems with the Allegro pants,
Is there a way to view entire LDT pattern with the numbered pieces on them for the correct placement? I’m having difficulty placing the pieces together that make sense to me. You mentioned placing them in rows but I can’t figure out where the row starts/stops. If I could see a picture of how they go together, I’d have better success.
Page 3 is not very use full I cant hardly see it. is there another way.
Thanks so much for this pattern.
So sorry to hear you are having trouble assembling the LDT pattern. Page 3 is indeed the print chart and it is zoomable. You can zoom in on that print chart as much as you need to for clarity. Each row has 6 pages if that helps. ~K
I am stock with the layout of the pattern of Allegro pants and need help figuring it out. I don’t know were the crotch goes in the pattern.
Hi Priscilla, I am so sorry I do not fully understand your question. Are you referring to the print chart or the instructions? ~K
HI I purchased a pattern thinking that I would be able to use it with my projector. Am I wrong?
Carol Murphy
Hi Carol! Yes, most LN patterns come with a projector file. There are a handful that don’t because I don’t have the original file anymore, but each pattern listing should note what kind of files come with it.
Hello,
I’m using Adobe Acrobat Reader v 2021.007.20099 (64-bit) and do not have a Print dialog option for no scaling as shown in diagrams and referenced various places in the documentation. After trial and error, I discovered that my settings should be as follows:
1) radio button selected for Custom Scale 100%
2) put a check in the box for Choose paper source by PDF page.
I do like the no-trim pages a lot, thank you, so perhaps this bit of information will help others.
Looking forward to making my Serenity Sweater!
Hi Sheila! So happy to hear you figured it out! Thanks so much for sharing that bit of information. Make sure to share your Serenity Sweater with us in our Facebook Group and also tag us on Instagram if you plan to post there. We would absolutely love to see what you make! Happy Sewing ~K
I have re-downloaded the LDT pattern in both the “Print at Home” document and the large format file. I have also re-installed Adobe Acrobat however, the layers for printing just the size I want are not showing up. I have access to a plotter and so can print from the large format file but “layers” don’t seem to be working. Please advise. Thanks.
So sorry to hear you are having issues with the layers. In Adobe Reader or Acrobat, when you click the layers icon, there should be a little black arrow head pointing to the words ‘LDT XS-5X pattern final.pdf’. If you click that arrow head, it then faces downward and opens up the layers. Can you try this and let us know if it works? ~K
Has anyone had an issue with printing a selection of pages? For some reason I am only able to print one page at a time, instead of using a selection such as pages 24-35. I have to select the page I want and then select current page in order for it to print.
Not sure if this is my printer or something to do with the pdf?
I’m so sorry. We haven’t encountered this issue with our PDFs. Are you using Adobe Reader/Adobe Acrobat to print? Maybe it’s a printer setting? ~K
I appreciate the free pattern. BUT, I’m struggling to put the patterns together. I isolated my size, printed the pattern but it just doesn’t make sense to my brain, especially when there is another piece of a pattern on the same piece of paper. One little suggestion, could you label the sides that go together, as well as the entire page. Like “a” would go with “a”?
I desperately wanted this to work for me, I LOVE your videos.
I became so upset I cried and threw the paper away 🙁
Oh no. We are so sorry to hear that! Our pattern pages are numbered for this reason, and there is a print chart included in every pattern that you can follow to assemble your pieces. We do have videos that show you how to print and assemble our patterns. I am going to link those along with some other helpful resources:
Getting started with LN patterns: https://www.lovenotions.com/shop/sewingbeginners
How to print: https://youtu.be/Kjl2LLtn1Mc
How to assemble: https://youtu.be/I_0XxOn8Brc
I also suggest you join our FB Support Group where you can post photos of any issues you are having. Photos make troubleshooting so much easier and quicker. Might I add, that group is filled with lots of makes and inspiration from sewists of all parts of the World. We hope you will join so we can better connect: https://www.facebook.com/groups/lovenotionspatternsupport
Please let us know if you are still having trouble with assembly after watching the videos I linked to, so we can try to assist further. ~K