

Are you looking for inspiration on how to make a sewing space? Maybe you have recently started sewing and need to organize your set up, or maybe you’ve downsized or relocated and need to re-configure your space. No matter your situation, Noreen is here to show off her new sewing space and demonstrate the essentials and all the ways you can fit your sewing materials into your spot — no matter the size!
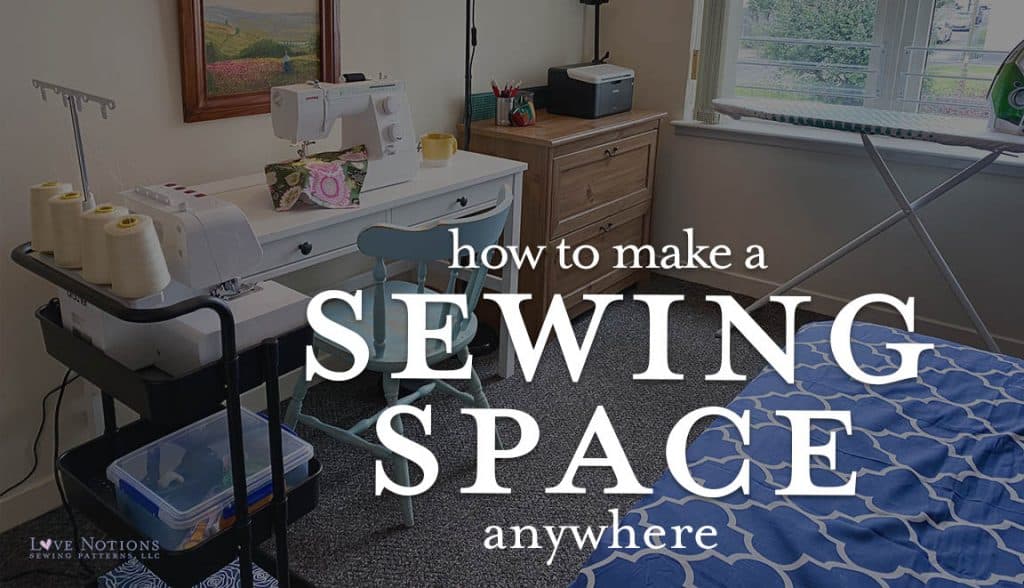
How to Make a Sewing Space Anywhere
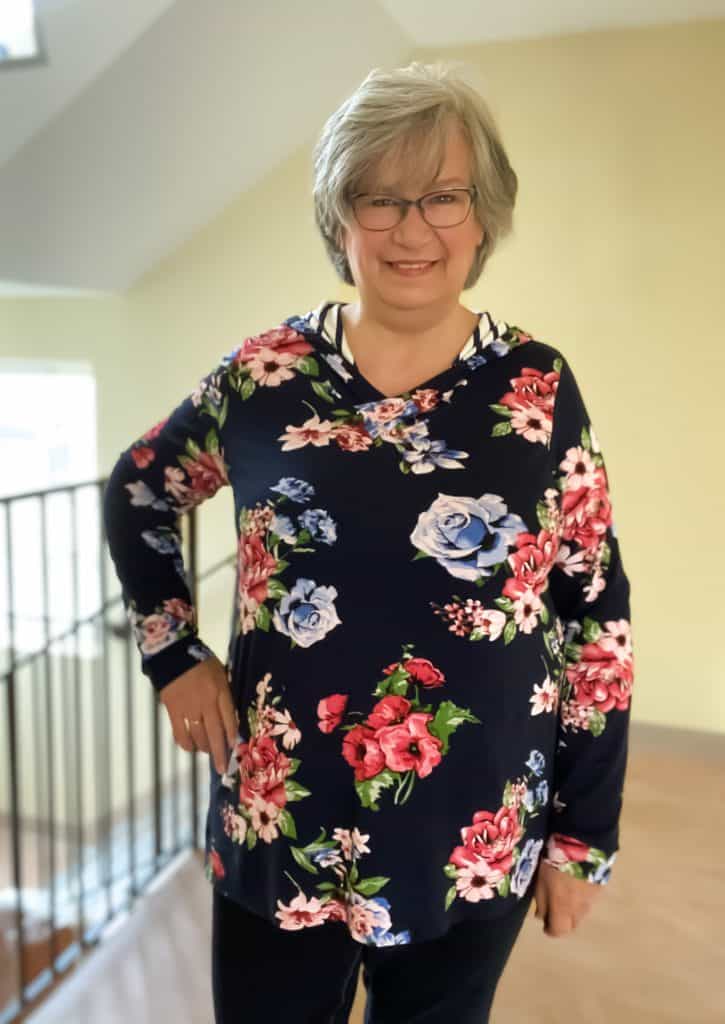
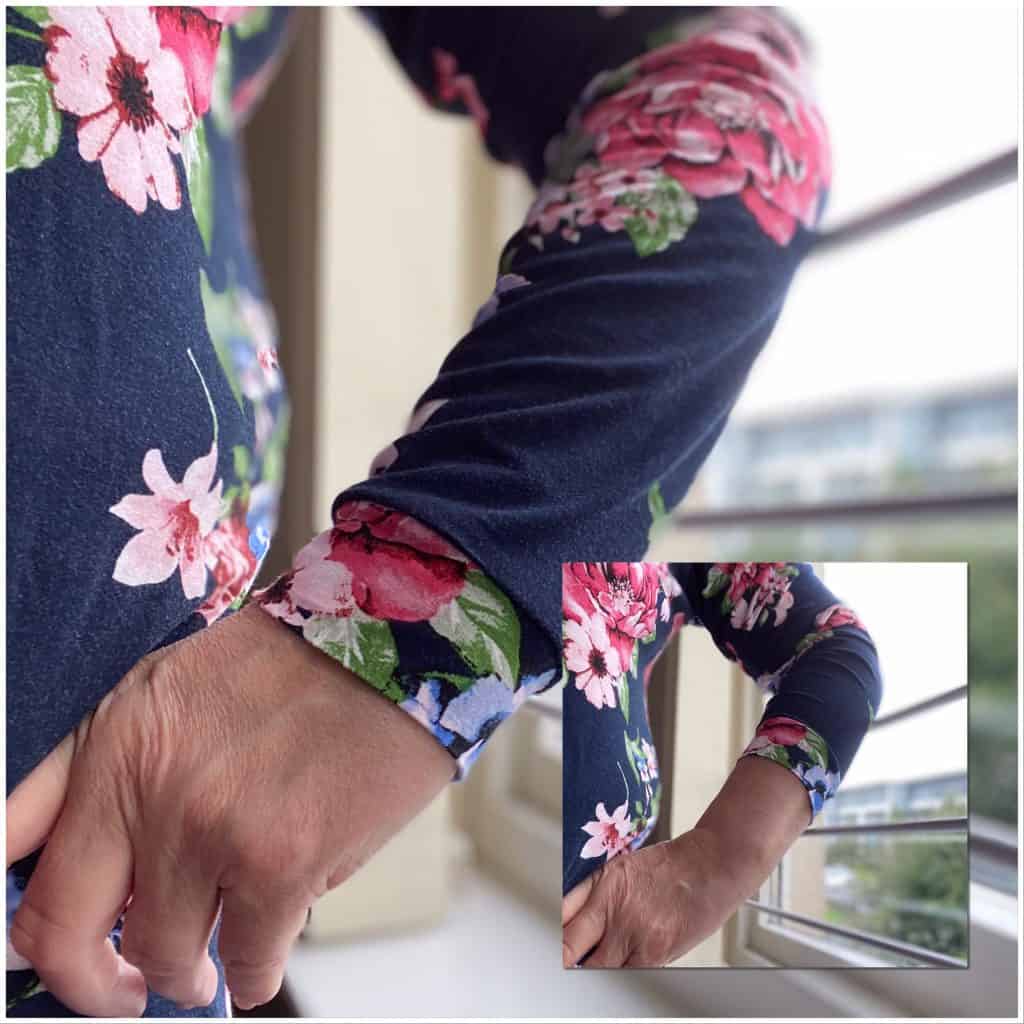
I am so excited to share this week’s Feature Friday pattern, The Terra Tunic! (aff link) I just love this pattern! It has 6 neckline options and 3 sleeve lengths. I especially like the side vents and the easy fit. Plus, I’m feeling a little sassy with that stripe inside the hood.
Besides sharing this amazing pattern with you, I ‘d really like to invite you on my journey to creating this great shirt.
THE SEWING SPACE STORY BEGINS
Once upon a time there was a girl who loved to sew but lived in a tiny flat…
Don’t let space stop you from sewing
Sewing, like a lot of things, comes with stuff and at least for me, quite often, messes. I always thought if I just had my own sewing space, you know, like the ones that fill up your Pinterest board, it would be easy to sew. I really let that idea hinder my creativity until recently. I’ve actually come to the realization that anyone can have a “sewing space” with some creative thinking. To be fair, my Daughter in Law Zoe is the BEST at evaluating what you really need, purging and organizing. I’m a pretty creative thinker so with what I’ve learned from her I’ve come up with a great system that works well for me and I’ve got a few other ideas I’m going to share with you too.

1. Evaluate Your Space
The first thing I did was to evaluate my space (s) and what I had. We moved into a semi furnished flat right before a pandemic hit so I had no choice but to work with what I had inherited. While we have a spare room, it cannot be a dedicated sewing space. It needs to be an office and quickly and easily house guests. The next thing I had to do, was tell myself I was only allowed to have the number of things that actually fit into each area. This is a hard one but definitely worth it in the time it saves both setting up to sew and cleaning up after not to mention actually finding things. LOL!
2. Consider Space Saving Purchases
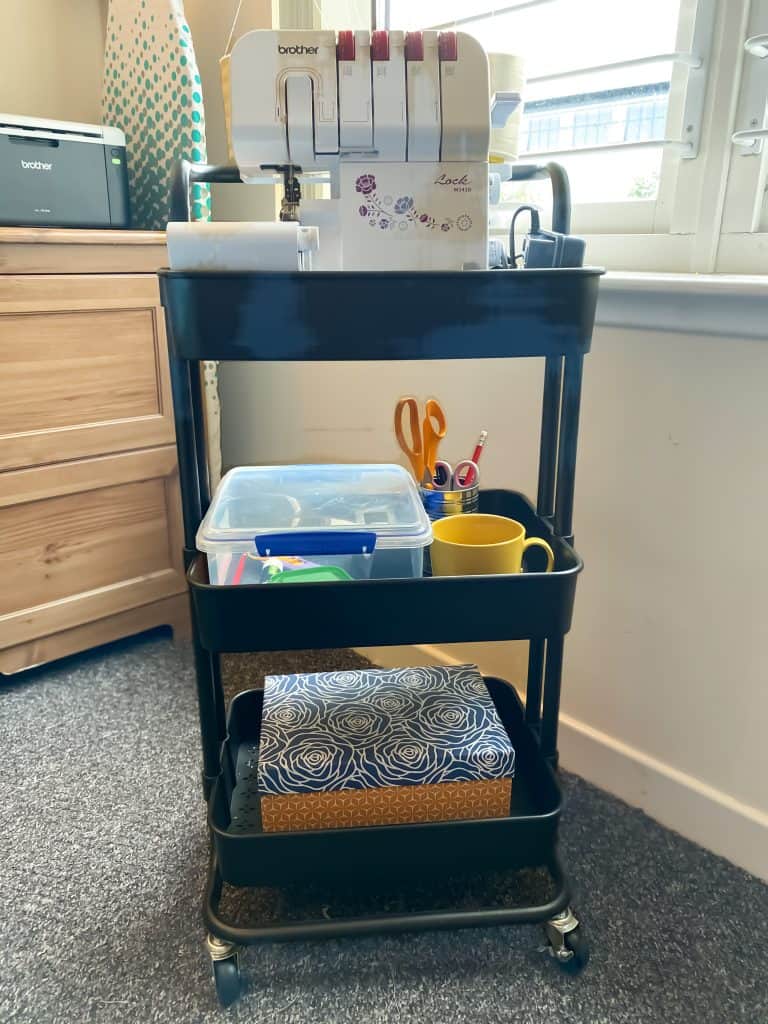
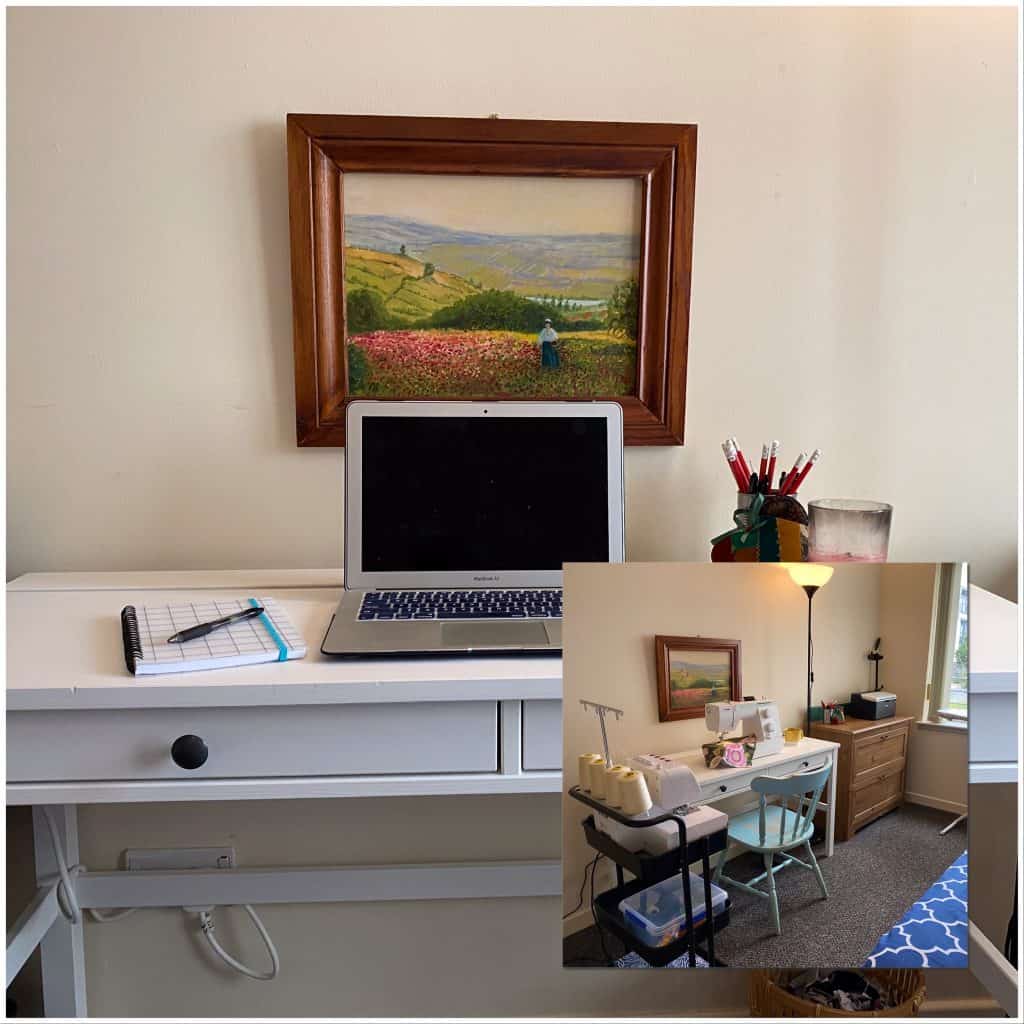
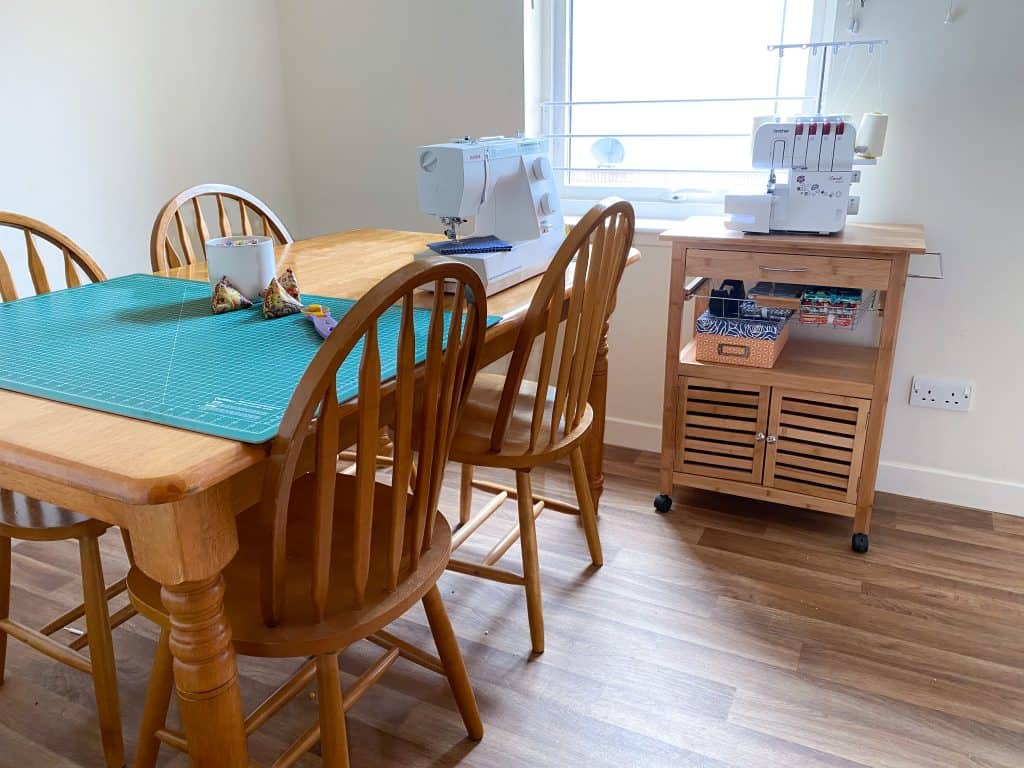
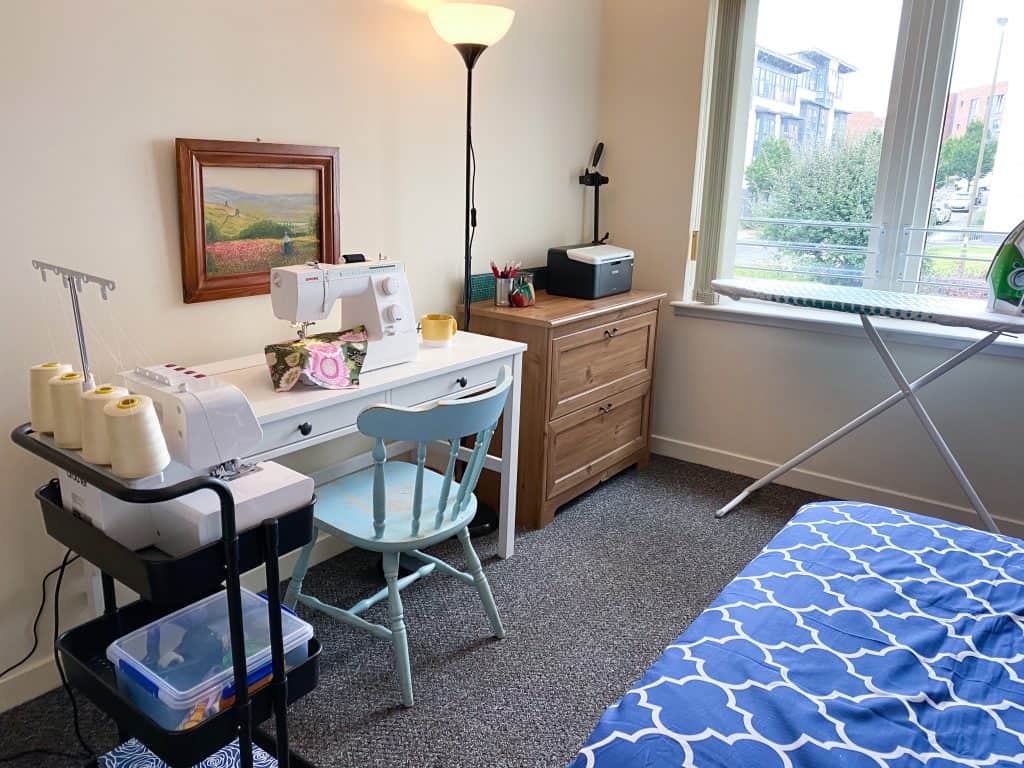
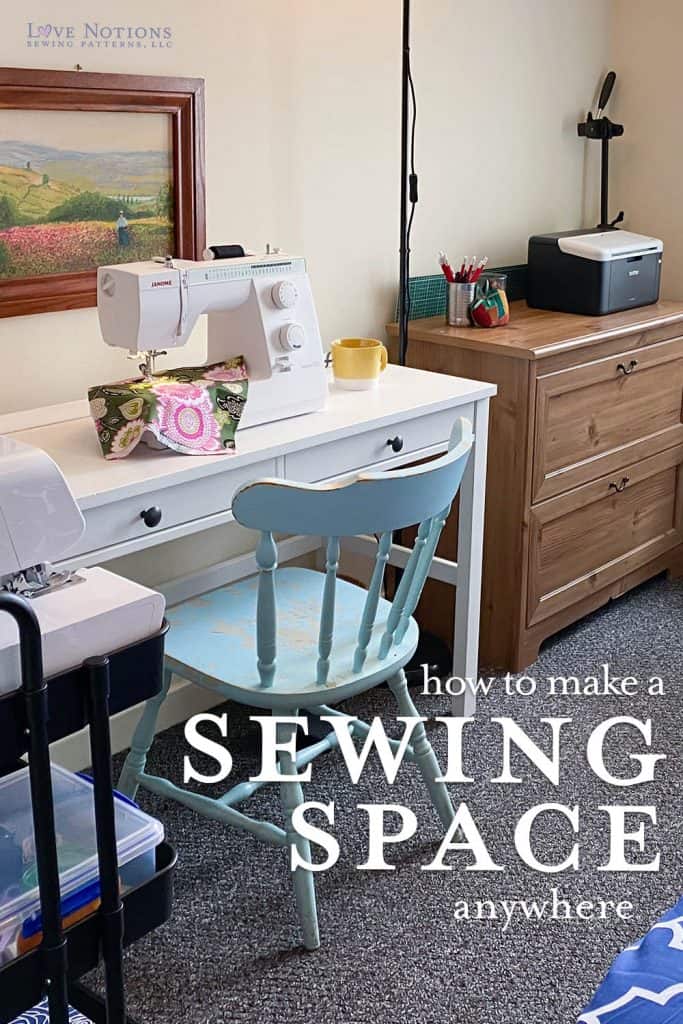
I made only 2 purchases. A trolley and a desk. Thank goodness for delivery! Oh my word! For those of you who need to sew in other places in your home I can’t encourage you enough to get a trolley!! Mine is from Amazon but there are lots of places to get them. My trolley holds my Serger, a box with all my pattern making and cutting out supplies, my clips, a holder for small scissors, seam ripper, tweezers etc., and a box with my thread and needles. It tucks out of the way and I can easily wheel it anywhere in my flat to sew. It’s amazing! I did put an extra cutting board I had under my machine to stabilize it.
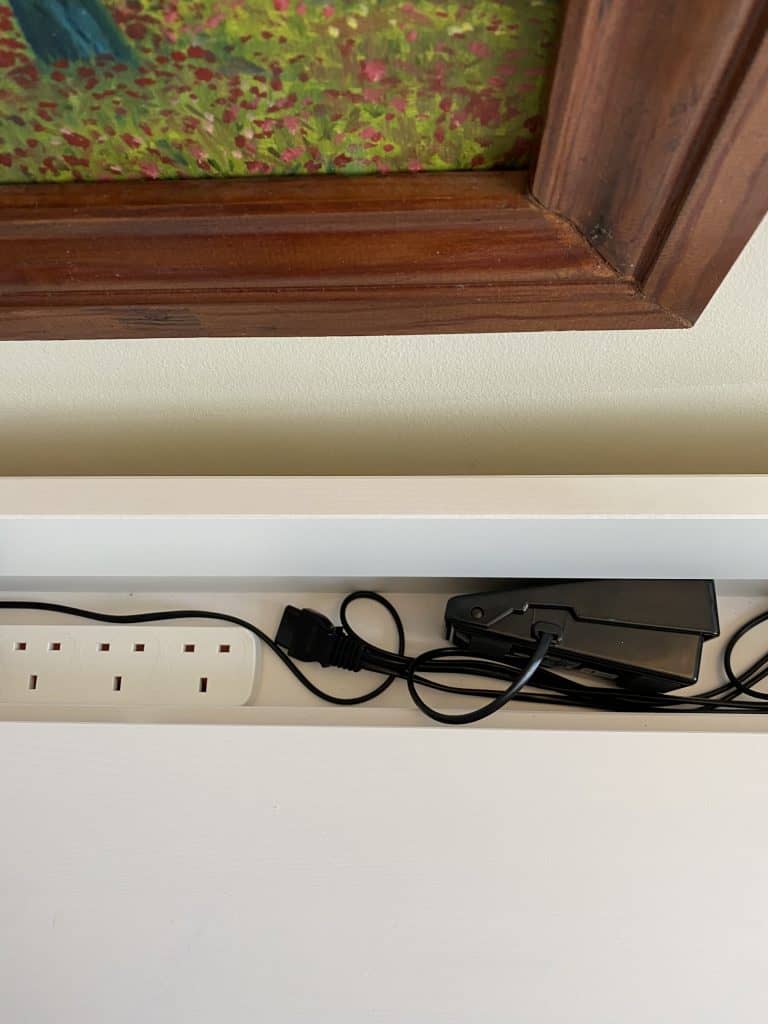
This desk is a the perfect for dual functions. My favorite thing about it is the cord storage at the back. Since this is not a dedicated sewing desk, it’s easy to take down and set up my machine since the pedal fits neatly in the storage tray!
3. Configure Furniture for Storage
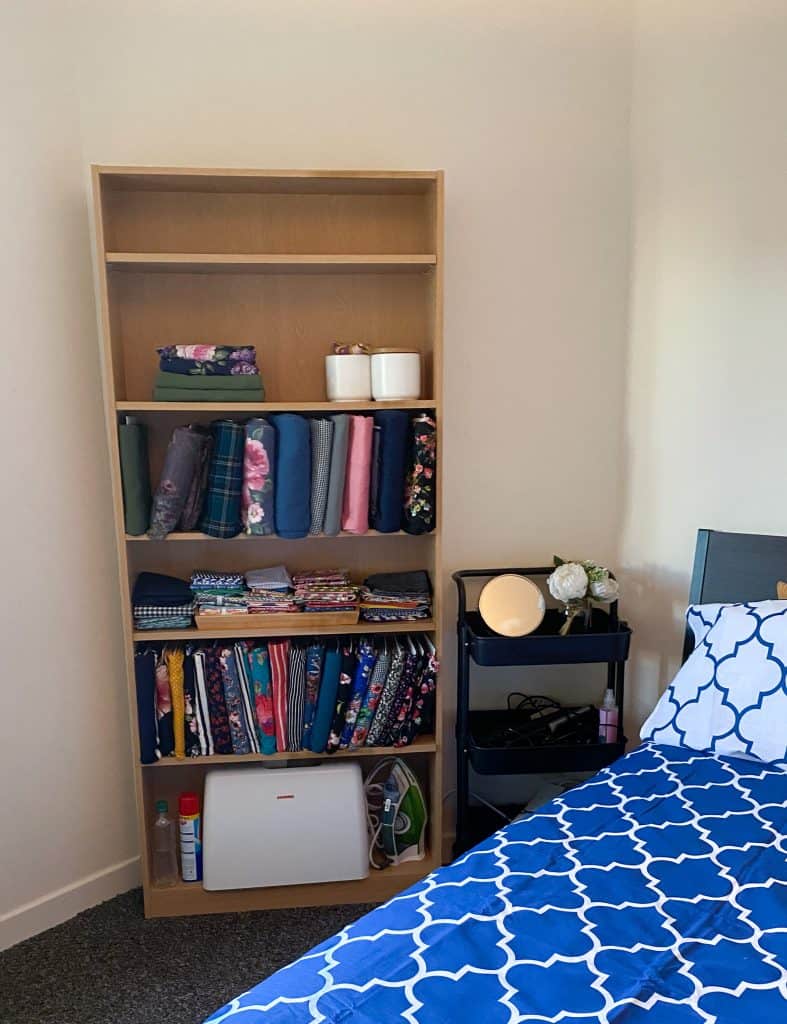
The bookcase is where all the action is. My regular sewing machine and iron sit on the bottom shelf then the rest is filled with my fabric. I did commit to only having fabric on had to fit in this bookcase but don’t despair if you feel like you’d like or need to keep more. Under the bed storage bins work great for this too. I did roll my fabric on boards. Not only do I like seeing them in this way, I think I can get more in than when it’s just folded. Bonus!
4. Consider Pattern Storage
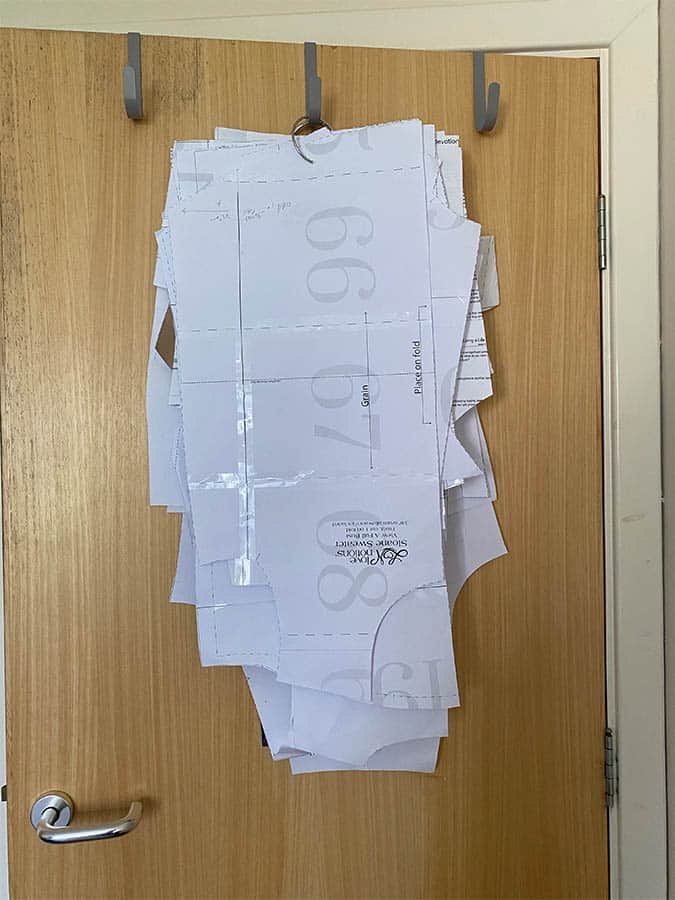
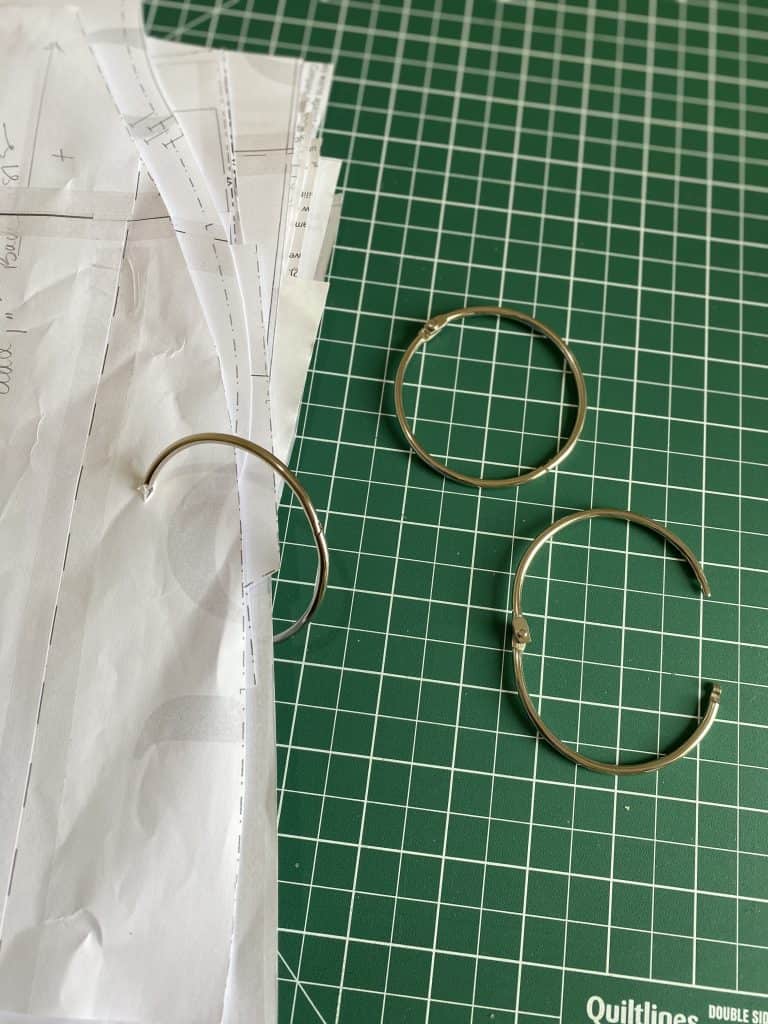
I store my all my Love Notions patterns by hanging them on the back of the door out of sight. I’ve been using this method for a while and it works perfect for me. I group my patterns by style on binder rings or shower hooks. Then I can flip through them to easily find the pieces I need. They are really fast to put away too.
5. Reallocate and Repurpose
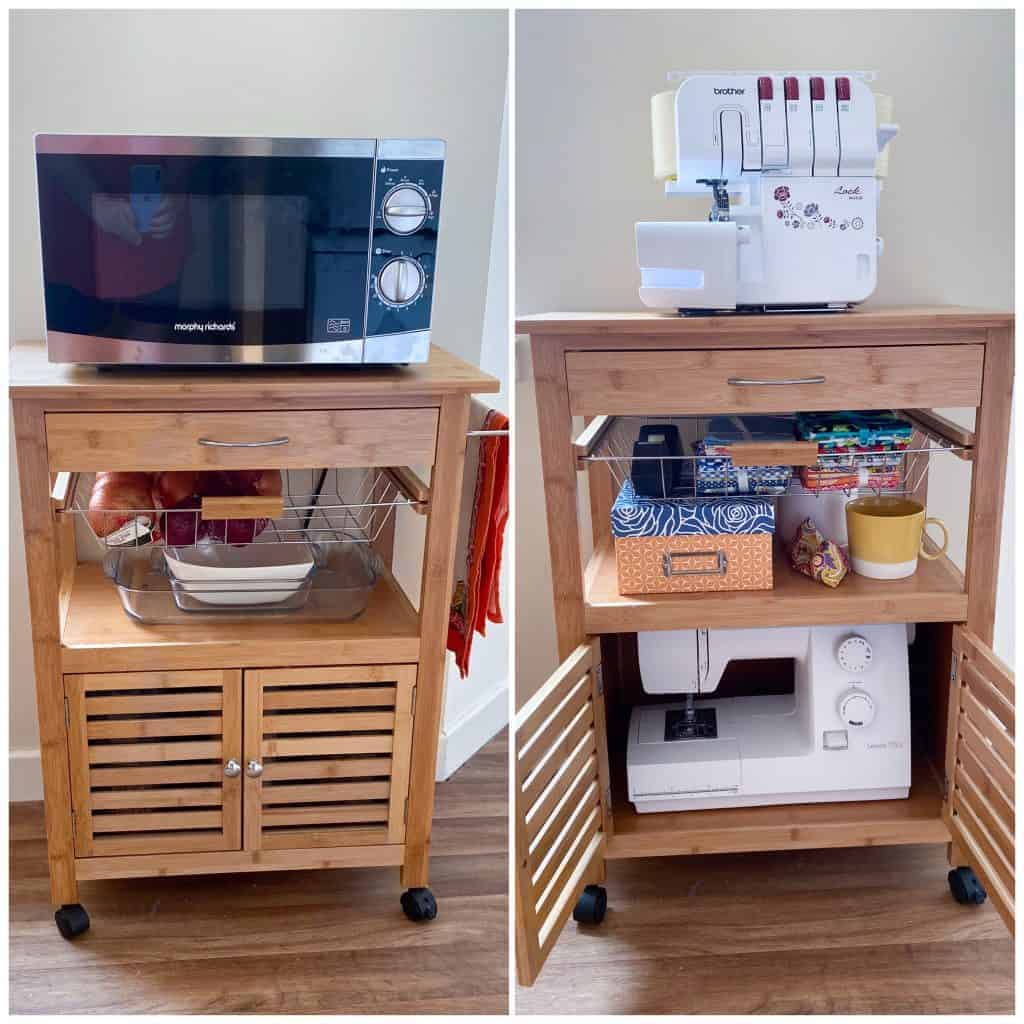
Here are some other ideas I came up with. Maybe you have a buffet, sideboard or china cabinet that you could reallocate as your sewing storage. How about a big basket under your coffee table or a stack of vintage suitcases for storing fabric? I find that keeping things as convenient possible and easily accessible is the key. If it’s a chore to get out or put away I’m probably not doing it. That space under your sofa is perfect for a cutting mat, your patterns and possibly your ironing board! How about repurposing a microwave cart if you always have to sew at the table? I tried it with mine and I was amazed at what I could get in there. I decided that if I ever lose my spare room this is what I’m going to do for sure. Setting up this way to sew was under 2 minutes!
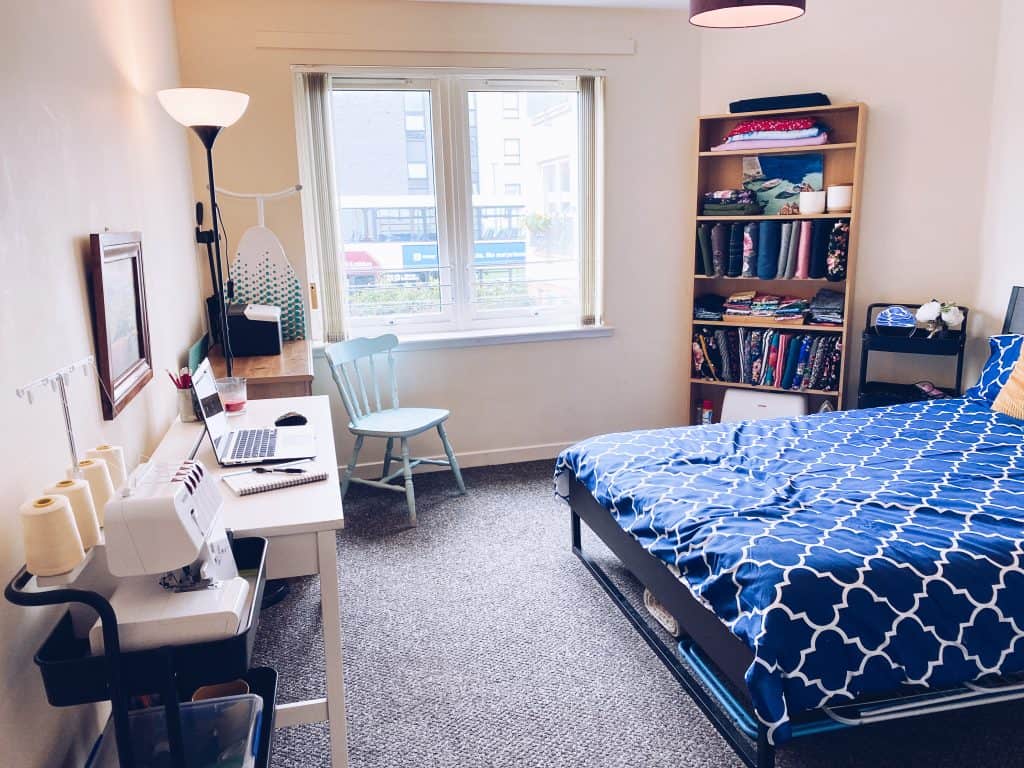
My Completed Sewing Space
Here is my completed space. Take a peek around and you can see all the essentials. A place for my fabric, ironing board, tripod, printer, cutting mat (it’s hiding in the space behind the chest) and my machines. It’s all easily accessible and mobile as well. If my husband is using it as an office and I want to sew, I can be set up neatly and efficiently at the kitchen table in no time flat. After all, nothing is more of a bummer than wanting to sew and having to drag stuff out only to have lost your time window and your motivation in the process. ( Ok, I had to time it. It took me 2 minutes and 20 seconds! ).
Time- (and Space!) Saving Ideas for Sewing Productively
So now that I’m all organized, I’m ready to bust out that Terra Tunic, right? Well, maybe not so fast. The other thing that can discourage me from sewing is time. Like many of you I don’t always have huge blocks of time in which to sew so I’ve found that grouping specific tasks together and working on just those things really helps. For example, I’m a fabric washer. I spend a lot of time and effort (and money) making clothes that fit so I want the size I make to still be that size after its been through the laundry. I’ve always tried to wash my fabric as soon after it’s arrived as I can. In my present circumstance that is even more important. I don’t have a dryer, so clothesline or indoor drying rack are my choices and that takes time.
Batch Printing
If I need any new patterns printed for some upcoming sewing I want to do, I will do that ahead of time. One of my favorite things about Love Notions patterns is the ease in which they go together. I’ve been known to knock out assembling a few at my coffee table while enjoying a good movie. Got littles? I once gave my Grandson some crayons and let him “help” by coloring on my patterns.
Batch Cutting
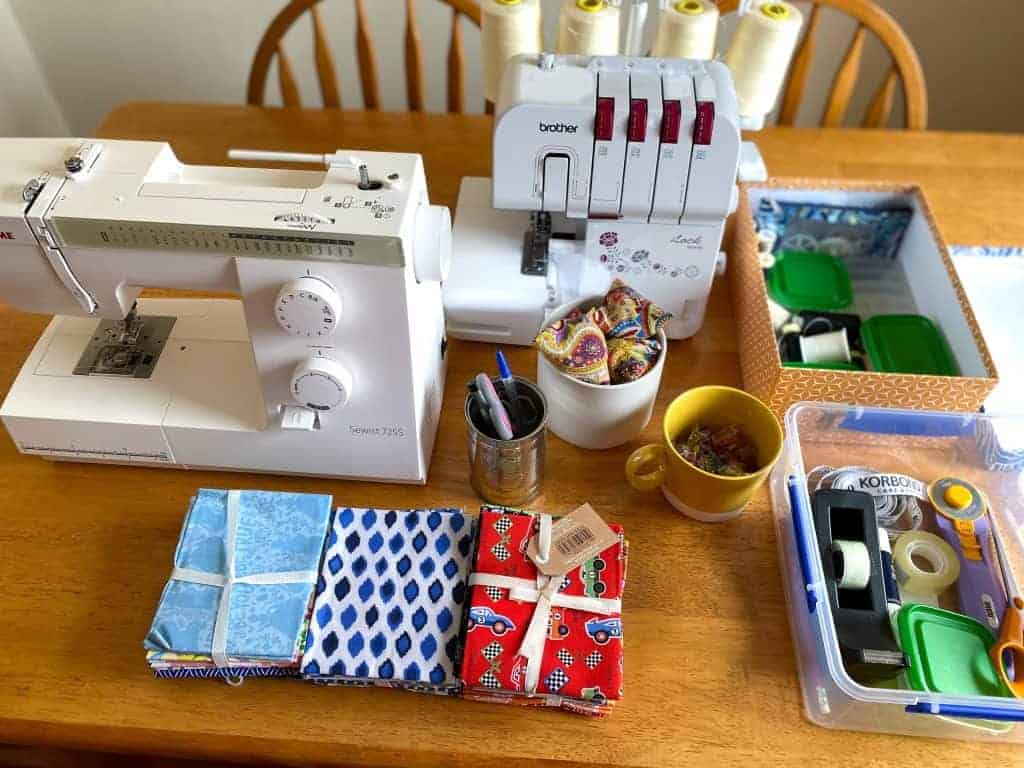
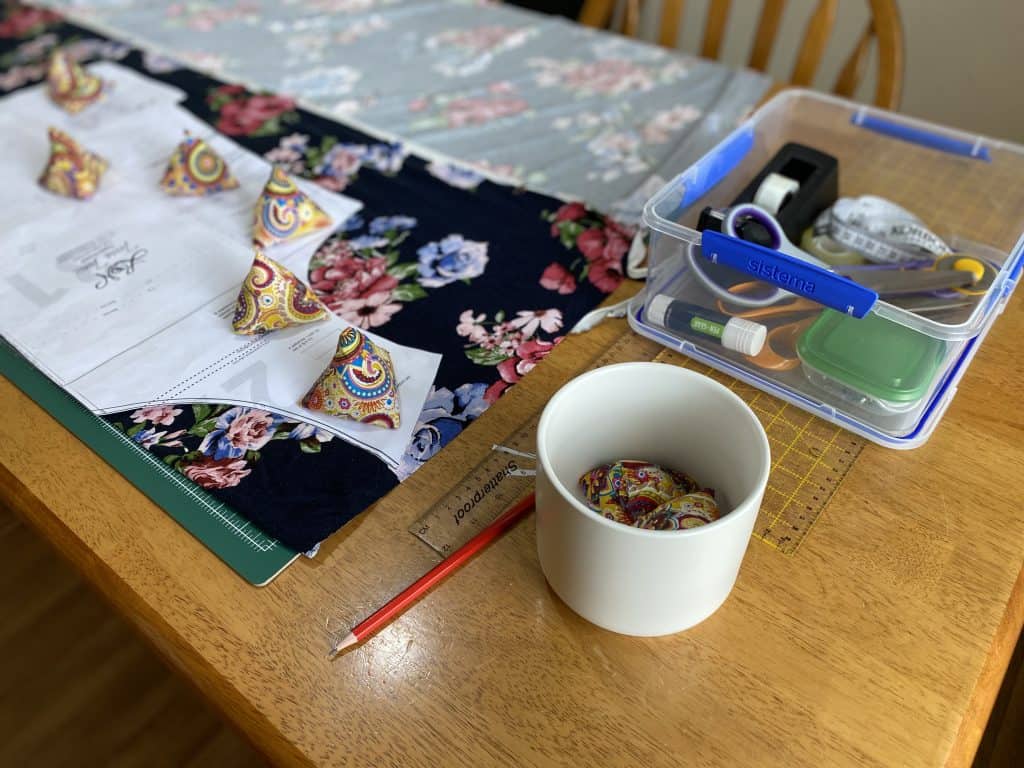
Another thing I do is have cutting days. Much like batch sewing I do batch cutting. That way I am only getting out the cutting supplies and can easily get it all put away at the end. When I got ready to cut out my Terra Tunic, I grabbed my cutting mat and my cutting/assembling box off the trolley, my pattern weights and straight edge and put them out on the kitchen table. Then I pulled my fabric choices off the bookcase and grabbed my pattern ring from the back of the door, and I was ready to go in around 5 minutes.
Project Storage
When I finish cutting, I find putting the pieces for each project in a zip bag an easy way to keep them together. I add a note with the details and ideas I have for that project. For my floral Terra Tunic, I noted the striped hood and the fact I cut cuffs.
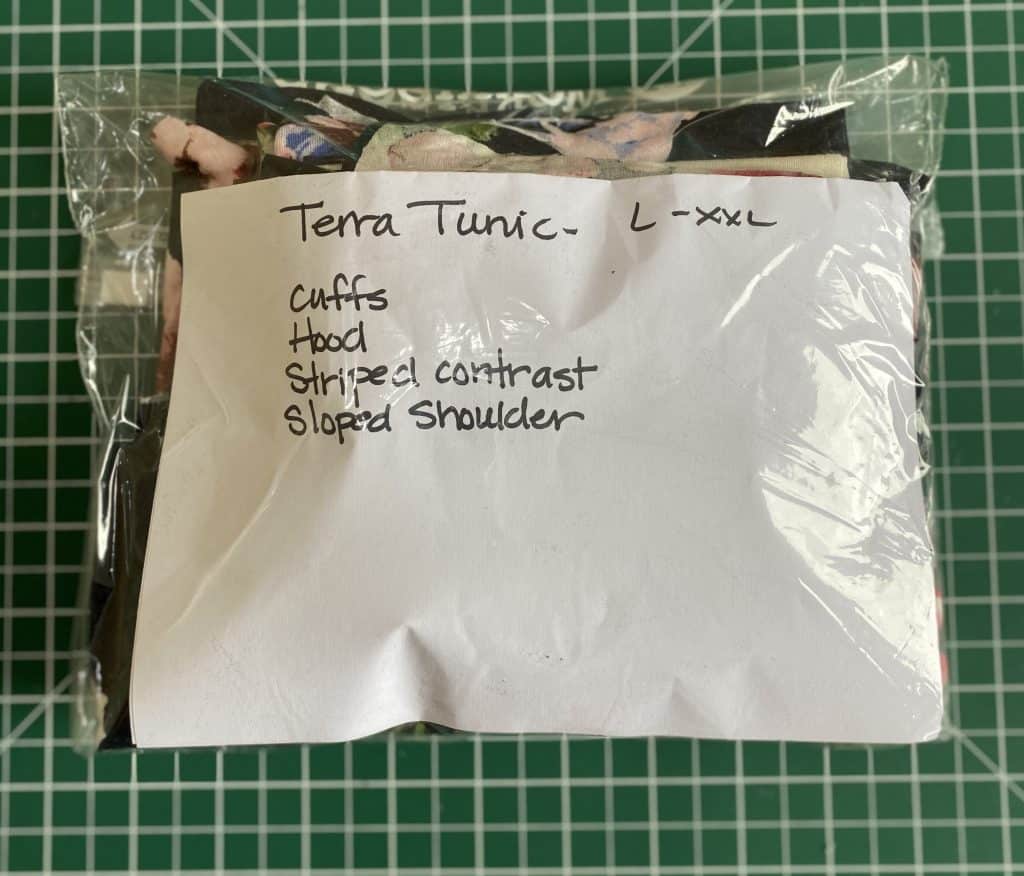
I am always pushing my sleeves up, so cuffs stay up better. LOL!
Sewing Efficiently in your Space
Now let’s grab that bag with the Terra Tunic in it and get ready to sew! The very first thing I do is read through the tutorial and get the basic idea of how the garment is constructed. I look to see if there are any tricky areas or techniques that are new to me. This way I can make a plan of the most efficient way to work on it without getting necessarily everything out at once and maximizing the time I do have free to sew. Like many of us, sometimes I only have a bit of time here and there to sew and I can’t always leave my machine up. I really try to group specific machine, ironing and pinning tasks together. To sew my version of the Terra Tunic, here’s what I decided:
- Serger only : Hood (no top stitching or basting the front), cuffs and shoulders This took me about 20 minutes with clipping the hood pieces together. I only had to pull out my serger trolley.
- Ironing: I pressed the hood, cuffs, shoulder seams and I pressed up the hems and side vents. This was another 20 minute session
- Serger only: set in the sleeves and finish the hem edges. 10 minutes
- Time to get out the Regular machine: Top stitch the hood, staystitch the hood fronts together, stay stitch the bodice front neckline at the v, sew up the side seams and stitched the vent hem. This only took me about 15 minutes including setting up the machine!
- Back to the ironing board: turn and press the vents and repress and clip or pin up the hems. While I was at the ironing board, I pinned on the hood. This is a good place to stop if needed or go straight on to the next step.
- Regular machine: attach the hood, sew in the hems top stitch the neckline.
- Big finish with the serger! Serge around the neck opening and attach the cuffs. We are done!!
By breaking the tasks down in this way, I didn’t have to get everything out all at once and I didn’t have to leave anything out. Cleaning up after each session was a cinch because of the way I organized my things in the first place. It also shows that you don’t need to set aside big blocks of time to sew. If you did have more time you can combine blocks. 1-3 would be a good session, as would 4-7. Both easy to set up and put away. Then a quick pull out of the serger for the big finish!


You can sew anywhere
I hope that I’ve encouraged you to not let your lack of a dedicated sewing space discourage your creativity. Maybe like me you can stop dreaming of the “perfect” space and get creative with what you have right now. Who knows, maybe YOUR perfect set up is just a think outside the box away. As for me, I am going to grab a “cuppa” (cup of tea) and relax in my new Terra Tunic (aff link) enjoying the fact that there is no mess to conquer later and another new make is simply a zip lock bag away.
….and she sewed happily ever after.
THE END
Need V-Neck Instruction?
Check out Noreen’s latest youtube post for Love Notions about perfecting that V-neck on the Classic Tee. This technique works with virtually any V-neck pattern — including the Terra Tunic!
Tell us about YOUR Sewing Space
Inspired by Noreen’s post on making any space perfect for sewing? Consider your own space. What’s it look like? What do you love about it? What do you want to improve? Take a look on the Love Notions Youtube account for more inspiration along with some more patterns that are begging to belong in your space — no matter your set up!
Pin this for later!


What a great read!! After 50+ years I’m super blessed to have a small room for my sewing “gear” but love all of the organizing ideas you’ve shared…thanks so much ????
Thanks for this article. I especially like the idea of the serger cart and I am already thinking about Binger clips for my patterns. Good ideas!
Just watched your video on sewing a vneck top. If you don’t have a serger what stitch do you use to finish sewing the v band to the top?
I loved your storage solution for the paper patterns! Mine are rolled up, but then they are curled when I take them out to use them again.
Love this! Timely, too, since I’m looking at relocating my main sewing space to edges of our guest room. I have a cart (right now it is mounded up with denim and black knits), so I think I’ll clear it off and try the serger on it. Thank you!
I have a trolley like that! Do you use the serger on it, or do you have to move it to the desk? If I could leave it on there I would have space to keep my embroidery unit set up on my table!
LOVE the idea of using a trolley. I actually have one and plan to get my serger off the dining room table tonight! Always nice to see what others do in their space to get wonderful ideas.
I needed to hear this! Thank you for being so creative and encouraging!