Many of us wear a cami body shaper almost every day, so this post is a gold mine for anyone interested in working with a few lingerie notions to make the most comfortable and functional foundational garments ever – using the Luna Loungewear Collection ($5 today only)! These bralettes and body shapers have all of the features you see in RTW, but are made just for YOU. Be sure to follow Michele on Instagram — she always has some fun sewing project on her table!
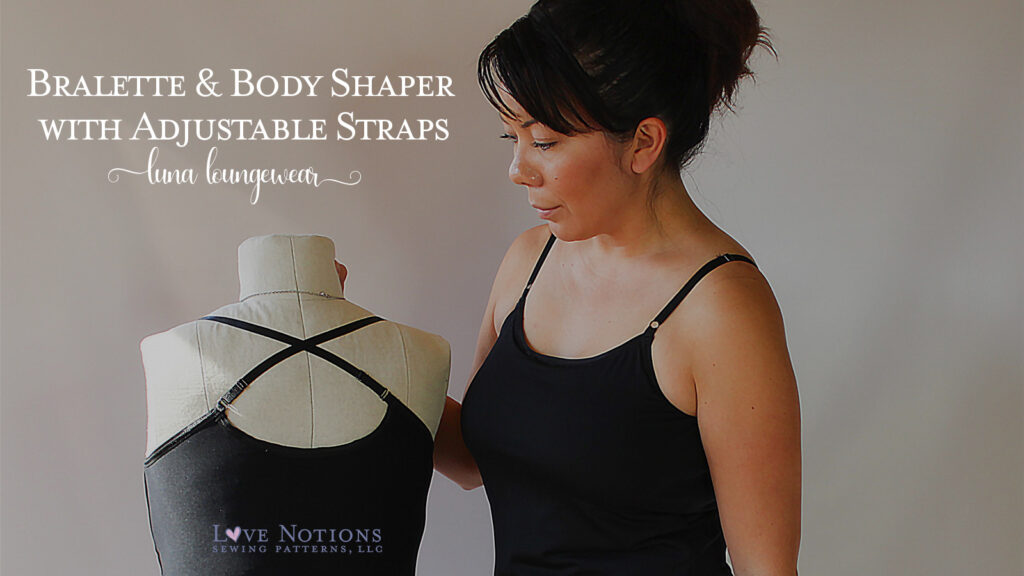
Luna Loungewear: Body Shapers and Bralettes with Adjustable Straps
Hi, it’s Michele from WinMichele on Instagram! I am back to bring you a few cool ideas that will hopefully have you thinking outside the box with future Love Notions patterns. For this guest blog post I wanted to encourage you to be creative with your Love Notions patterns. I recently finished a semester of Advance Pattern Making in school and during the semester we covered knitwear. Patterns using knit fabrics have been on my mind ever since. What I learned is that fabric choices can play a huge role and something as little as selecting a different fabric can transform a pattern. So let me show you how you can transform the cami from the Luna Loungewear Pattern set into shapewear and give some added touches to the bralette.
THE PATTERN:
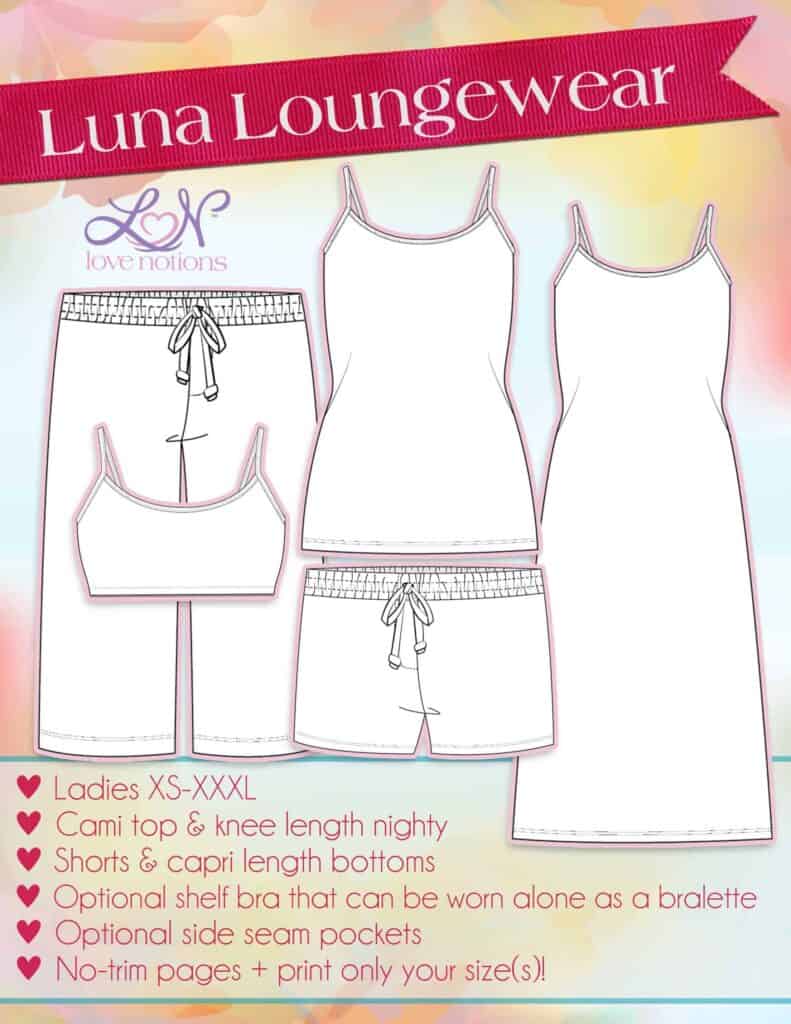
The Luna Loungewear (affiliate link) is a pattern set that includes a camisole, knee-length nighty, bralette, capris and shorts. The great thing about the bralette is that it can be used in conjunction with the camisole and nighty as a shelf bra. This pattern is a great deal!
THE PLAN:
I’m going to show you how to take the camisole pattern and create two different shapewear. It will be in a camisole and dress length. We will add adjustable straps to them, and create a shelf bra with coverage using foam cups. I’ll even show how to make the bralette pattern with the foam cup coverage and have convertible straps! Now you can wear the bralette with racerback tops. Each make will have a slightly different technique explained in the tutorial but all can be interchangeable with one another. Here is what I mean…
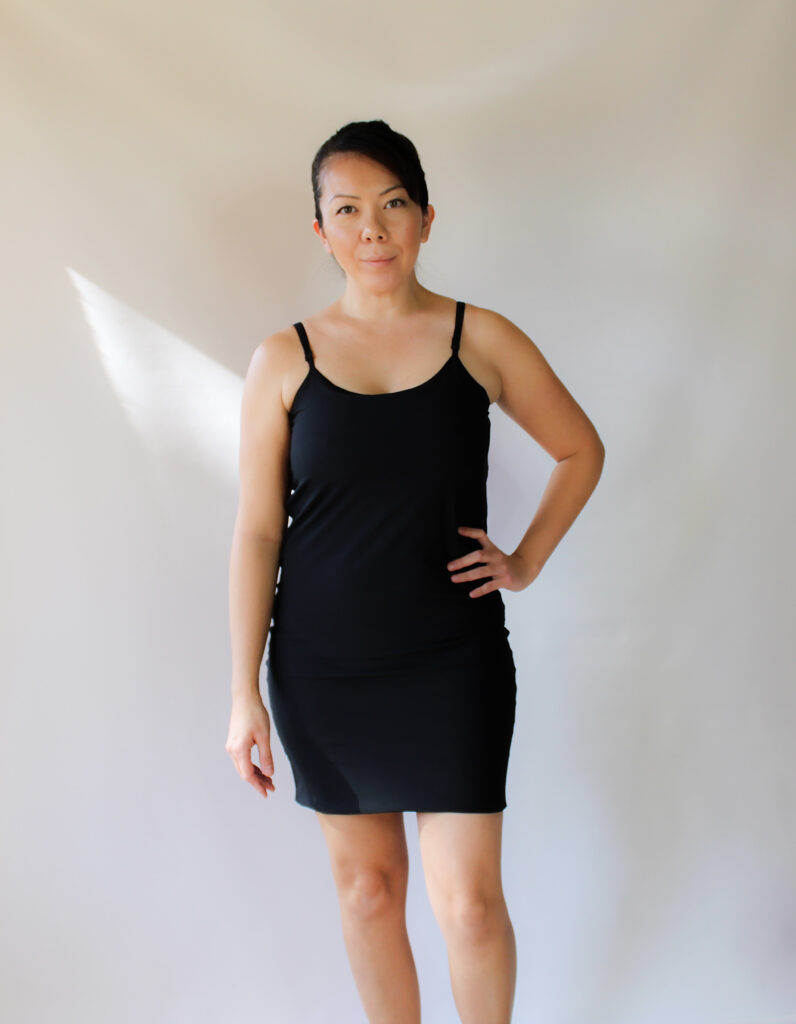
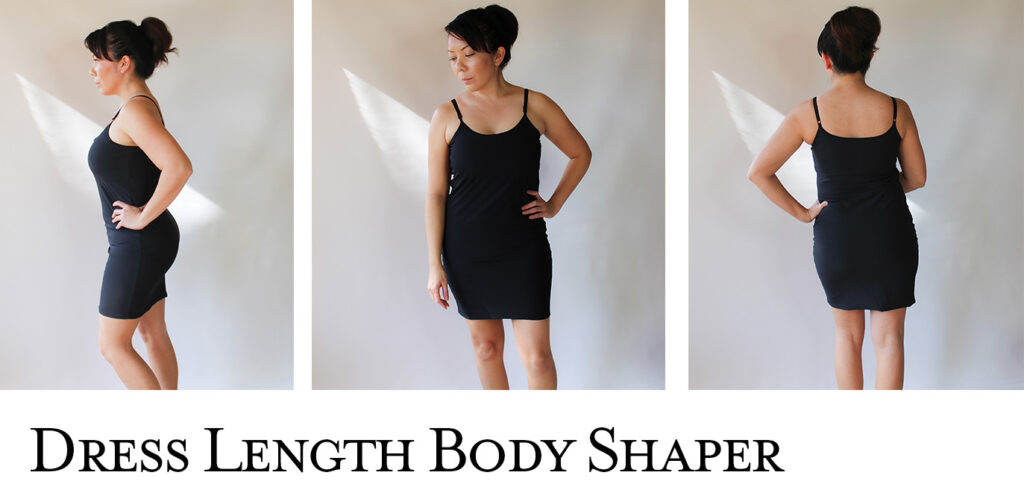
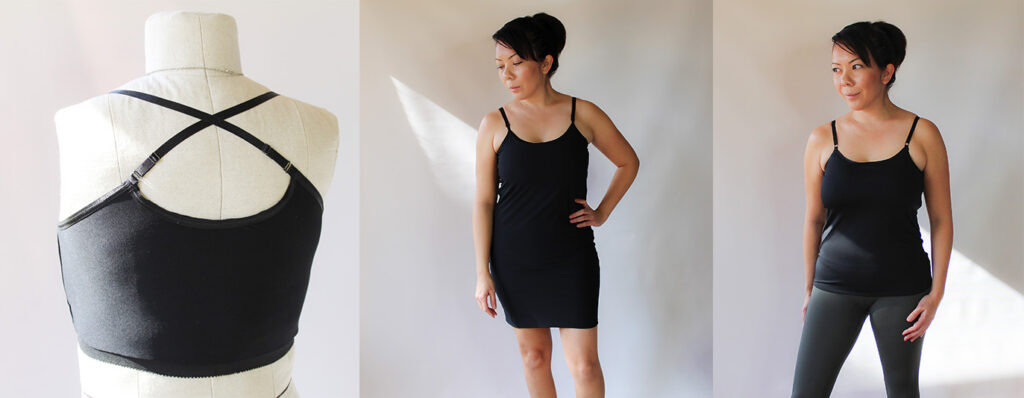
Dress length shapewear: Transform the camisole pattern to a length that can be worn with a dress. It will be made out of fabrics that are ideal for shapewear. This will have adjustable straps and a shelf bra with added lining or foam cups.
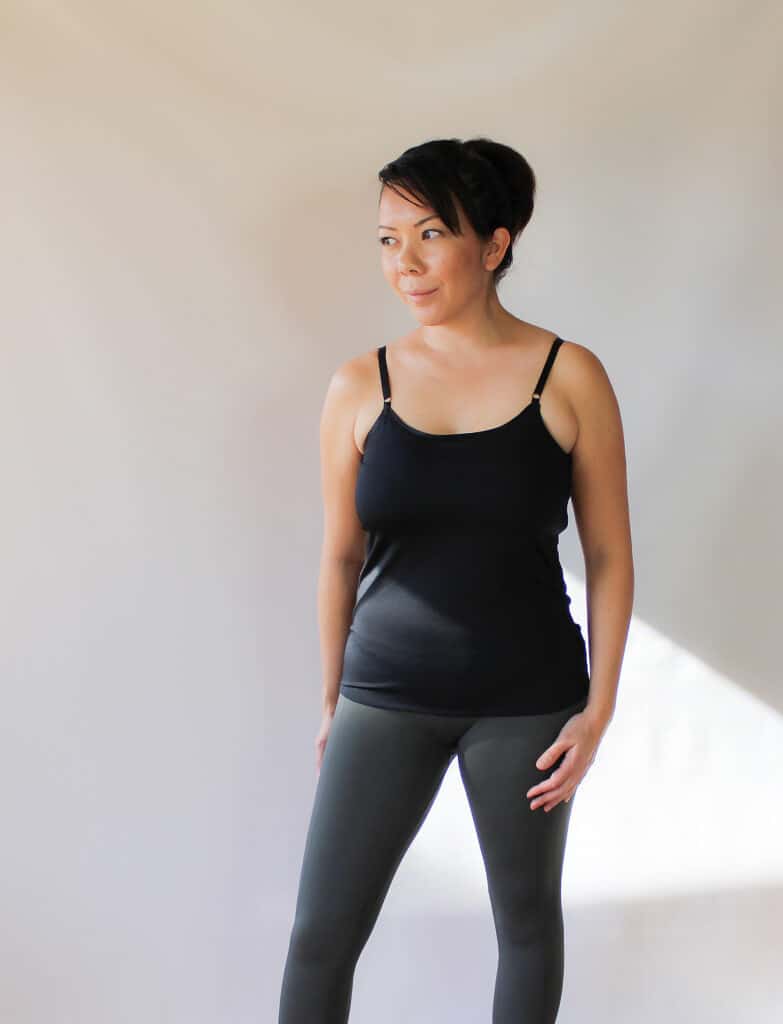
Camisole length shapewear: Use the camisole pattern to make a camisole shapewear. Same materials used as the dress length shapewear. It will also have a shelf bra, but this shelf bra will have a lining in it to hold foam cups for added coverage. This camisole will also be constructed with adjustable straps.
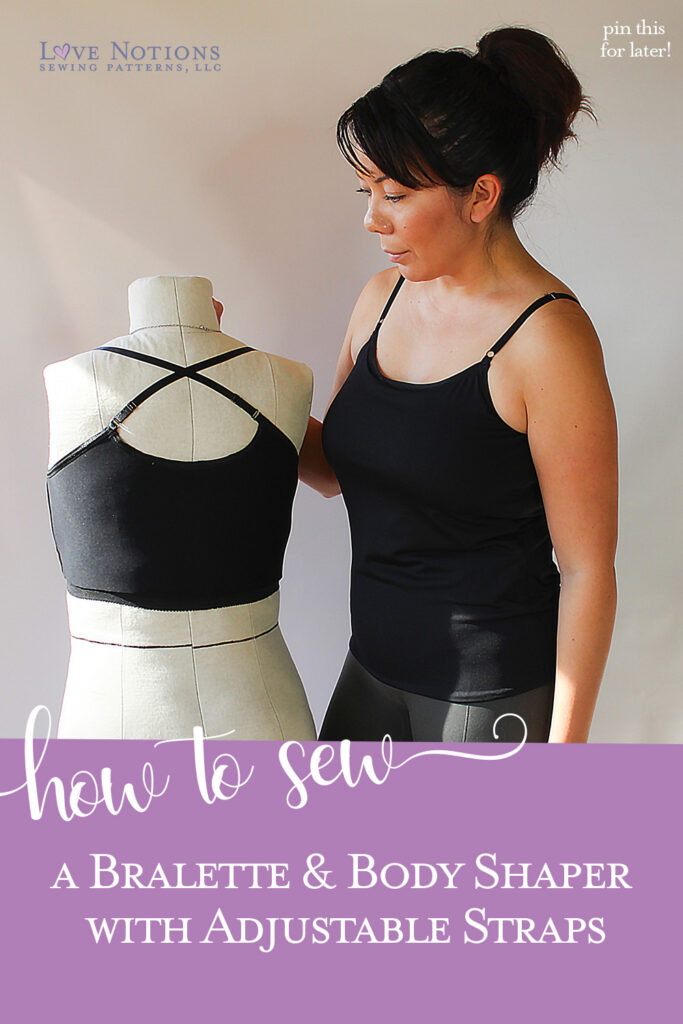
Bralette: Take the bralette pattern and make a bralette out of the same materials used in the shapewear. The bralette will have a lining to hold foam cups and the straps will be constructed to be convertible. I will also show you how to make the foam cups in case you don’t have access to purchasing foam cups.

THE MATERIALS:
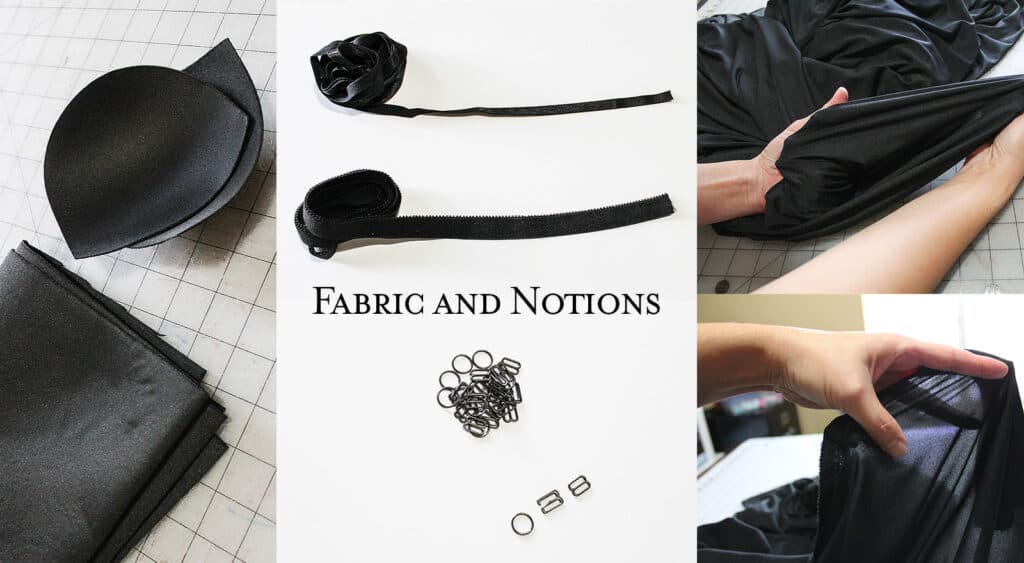
Here is a list of materials I used and as I mentioned before, the materials you select is very important. Surge Fabrics was so awesome to sponsor this blog post with all the materials I needed. Surge fabrics not only carries garment fabrics but they have a large selection of notions as well. I was so excited to see they carried a variety of lingerie supplies and athletic wear fabrics. My goal was to find good quality athletic knit with great stretch recovery. Surge fabrics carried that and much more.
Fabric: Knit athletic wear. Specifically nylon and spandex blends. Ones that have GREAT recovery and compression aspects to them. These fabrics have a slightly heavier weight but can still stretch to 50-70%.
Power Mesh: A type of mesh that is made of nylon and spandex and is used to help compress and smooth. It has a 4 way stretch. You often see this in swimwear, bras, and pantyhose.
Swimwear Lining: This is a thin knit fabric used as lining for swimwear. I used this as the lining for the bralette. It’s lightweight and ideal for the lining of the shelf bras.
O rings, sliders, and G hooks: I used these to make the straps adjustable and convertible. I picked the ⅜” size so they can fit the size of the binding/elastic recommended in the pattern.
Picot elastic and plush back elastic: in the pattern it will list the quantity and size of the elastics needed.
Foam cups and Cut & Sew Foam: Foam cups come all ready made contoured that you can order. Also, there is foam that you can cut and sew to customize.
The Pattern Pieces:
I highly recommend making a muslin and check the fit of this pattern before attempting this project. The following pattern pieces you will need are…
Camisole pattern piece
Shelf Bra
Bodice binding
Strap binding
Measurements needed:
Additional measurements are needed to make the dress length shapewear. We will be taking the camisole pattern and extending it to be mid thigh length and fitted. Keep in mind the camisole’s hem is meant to hit around the hip.
Hip to Mid thigh: From the side measure from your hip level to your mid thigh or desired length.
Mid thigh- (with both legs) circumference: Stand with legs hip distance apart measure around both legs circumference.
Adjustments to the Luna pattern pieces:
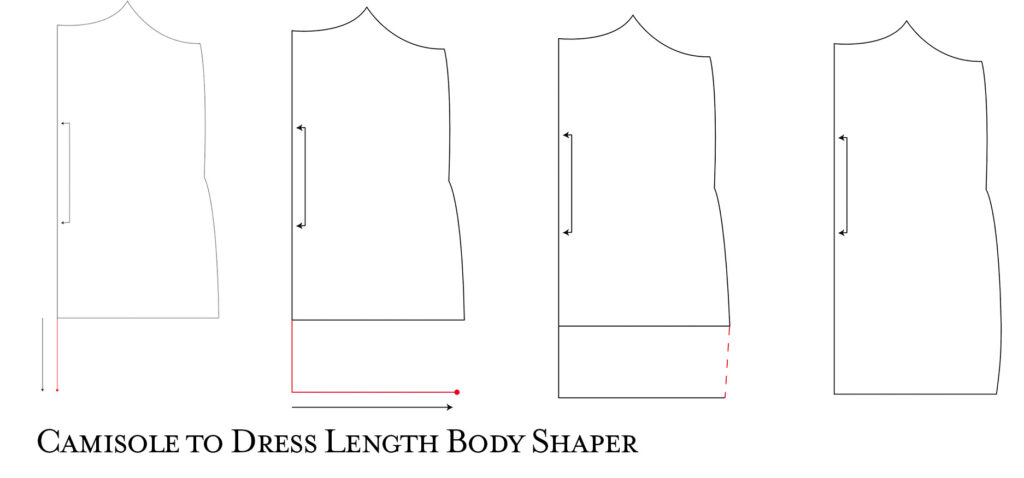
Camisole to dress length shapewear (using the one pattern piece for Front and Back)
1. Copy the camisole pattern piece for the dress length shapewear.
2. Extend the fold line (Center Front and Back line) down to the desired length.
3. Place a perpendicular line at the new hem level up to ¼ of mid thigh circumference.
4. Connect the end of the camisole hem to the new dress length hem line.
5. Add ⅜” seam allowance to the hem.
Dress length shapewear lining
1. Make a copy of the new dress length shapewear pattern piece.
2. Add ¼’ to the length of the pattern. * THIS IS VERY IMPORTANT* It’s important to have vertical ease for linings that are attached at the hem. If you do not do this you will see a bend and bow at the hem line. We are trying to achieve a seamless look without the bulk of a traditional fold over hem.
Straps binding
1. Copy the Strap binding pattern piece and make sure to transfer the star key notches.
2. Add 2” to the length of the strap binding pattern piece (The pattern is on fold). This will give enough length to create an adjustable strap with sliders.
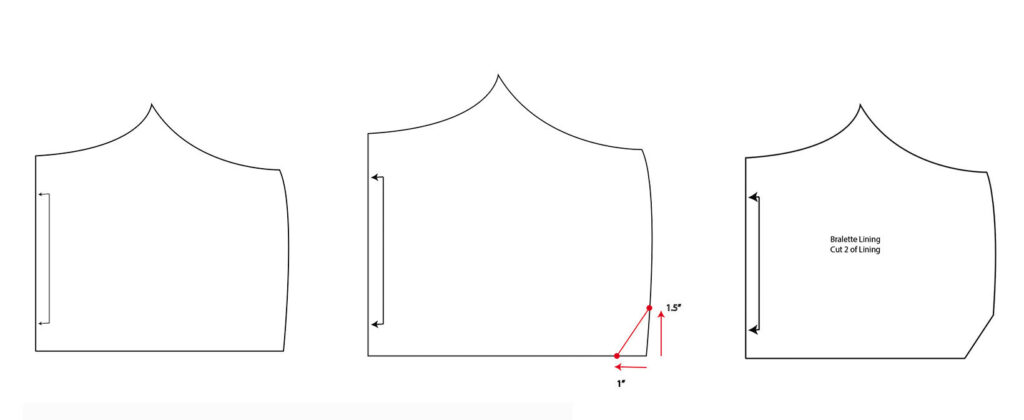
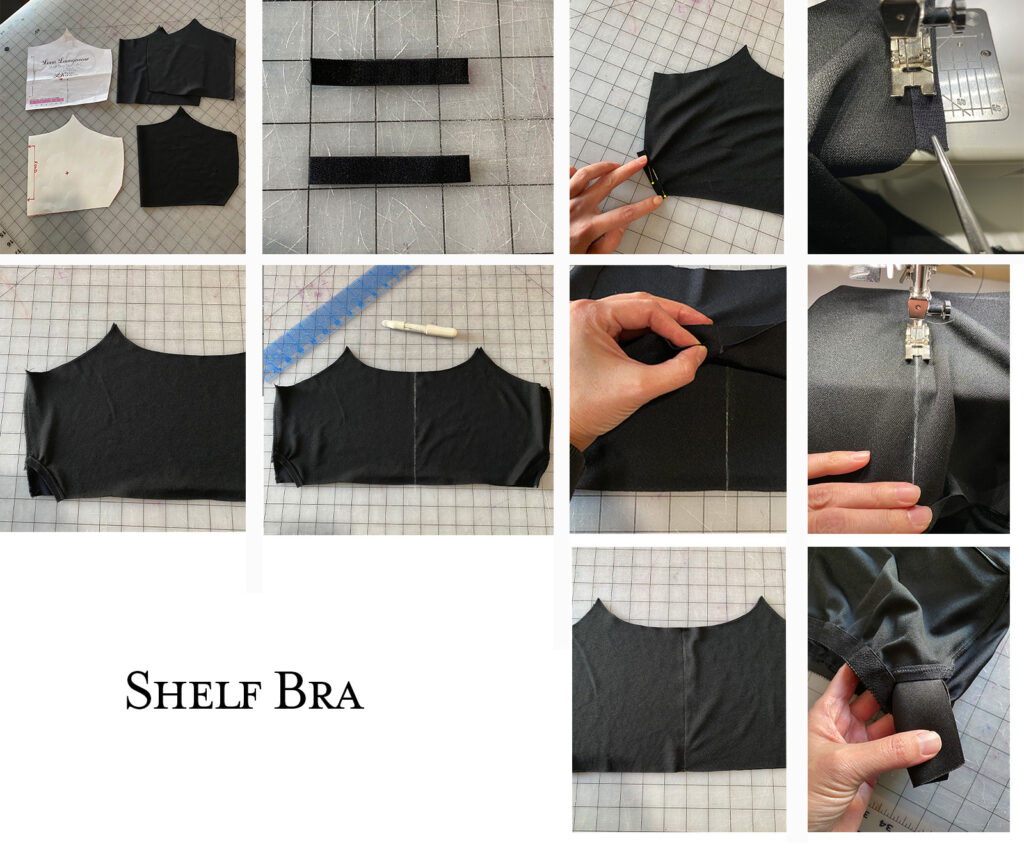
Lining for the shelf bra
1. Trace the shelf bra pattern piece.
2. As shown in the illustration we will cut out the corner off of the shelf bra. This will be the opening for inserting foam cups in the lining.
STEP-BY-STEP INSTRUCTIONS
Let’s get started. I will be using the serger to construct the majority of this project and will note when I will use a sewing machine.
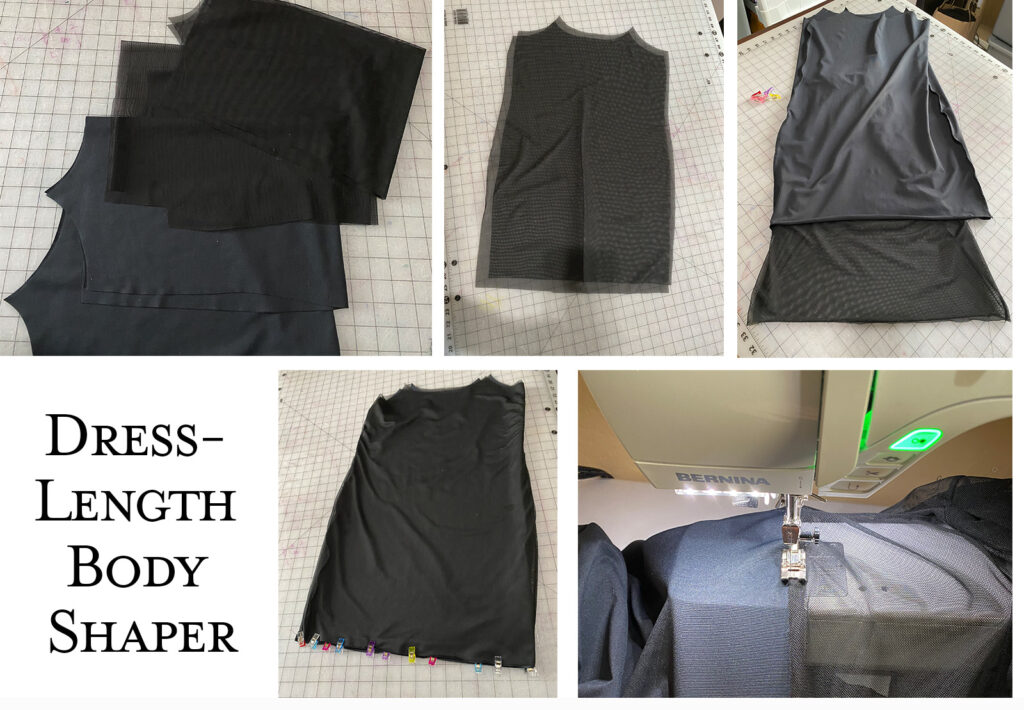
Dress-Length Body Shaper:
You need …
2 cut pieces of the main fabric
2 cut pieces of the power mesh lining
2 cut pieces of the shelf bra (you can use the main fabric or swimwear lining)
Strap and bodice elastic or binding.
Plush Elastic for shelf bra
2 O-rings and sliders
1. Construct the main fabric pieces with right sides together and serge along the side seams. Do the same for the power mesh pieces. You should have two dress length shapewear. One in main fabric and one in power mesh. With the main fabric dress piece wrong side out and the power mesh with right side out. Place the power mesh inside the main fabric dress. They should have both of their right sides facing each other. Straight stitch or serge the hem at ⅜” seam allowance.
2. Pull out the power mesh dress and understitch (Straight stitch ⅛” from the seam with slightly stretching of the knit while you sew.) the hem of the dress. The seam allowance should be pressed and stitched towards the power mesh.
3. Place the power mesh inside the dress so that its wrong side now faces the main fabrics wrong side. Baste both layers around the neckline. Press with low heat and pressing cloth along the hem.
4. Attach the shelf bra and bodice binding as instructed in the pattern. Making sure to attach the plush elastic as the pattern instructs.
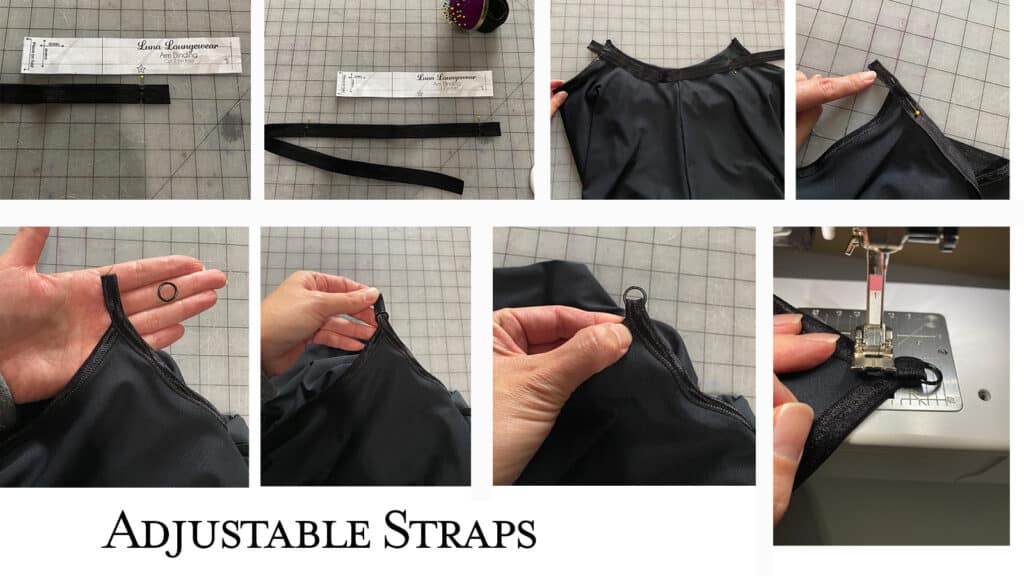
Adjustable Straps
Now for the adjustable straps. We need to mark on the straps star markings on the straps to know exactly where to attach the strap to the armhole. From one end of the strap, mark with a pin 1’’ down. This will represent the first star notch in which you will attach this point to the front arm hole. Now following the pattern piece, pin the second star notch as if you had it on fold. The second star notch will be the back side of the arm hole. These two pins now represent where you will attach it to the beginning and end of the armhole. Leaving 1” hanging out at front end and a longer tail on the back. Attach the binding or elastic to the armhole as instructed in the pattern.
On the 1” strap tail end, insert the O ring to the tail. Fold over the binding and stitch the tail closed. I used a short zig zag stitch. Take a slider to the longer strap tail, weaving it through the slider. Loop the long strap end through the O ring and weave it back through the slider again on the back side. To make it easier, to pull some slack from the slider. Now stitch the ends of the strap on itself to secure it closed.
Camisole Shapewear with Shelf Bra and Foam Cups:
You need …
2 cut out camisole pieces of the main fabric
2 cut out camisole pieces of the power mesh
2 cut out shelf bra pieces of the main fabric
1 cut out shelf bra lining
Elastics and binding for straps
2- 2.5” of elastic for the lining opening. (you can use the same elastic or binding used for straps)
Foam cups
O rings and sliders
Use the same construction method as the dress length shapewear for the camisole. Stop before attaching the shelf bra.
Shelf Bra with Lining:
Zig Zag stitch the 2.5” piece of elastic or binding on top of the slant opening of the lining shelf bra piece. Take one main fabric shelf bra piece wrong side up. Place the shelf bra lining on top. Mark the center with a marking tool. Stitch with a narrow zig zag down the center where you have marked. This seam will keep the foam cups from shifting around in between the layers. Place the newly stitched layer on top of the second shelf bra piece (main fabric). Right sides together. Serge all three layers along the side seam. Flip the shelf bra right side out.
Attach the shelf bra to the camisole as instructed in the pattern. I ended up attaching the plush elastic to the edge of the self bra so that the opening of the lining was wide enough. You can use the instructions from the adjustable strap tutorial above to finish the camisole. Insert the already made foam cups through the slant opening of the shelf bra lining by rolling up the foam cups as shown in the picture.
Bralette with Foam Cups and Convertible Straps:
You need…
2 Shelf bra cut out in the main fabric
2 Shelf bra lining cut out in the swimwear lining
Elastics or binding for straps and plush elastic
Sliders and G hooks
Foam cups or materials for making foam cup (tutorial at the end)
1. Take the two lining pieces of the shelf bra and place them on top of each other. Just like in the shelf bra explanation (camisole shapewear) stitch a center narrow zig zag stitch. This time we will not be adding an elastic to the lining slant opening.
2. Take the two main fabric shelf bra pieces, place them right sides together. Then place the newly constructed shelf bra lining piece on top of the main fabric. Serge both sides seams. You will be serging through all four layers. Serge the lining slant opening edge to give it a finish look.
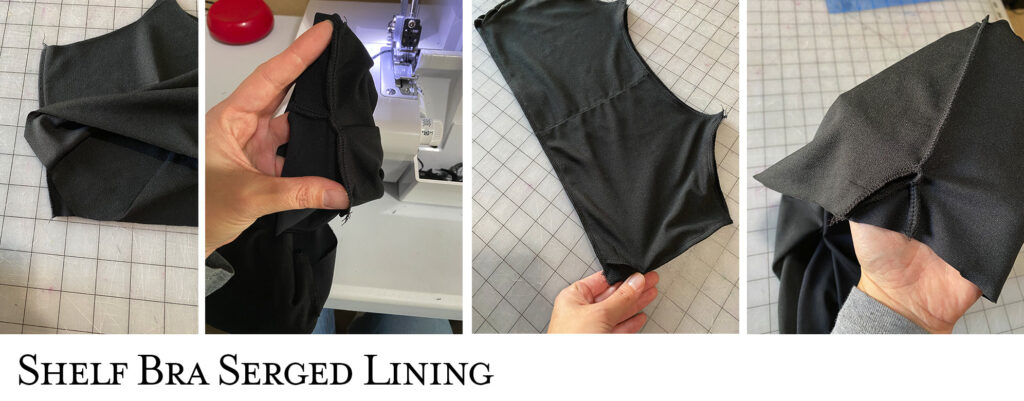
3. Turn everything right side out. You will now have the main fabric as the bralette and the two layers of lining in the front. This will hold the foam cups without showing a center stitch from the outside.
4. Baste neckline and hemline to prevent lining from shifting around.
5. Finish the hem with the plush back elastic as instructed in pattern.
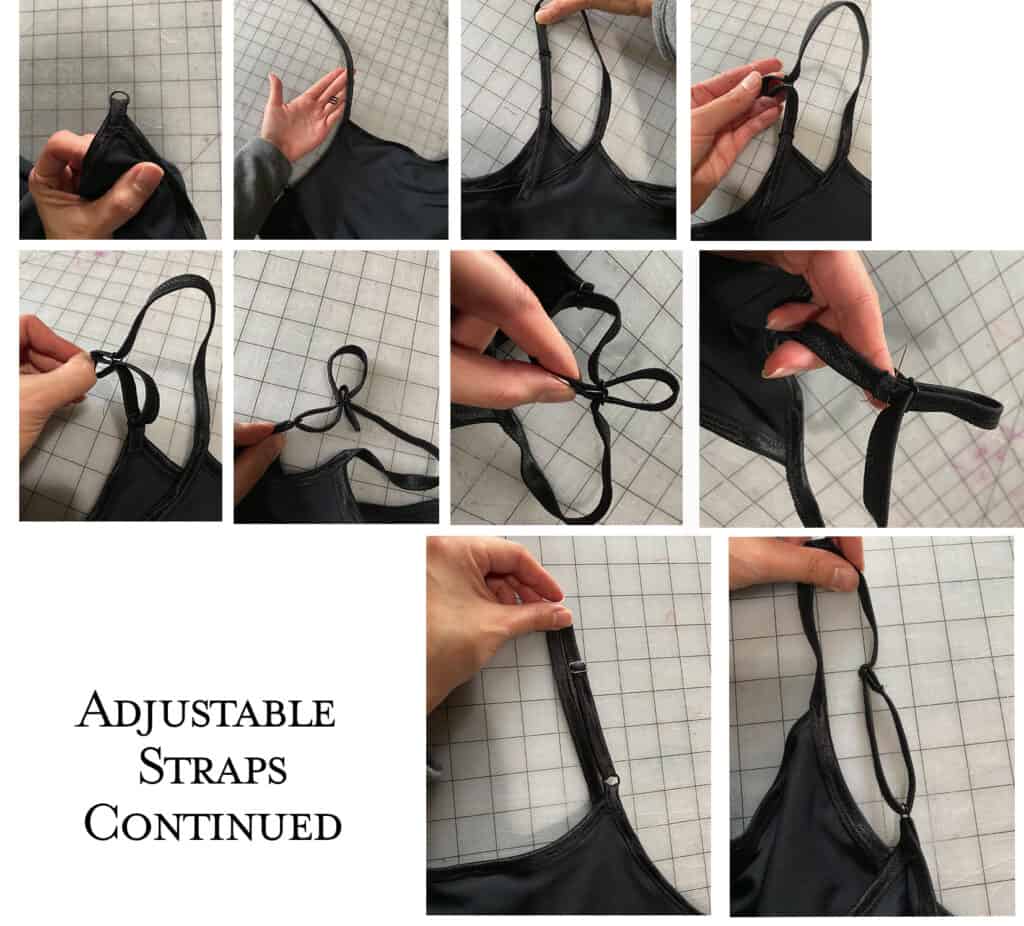
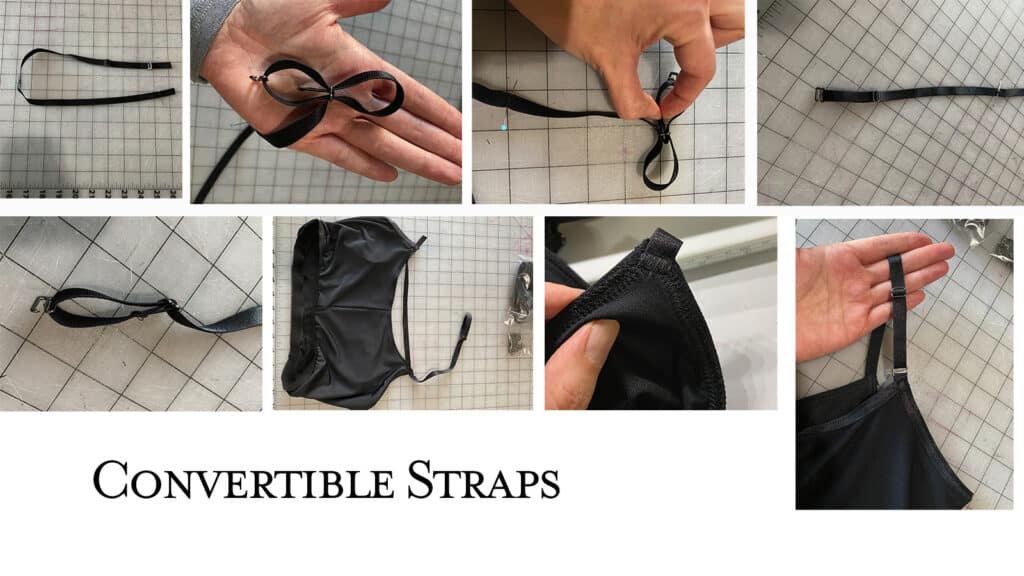
Convertible bra straps
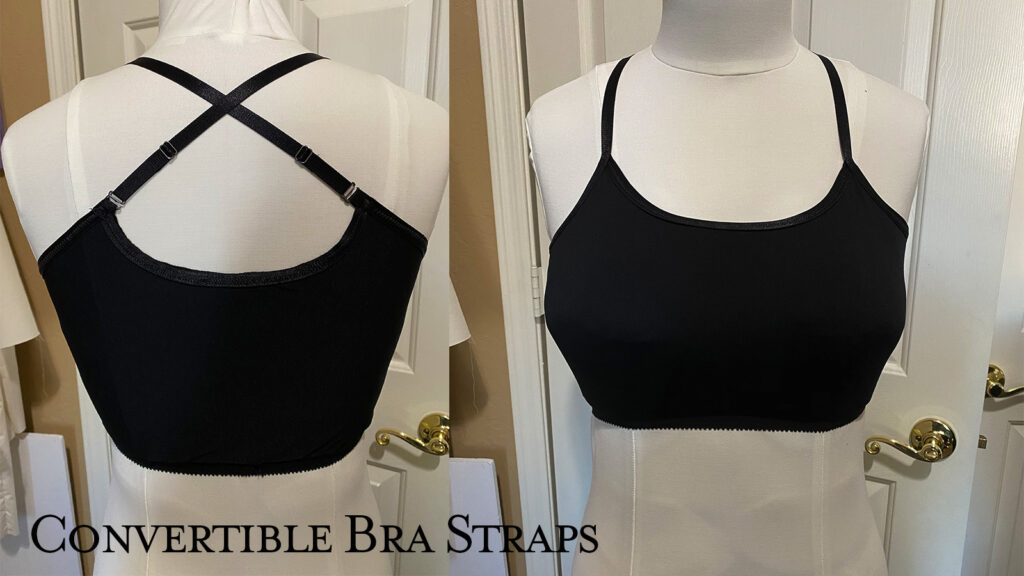
Go ahead and proceed to adding the adjustable straps as explained above. This time the 1” strap tail will be towards the back side and the longer tail end is the front. Instead of adding the O rings as you did before, you will just fold over and stitch closed creating a loop for the G hook. Place the Slider to the longer strap tail then add through the G hook. Weave back the longer tail end into the slider’s back and stitch closed. Now you have adjustable convertible straps.
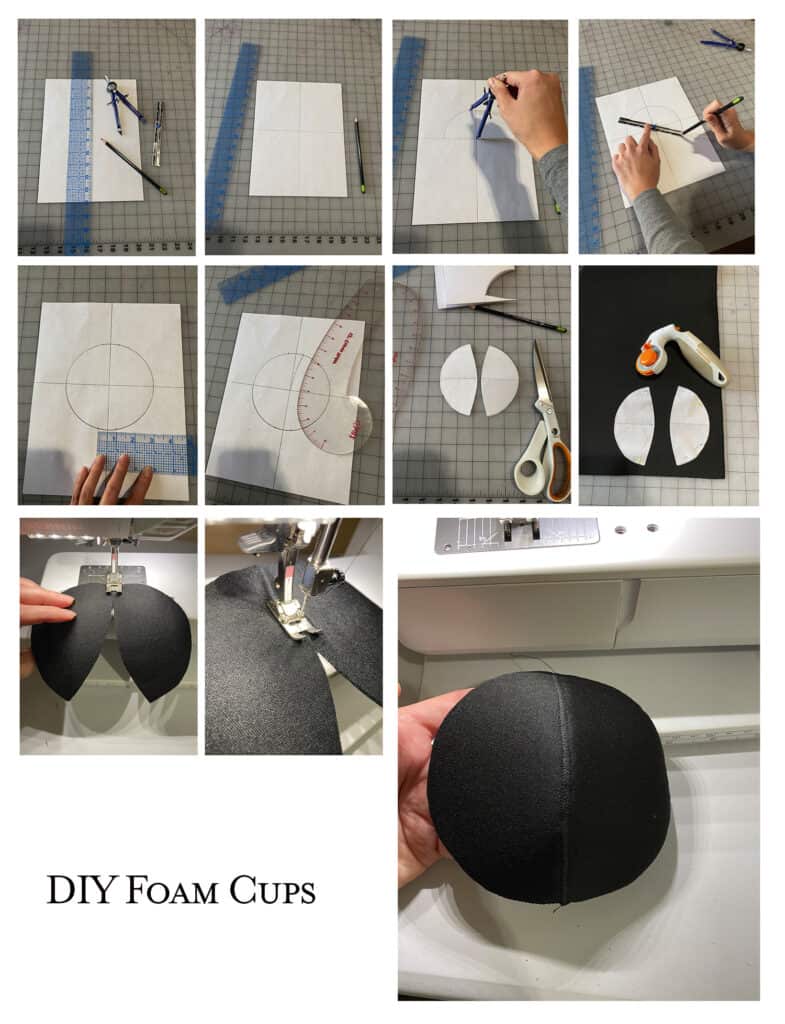
Easy DIY Foam Cups
If you are ever in a pinch and don’t have the ability to get already made foam cups, you can easily make some yourself. In this tutorial I am using cut and sew foam from Surge fabrics. You can easily make some with supplies you probably already have in your sewing room– like batting, fleece, shoulder pads, or thin foam sheets. We need the foam cups to be contoured over your bust. To do this find out your bust radius. Take the measurement from your bust apex down to chest. (Or you can use the measurement I’m going to use which is 2.5”-3”.)
1. Take paper and draw two lines perpendicular to one another.
2. Use a compass or a seam gauge to draw a circle using the bust radius.
3. Mark ½” either side of the center line both top and bottom.
4. Draw a curve line from the markings to the center of the circle.
5. See picture for example. You should have two semi circles with what would have been a straight edge, is now curved.
6. Cut 4 of the semi circles from your material.
7. Take two of the semicircles and stitch them together using a wide short zig zag stitch. Make sure not to overlap them. They need to be right next to each other as you sew along.
8. Once done you will have created a concave circle.
NOW YOU CAN MAKE ALL THE BODY SHAPERS, CAMIS, AND BRALETTES YOURSELF!
Thank you so much for sticking with me through this tutorial. I had so much fun creating this and hope to see your Luna loungewear makes soon! Get your Luna Pattern here (affiliate link). A huge thank you to Surge Fabrics for sponsoring this project. I also want to thank Love Notions for allowing me to bring you this project and for such wonderful patterns.
*Disclaimer I am a Love Notions Ambassador at the time of this post. Pattern was sponsored for this tutorial but all opinions and ideas were of my own and honest.
[carousel_slide id=’361728′]