

I started Love Notions from the standpoint of a consumer first. For almost 10 years I ran a children’s custom clothing company using patterns from around the web, Ottobre, “Big 4” patterns, as well as some of my own designs. Some patterns were awesome and some… not so much. When I started Love Notions I wanted my designs to be a pleasurable experience for the consumer. And I’ve found yet another way to make that experience even better! I’m so happy to introduce trimless pattern assembly to the Love Notions brand. That’s right, now our patterns have hyper links, layers AND are trimless! It’s like the trifecta of pdf sewing and assembling. I’m pretty excited about this and I hope you are too.
What does ‘trimless’ mean exactly? After printing off your pattern you’ll be layering and taping them together instead of trimming off one side and bottom. Here is a quick tutorial on how to assemble a trimless Love Notions pattern.
First things first
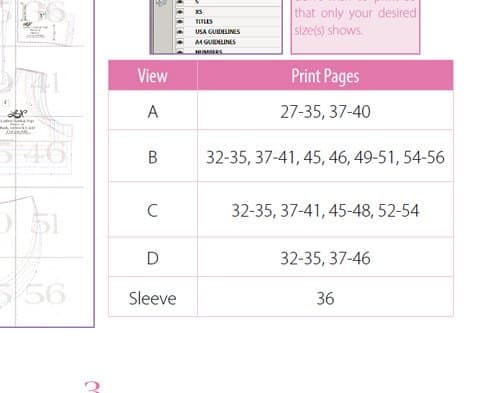
If your selected pattern has more than one view then you’ll need to decide which view you’ll be sewing. On page 3 you’ll find a print chart so you can print just your selected view’s pages.
Adobe Reader is the only option
Before printing be sure you are opening directly from Adobe Reader and that it is up to date. If you open and print the pattern directly from the web preview Adobe app you will not be able to use the layers feature and you run the risk of your pattern not printing to scale. Adobe Acrobat can be downloaded here for free.
Layers
Almost from the beginning Love Notions patterns have included the layers printing functionality. When the pattern is opened from Adobe Reader you’ll see several icons down the left hand side. The icon that looks like two sheets of paper stacked is the one that deals with layers. Click on that and a menu will pop out. Click on the + sign on the menu and all the sizes included will appear. Simply select the size(s) you’d like to print.

US or A4 printing
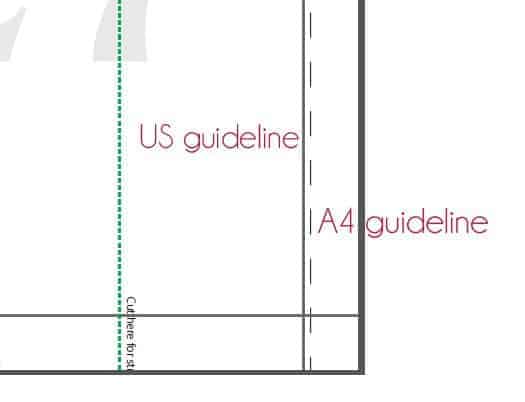
One last thing to select in the layers menu is your paper size. If you’re a US printer then your guideline is automatically selected. If you happen to be one of my lovely international customers I have included a special guideline just for your A4 paper. Un-select the USA guidelines button and select the A4 guidelines. One of these guidelines must remain on so the pattern can be lined up correctly. Once printed you’ll notice that the A4 is a dotted line and the USA guideline is solid. The horizontal line is the same for both types.
Ready to print
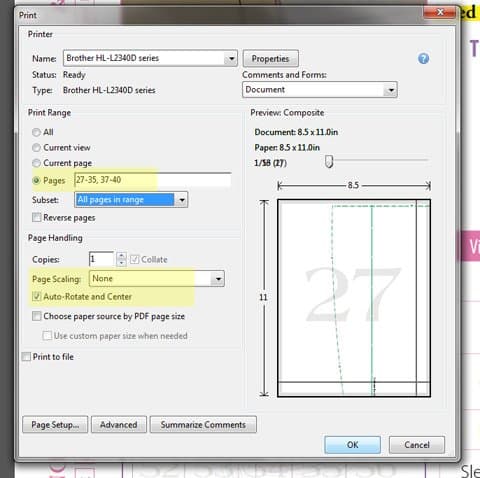
After you’ve selected your size(s) and paper size in the layers menu the only thing left to do print. In the printer menu input your selected pages, be sure page scaling is set to none and that the auto-rotate and center button is selected. Love Notions patterns print beautifully in black & white to save on ink so go ahead and make that selection as well if desired.
Now what
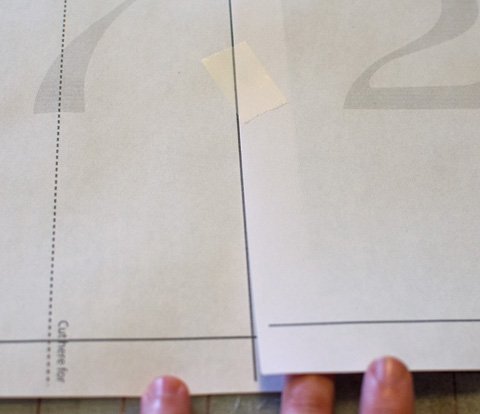
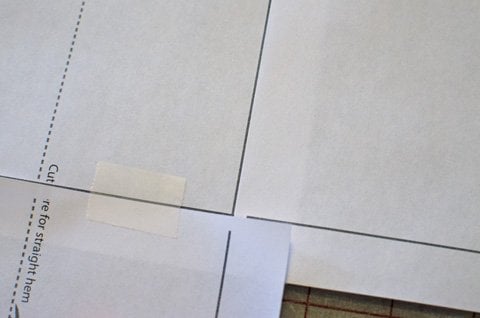
Now take your printed pattern to a clear area and begin assembling. Lay the second page on top of the first butting the edge of page 2 up to the guideline on page 1 but not covering guideline. Continue on for that row. For the second row, lay the first page on top of the bottom of the first, again right up to but not over the line. Continue on that row as you did row 1. You will notice there is a small piece of line that won’t print. Just cut like normal and fill in the line if you wish.
Get sewing!
Your pattern is now assembled and ready to cut out. If you have any questions or need further help I’m only an email away. Feel free to contact me or post in the Facebook group for help. And a huge shout out to Kymy of Everything Your Mama Made and More (EYMM), she let me bug her several times with my questions on the best way to implement trimless patterns. <3
UPDATE 3/2020
Here is a video on how to assemble the patterns using A4 (international) sized paper. The key difference with A4 paper is a solid line prints 1/4″ from the top of A4 paper. You can either trim off this small section of just overlap as usual. It is easier to see the pattern lines if you do trim that section.

