


Presto Pintuck Tutorial
Mary, one of the testers for the Presto tunic made a beautiful version of the pintuck option included in the pattern. We asked her to join us on the blog to share how she created such a beautiful feature for her top.
One of the great features of the Presto tunic is the front inset panel. I wanted to emphasise the panel and decided on one of my favourite finishes – pintucks.
Pintucks have all sorts of features that I love – they work on formal and informal garments, they work with patterns and plains and they don’t need any special equipment, just a little extra fabric and time.
Fabrics behave differently when making pintucks. Cotton, linen and other fabrics that take a good crease are ideal. More slippery fabrics can work too, but may make life a bit harder! I recommend a couple of practice tucks on a scrap if you are unsure.
Creating the Pintucks
To make the pintucked panel on Presto, I started by cutting two pieces of fabric, each the height of the the panel pattern piece and about 3 times the width of the pattern piece. The exact width will depend a bit on the size and spacing of your pintucks.
The construction of the placket of Presto means that it folds over the first inch of the panel piece (this is marked on the pattern piece). I left the first 1 1/2” of my fabric untucked to allow for this – I did not want the placket to lie over fabric that had been tucked.
Using the small flower pattern on my fabric as a guide for the pintucks, I have marked the first two lines for clarity. In reality, I did not need these lines and was able to use those flowers to fold the fabric.

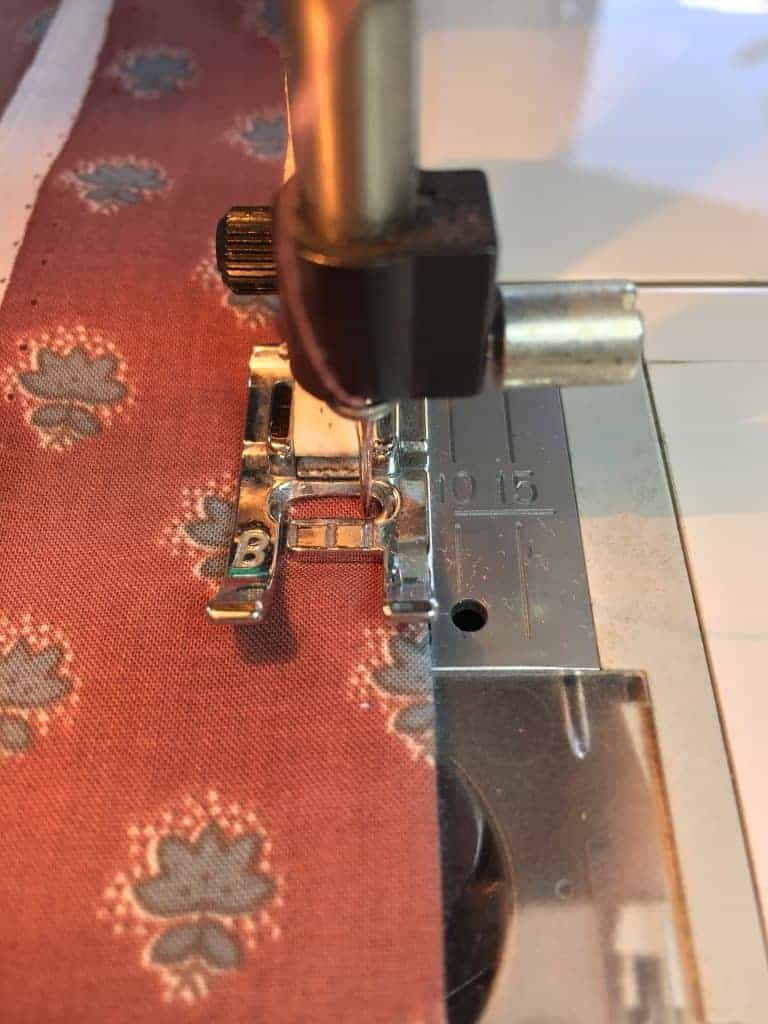
To sew the tucks, fold the fabric. Then, line the fold up to the right hand edge of the machine foot. Move the needle over to the right as far as it will go in order to produce a narrow tuck. Now, sew carefully for the whole length of the fabric. (This fabric behaved beautifully, but you might need a few pins if yours is less cooperative!)
 Then refold the fabric and sew the second tuck, then the third and so on until there is enough fabric tucked for the panel piece. For each line of stitching, start at the top of the fabric.

The second piece was done in exactly the same way, but this time work from the bottom to the top. This meant that when the tucks were pressed over it was always the top machine thread that showed. This may not be obvious, depending on your fabric and thread, so don’t feel this is essential.

The hard work was nearly over!
All that needs to be done was to press the tucks carefully from the centre front outwards, lay the pattern piece on the tucked fabric, and cut it out. Once both pieces are cut, carefully machine stitched round the edges, just inside the seam allowance. This just helps to make sure none of those lovely little tucks got flipped out of line when inserting the panel.


I love the way the Pintucks worked with this print. However, plain garments are so useful and I’m now playing with the idea of contrast stitching on a dark linen – exactly the same process, although I’ve had to mark each tuck! I’ve made these ones further apart and a bit wider. (I didn’t move the machine needle so far to the right.)


And then I need to decide whether they should be vertical or horizontal……!
I hope you have as much fun with pintucks as I have!

[et_bloom_inline optin_id=optin_3]

