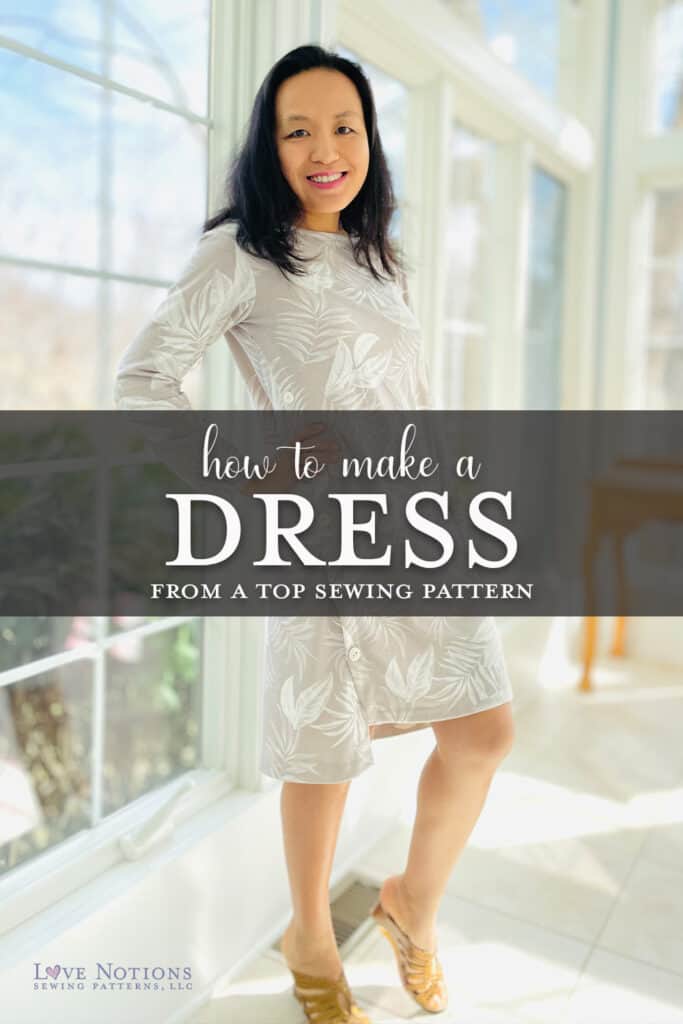
Lincoln Dress Hack
Dear Love Notions sewists, it’s Chloe @no.idle.hands here on the blog with the very first Lincoln Top $5 Feature Friday! I’m especially excited for this particular feature because ever since Lincoln was first tested and released last year, I’ve been dreaming of a dress hack. And now, one year and much deliberation later – may I present to you… the Lincoln Dress! And yes of course, with all the unique features of the original Lincoln:
- Relaxed and boxy fit
- Angled side seams
- Functional (or not!) button placket
- Optional hi-low hem
- Neckline and sleeve options

Love at first sight – Starting with a great pattern!
I don’t know about you, but when Tami first showed us the Lincoln prototype, I immediately fell in love with everything about this pattern. I always have been drawn to converging lines and hi-low hems in sewing patterns, because they are fun to sew and usually figure flattering to wear. So, it is no surprise how much I loved making and wearing several version of the Lincoln top. Unique as it might be, it is also a super versatile workhorse type of pattern thanks to all the included options and views. It is rare for a pattern to work so well as both a long-sleeved sweater in French Terry and a sleeveless tank in viscose jersey – basically covering all seasons!


The on-trend boxy fit has just right amount of ease for both comfort and style. For the button- loving sewist – you’ve got 2 plackets to showcase your creativity! Not keen on buttonholes? Don’t sweat – just skip them and sew down the buttons through both layers and no one is the wiser! Although as a nursing mom, I can’t tell you how thankful I am for the functional plackets!
The bottom line is, if you haven’t tried the Lincoln yet, don’t miss out today’s $5 Feature and sew up your new favorite top pronto! Now, enough gushing over the pattern and let’s get down to the business of THE DRESS HACK!
So you made it a dress – what’s the big deal?
There’s nothing new about hacking a top into a dress, you say. Been there and done that. Well…it’s not as straight-forward this time (pun intended!). You see, what makes Lincoln unique are the angled side plackets. The front and back bodice pieces need to match perfectly for those angled side seams to fit together and hang properly. When lengthening them into dress length, we need to ensure the same corresponding angles for the front and back pieces. Otherwise the plackets won’t overlap properly or the garment will hang crooked.

For research purposes, I took one for the team and braced myself to look up some side button ready-to-wear dresses in person. Not surprisingly, most of them use a faux-placket “cheat” method. The dress is sewn with regular side seams, with decorative plackets and buttons sewn on the side of the front bodice. It certainly does the job to achieve the look… but if we wanted to settle for ready-to-wear quality we wouldn’t be sewing in the first place, am I right? Plus as mentioned, nursing mom and functional plackets! So back to the drawing board we go. But if you hang around till the very end of blog, I will get back to the faux-placket method for some final thoughts.

On top of the angled placket puzzle, there’s the also the boxy shape to consider. The Lincoln top is straight up and down from chest to hip in terms of circumference. Lengthening it as is gives us a straight shift dress, which is great with the right fabric and on body types that are more straight than curvy. But of course, we want a hack that works for more fabric choices and body types, right? With some trials and error, I’m proud to say we have a winner formula that can be adjusted to your unique body type.
Now, two Lincoln dresses with different fit and fabric choices + their how to’s!
A word on fabric choices…
While the Lincoln works well with a wide variety and weights of knit fabrics, it is crucial to ensure your fabric has good structure and recovery, especially if you plan to have functional button plackets. A loose knit is prone to stretch out during the placket construction, through wash and wear, and under the weight of the buttons. When in doubt, stabilize it well with some good knit fusible interfacing (as instructed in the pattern). For my 2 Lincoln dresses, I teamed up with Mily Mae Fabrics, known for their beautifully curated collection of professional quality knits:


Dress 1: Boxy fit in French Terry
Keeping the original straight shape of the Lincoln top, it’s the perfect little shift dress for spring. The Viscose Blend French Terry has both the amazing drape of viscose and the stable structure of French Terry. The latter makes it a breeze to sew the button plackets! Mily Mae has a gorgeous selection of French Terry to choose from, and this light grey Tropical Leaf print just had to become a spring dress. I paired it with some large vintage white buttons for a slightly retro vibe.


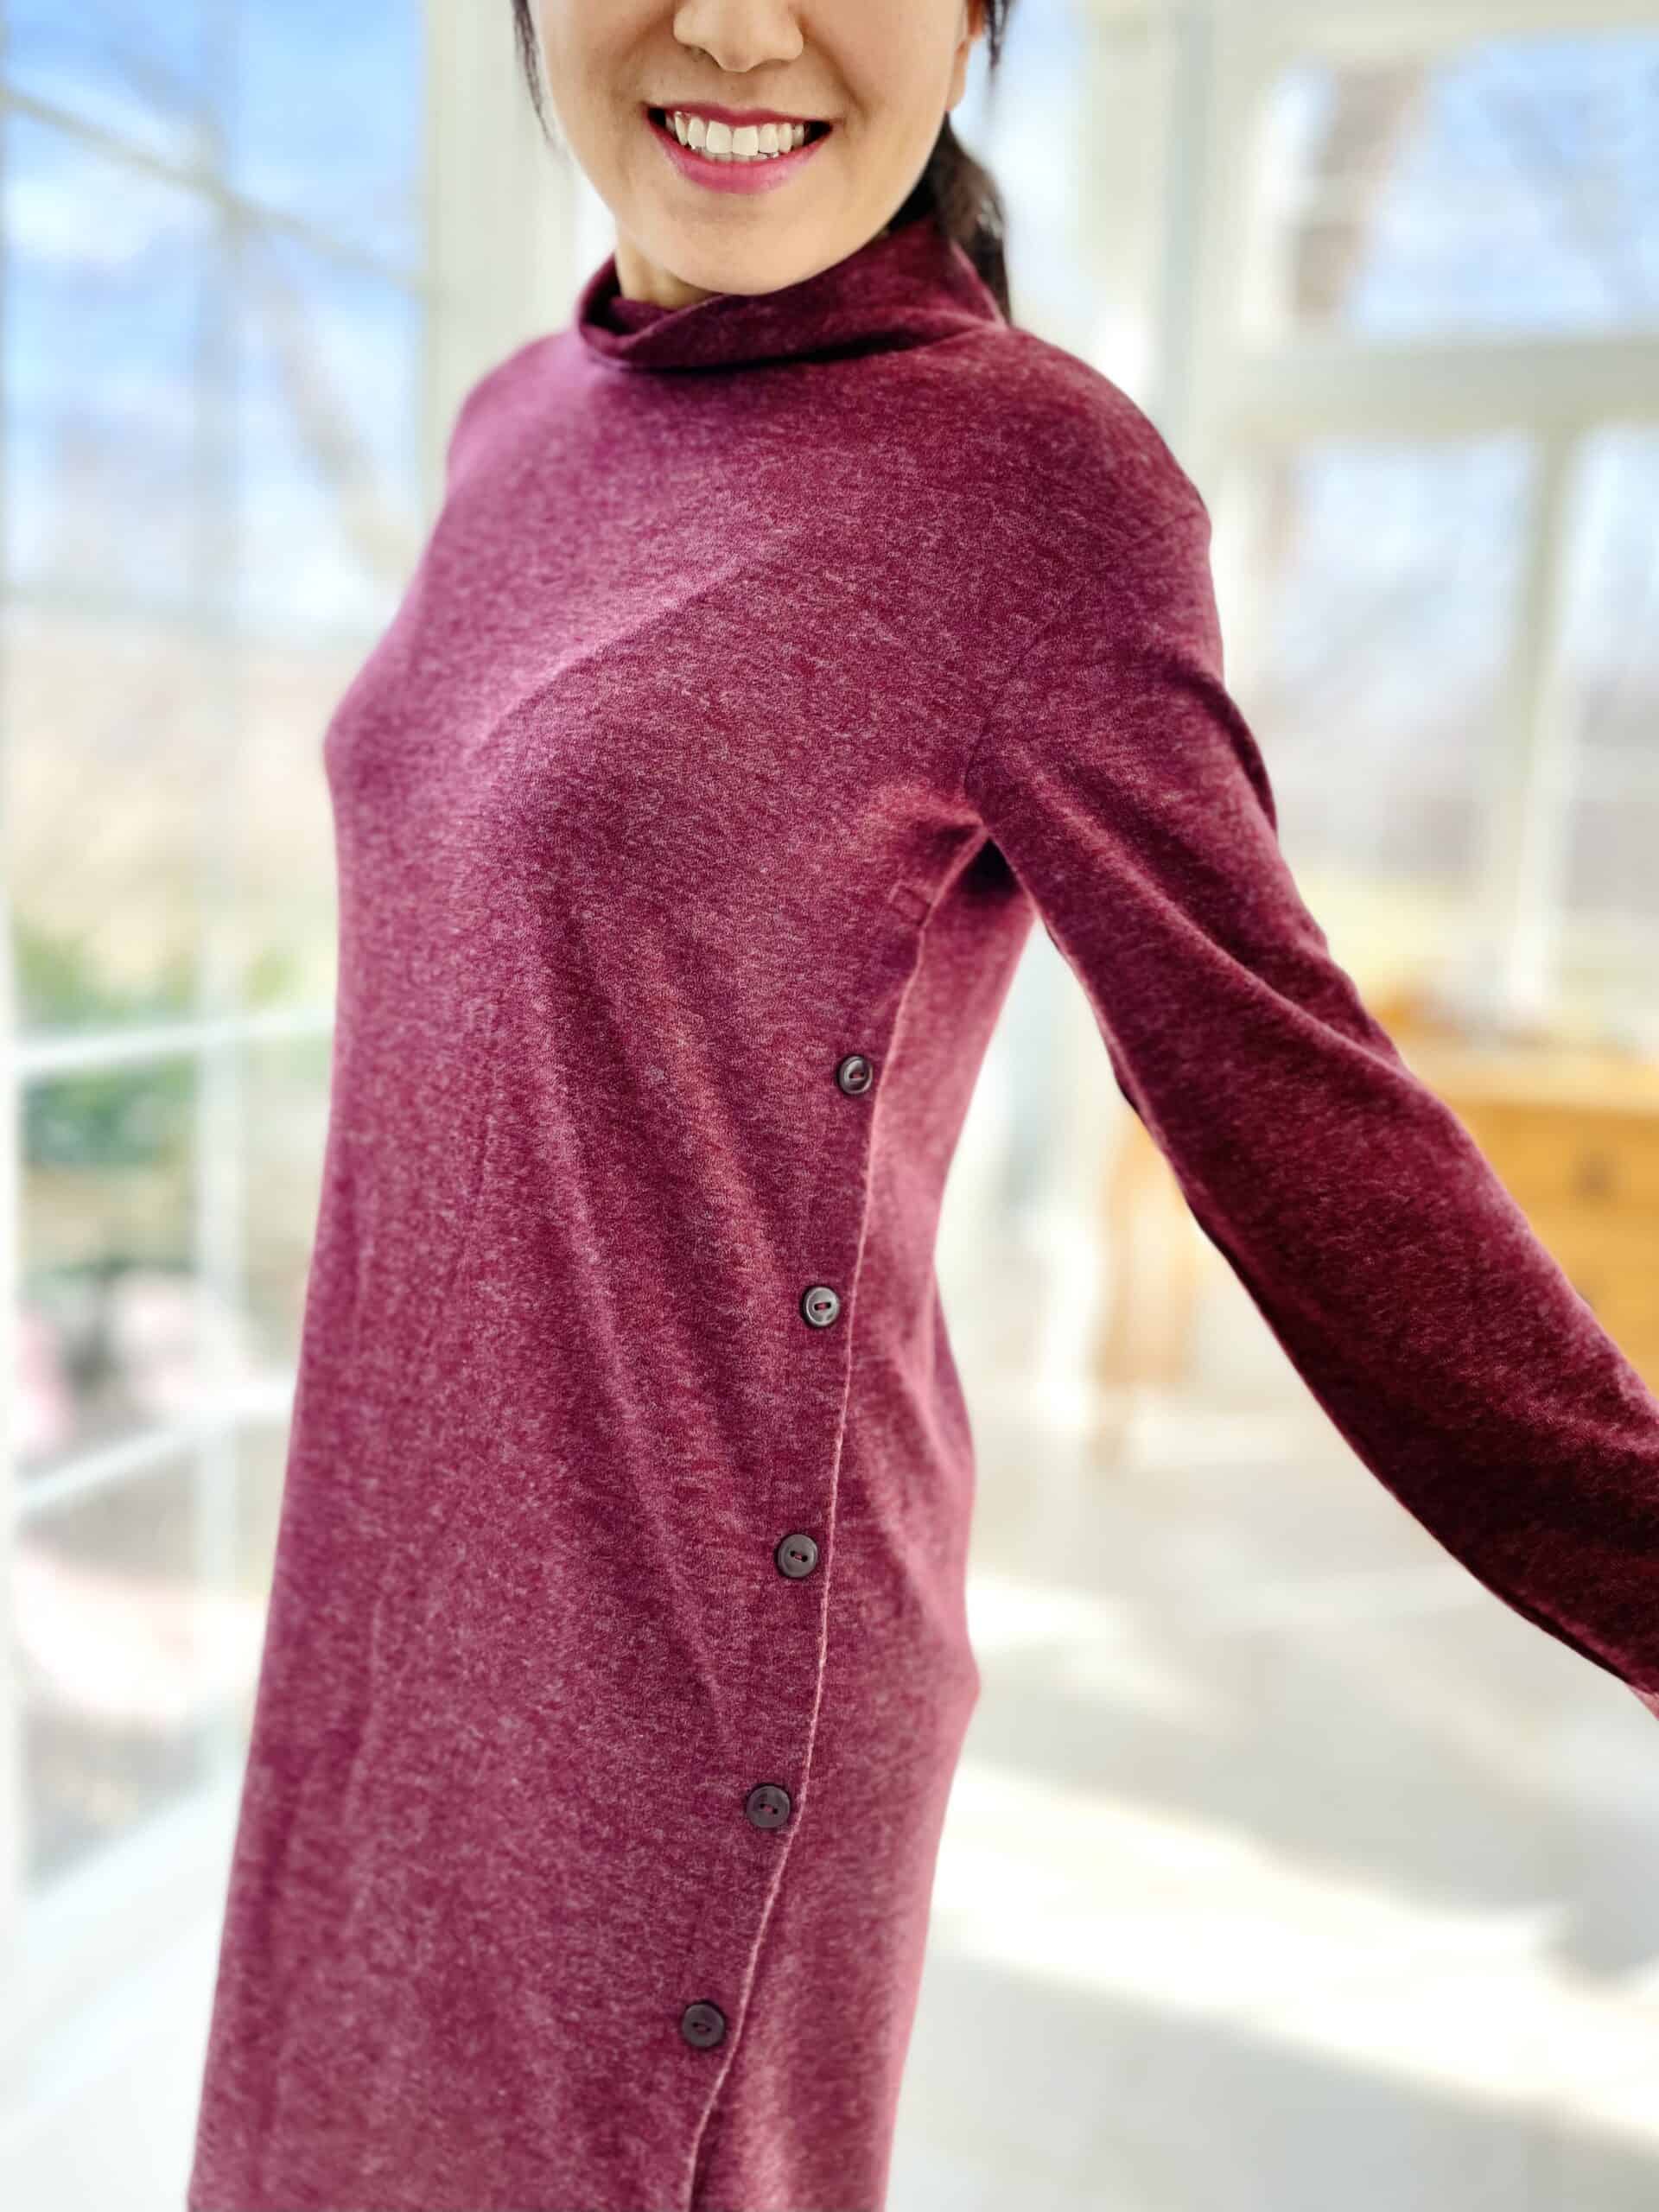
Dress 2: A-line fit in Hacci
With the super soft and warm Hacci and subtle A-line shape, this Lincoln is the sweater dress I will live in all winter. Not all sweater knits are created equal, and I really recommend the substantial Mily Mae Brushed Hacci base for Lincoln – again you will be thankful for stable plackets! Plus, the yummy squish factor of Hacci is hard to beat. I’m always drawn to a rich burgundy color and chose the Heathered Wine shade from a fun selection of both prints and solids. I used smaller buttons in coordinating color for a cozy look and added a funnel neck for extra warmth.
Ok what are we waiting for? Let’s get hacking!
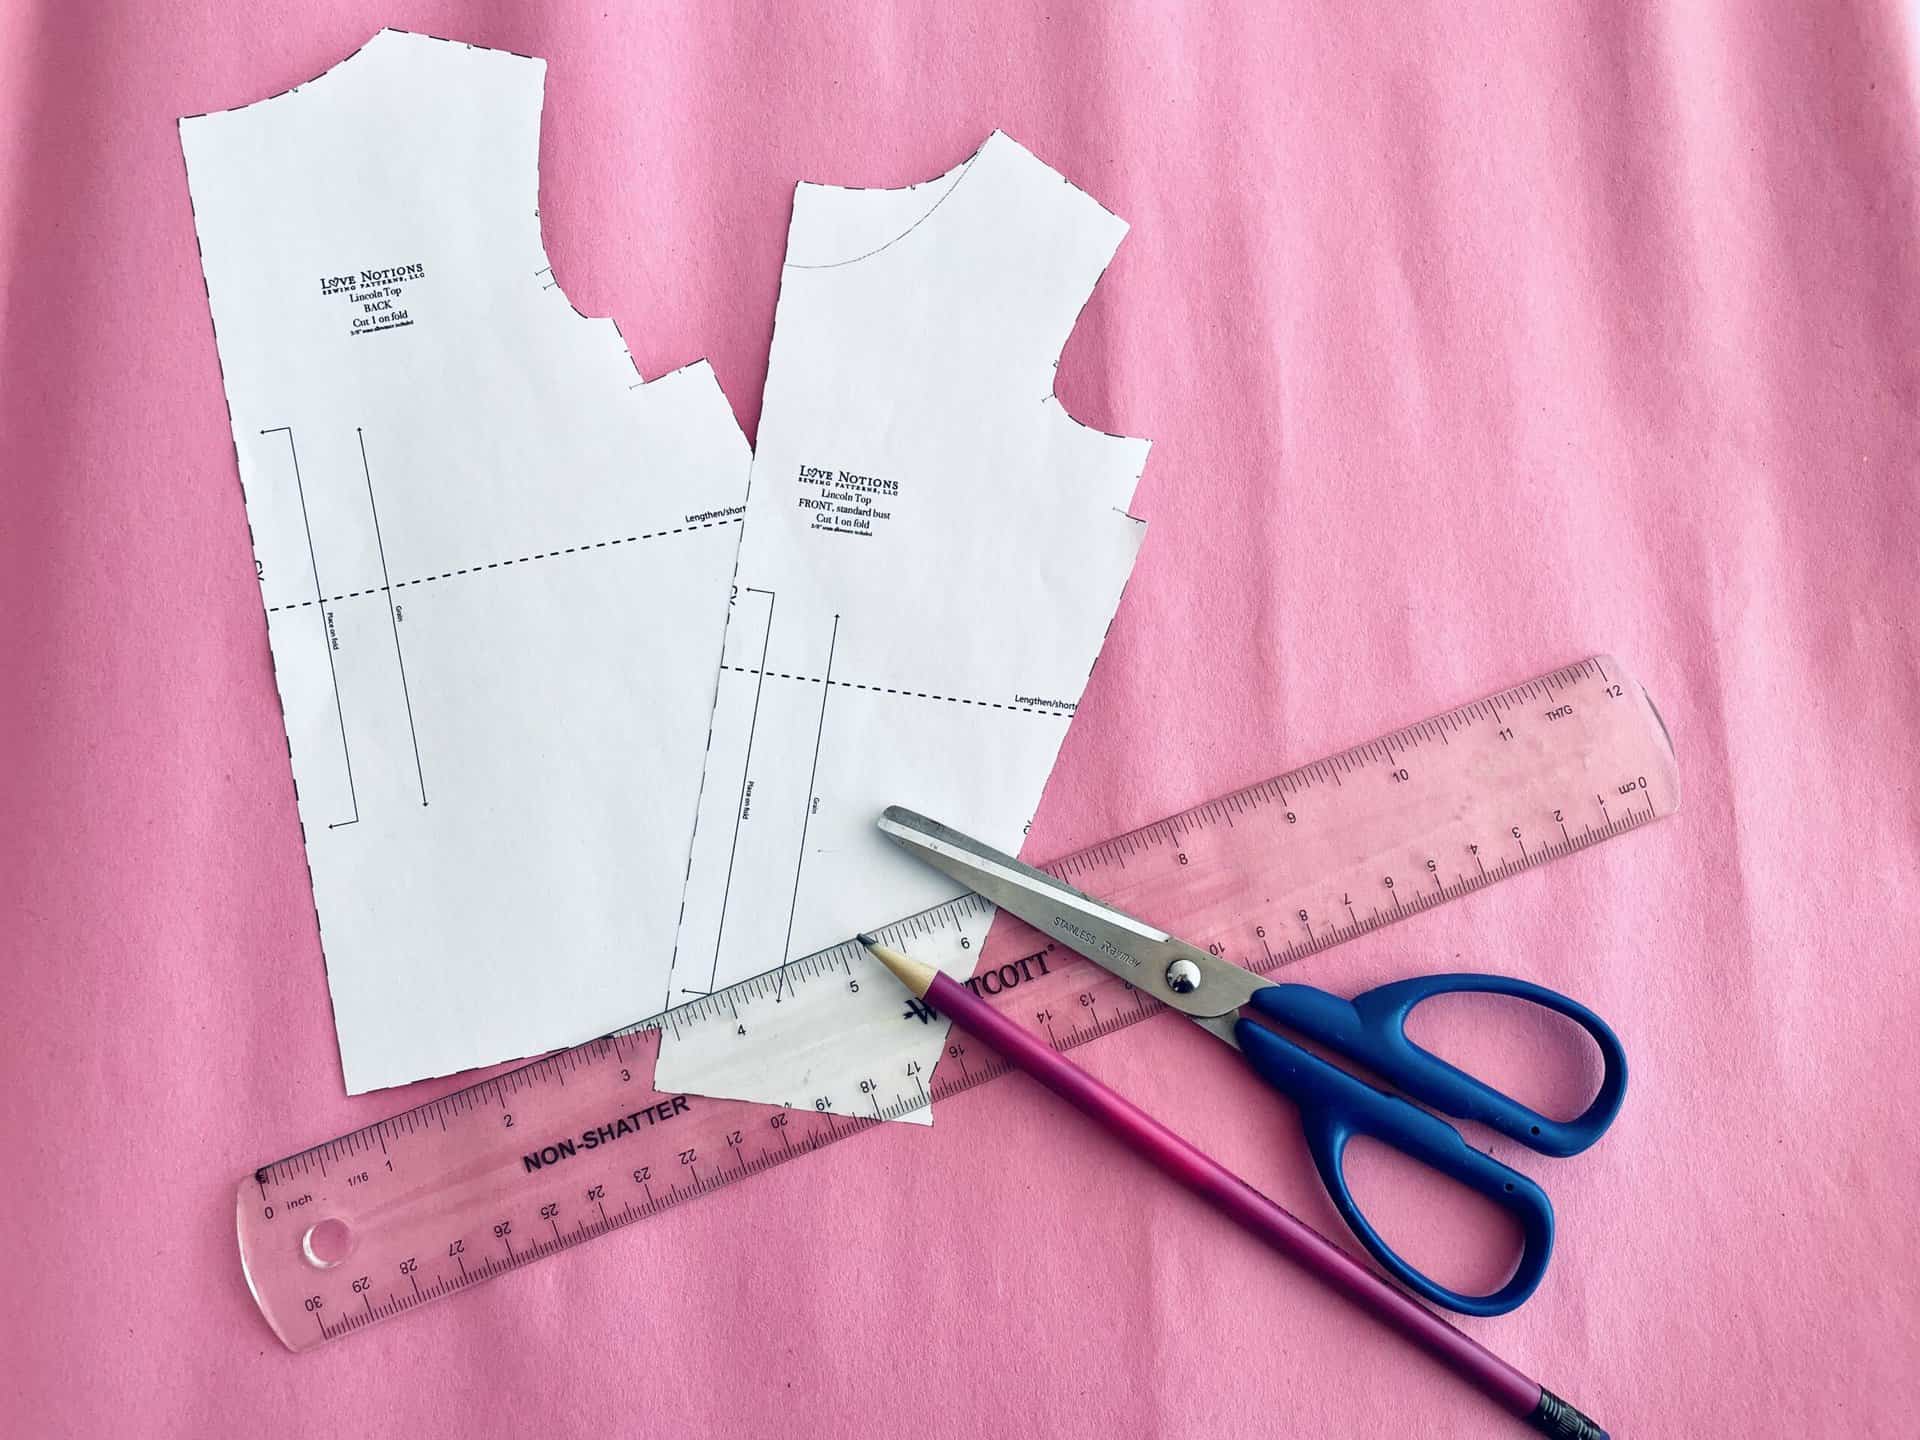
All steps below are shown with scaled down pattern pieces for clarity. I sewed up the XS standard bust with boat neckline and cropped front for mine but the hack can be applied to all sizes and views. You will need the original Lincoln pattern pieces in your size, some large sheets of paper, pencil, ruler, and scissors.
Dress 1 – Boxy fit
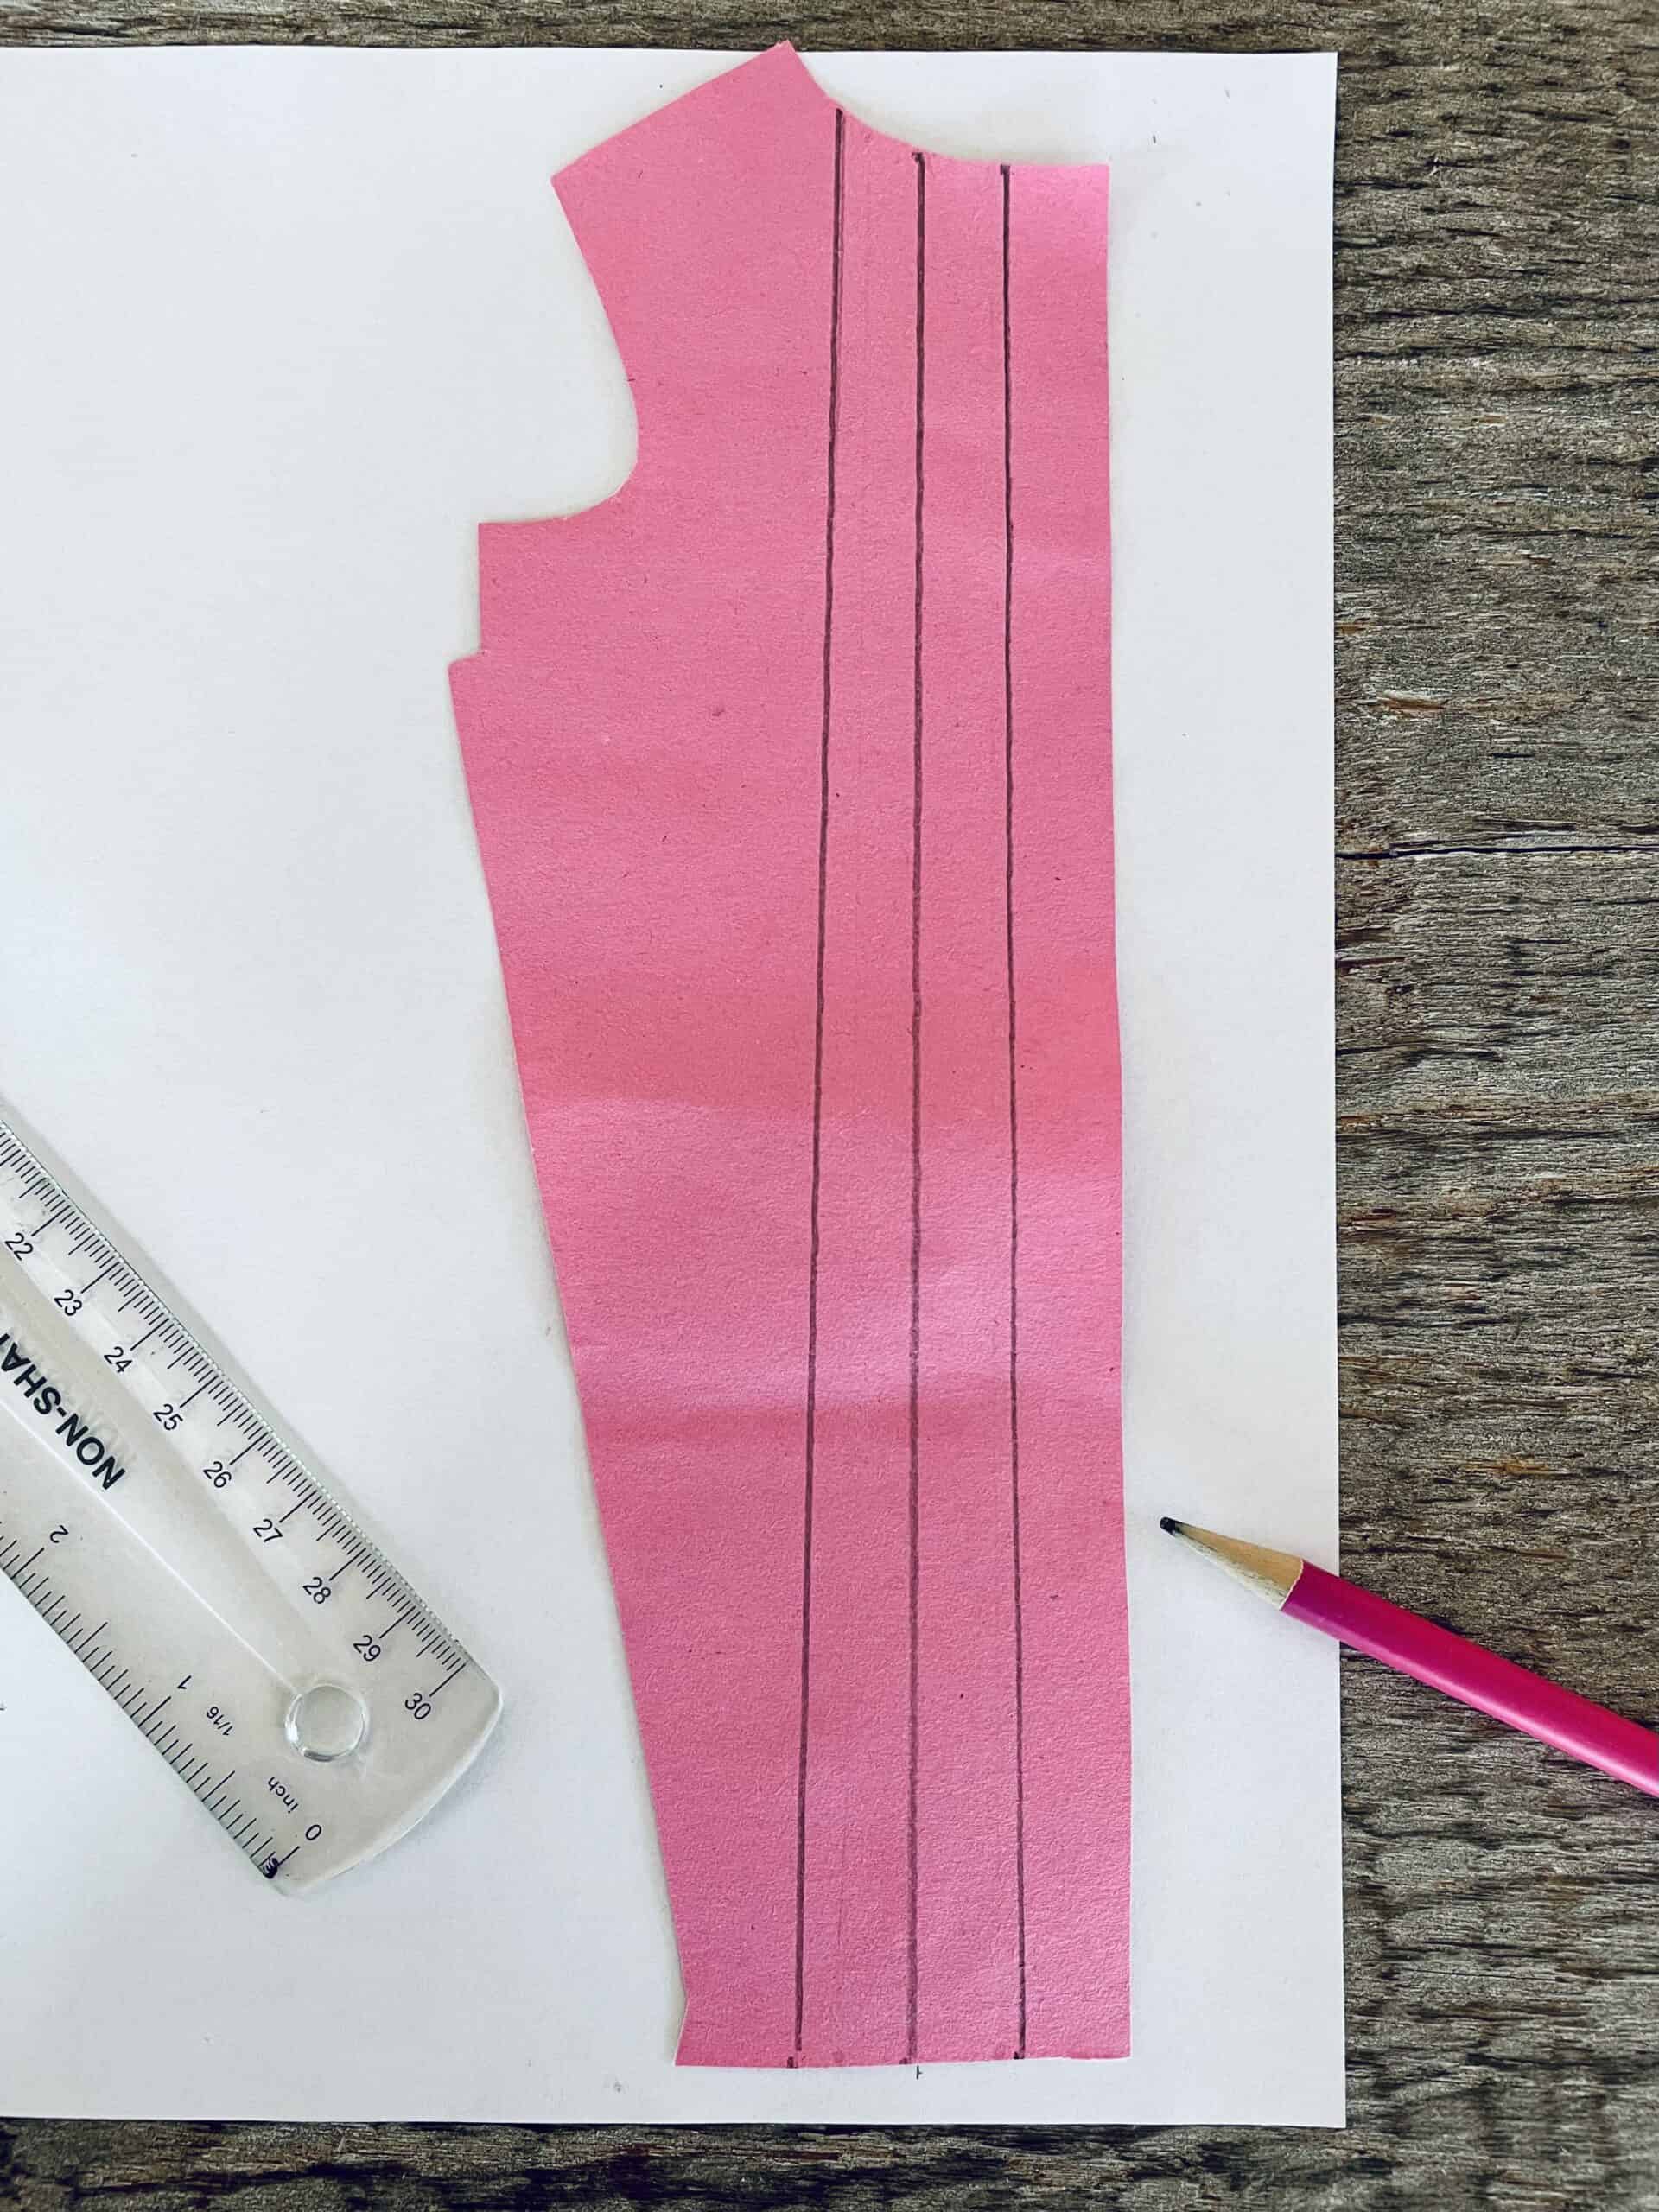
Step 1. Lengthen the front bodice
Cut your front bodice piece along the dotted “lengthen/shorten” line. Decide how long you’d like your dress to be and the amount to lengthen. For example, I am 5’2” and want my dress to hit about knee length. I used the cropped / hi-low front bodice piece in size XS, and added 13” length. Draw your new side seam line by connecting the 2 dots the arrows are pointing to in the photos.
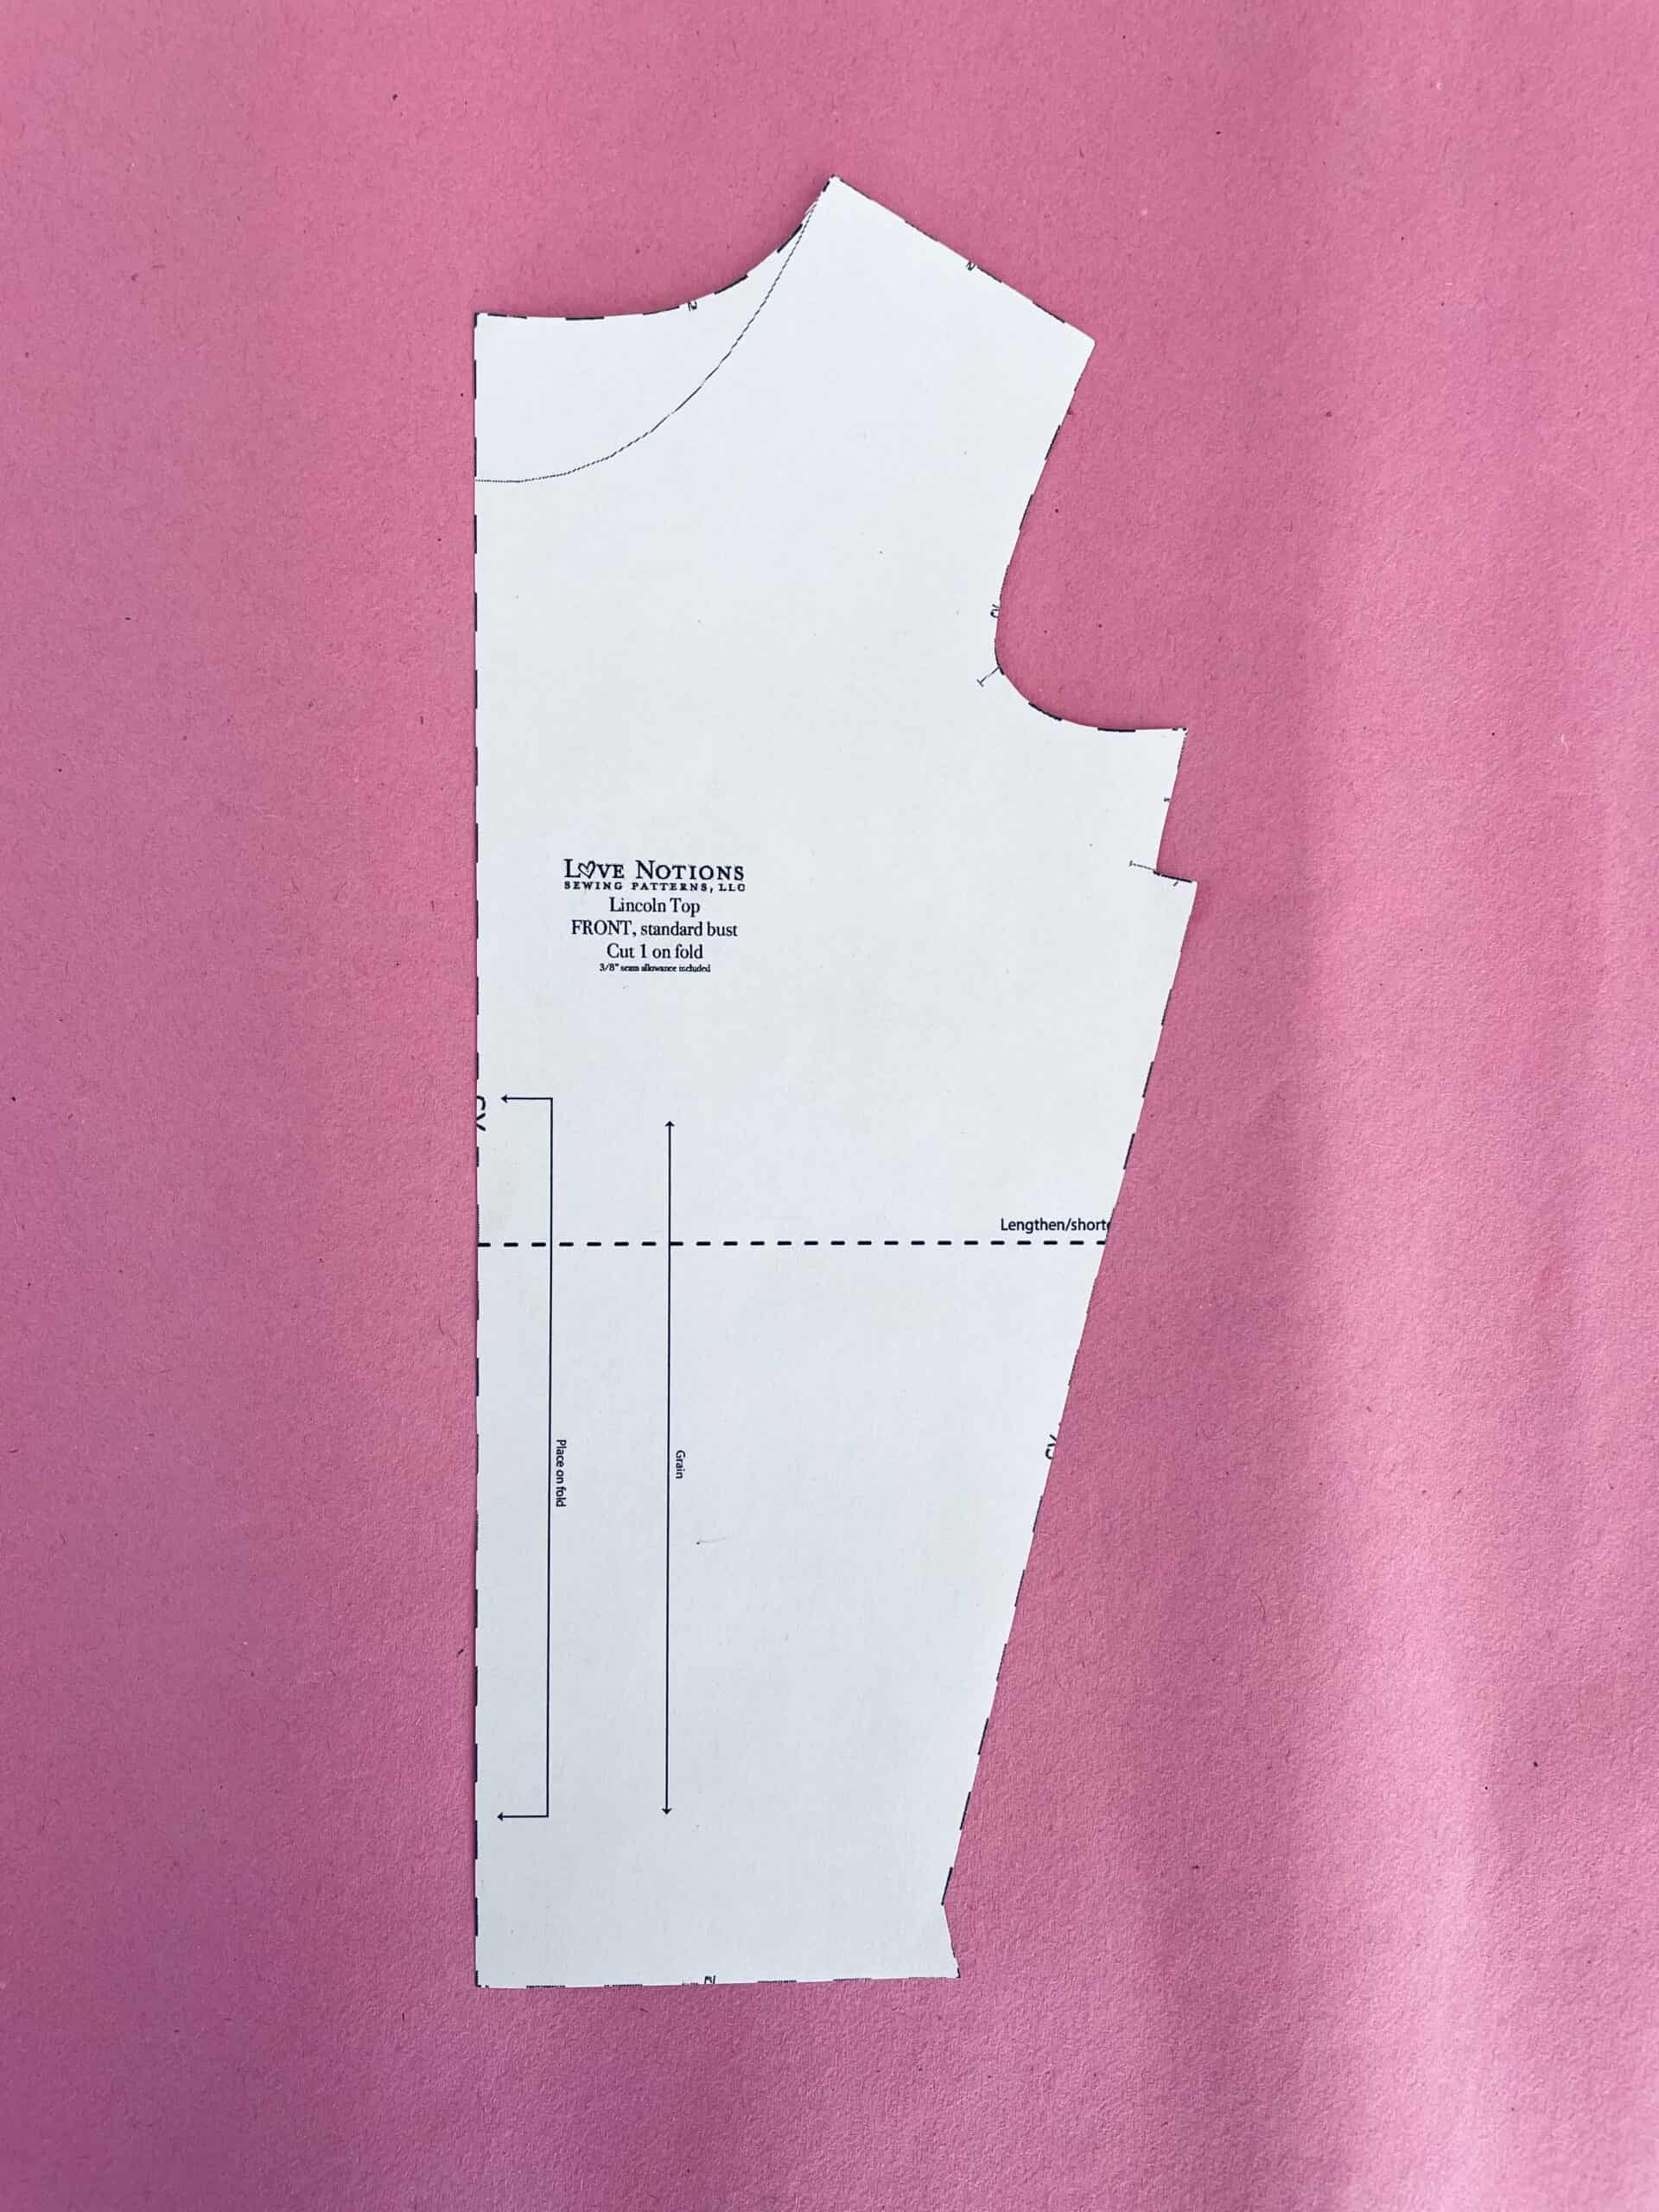
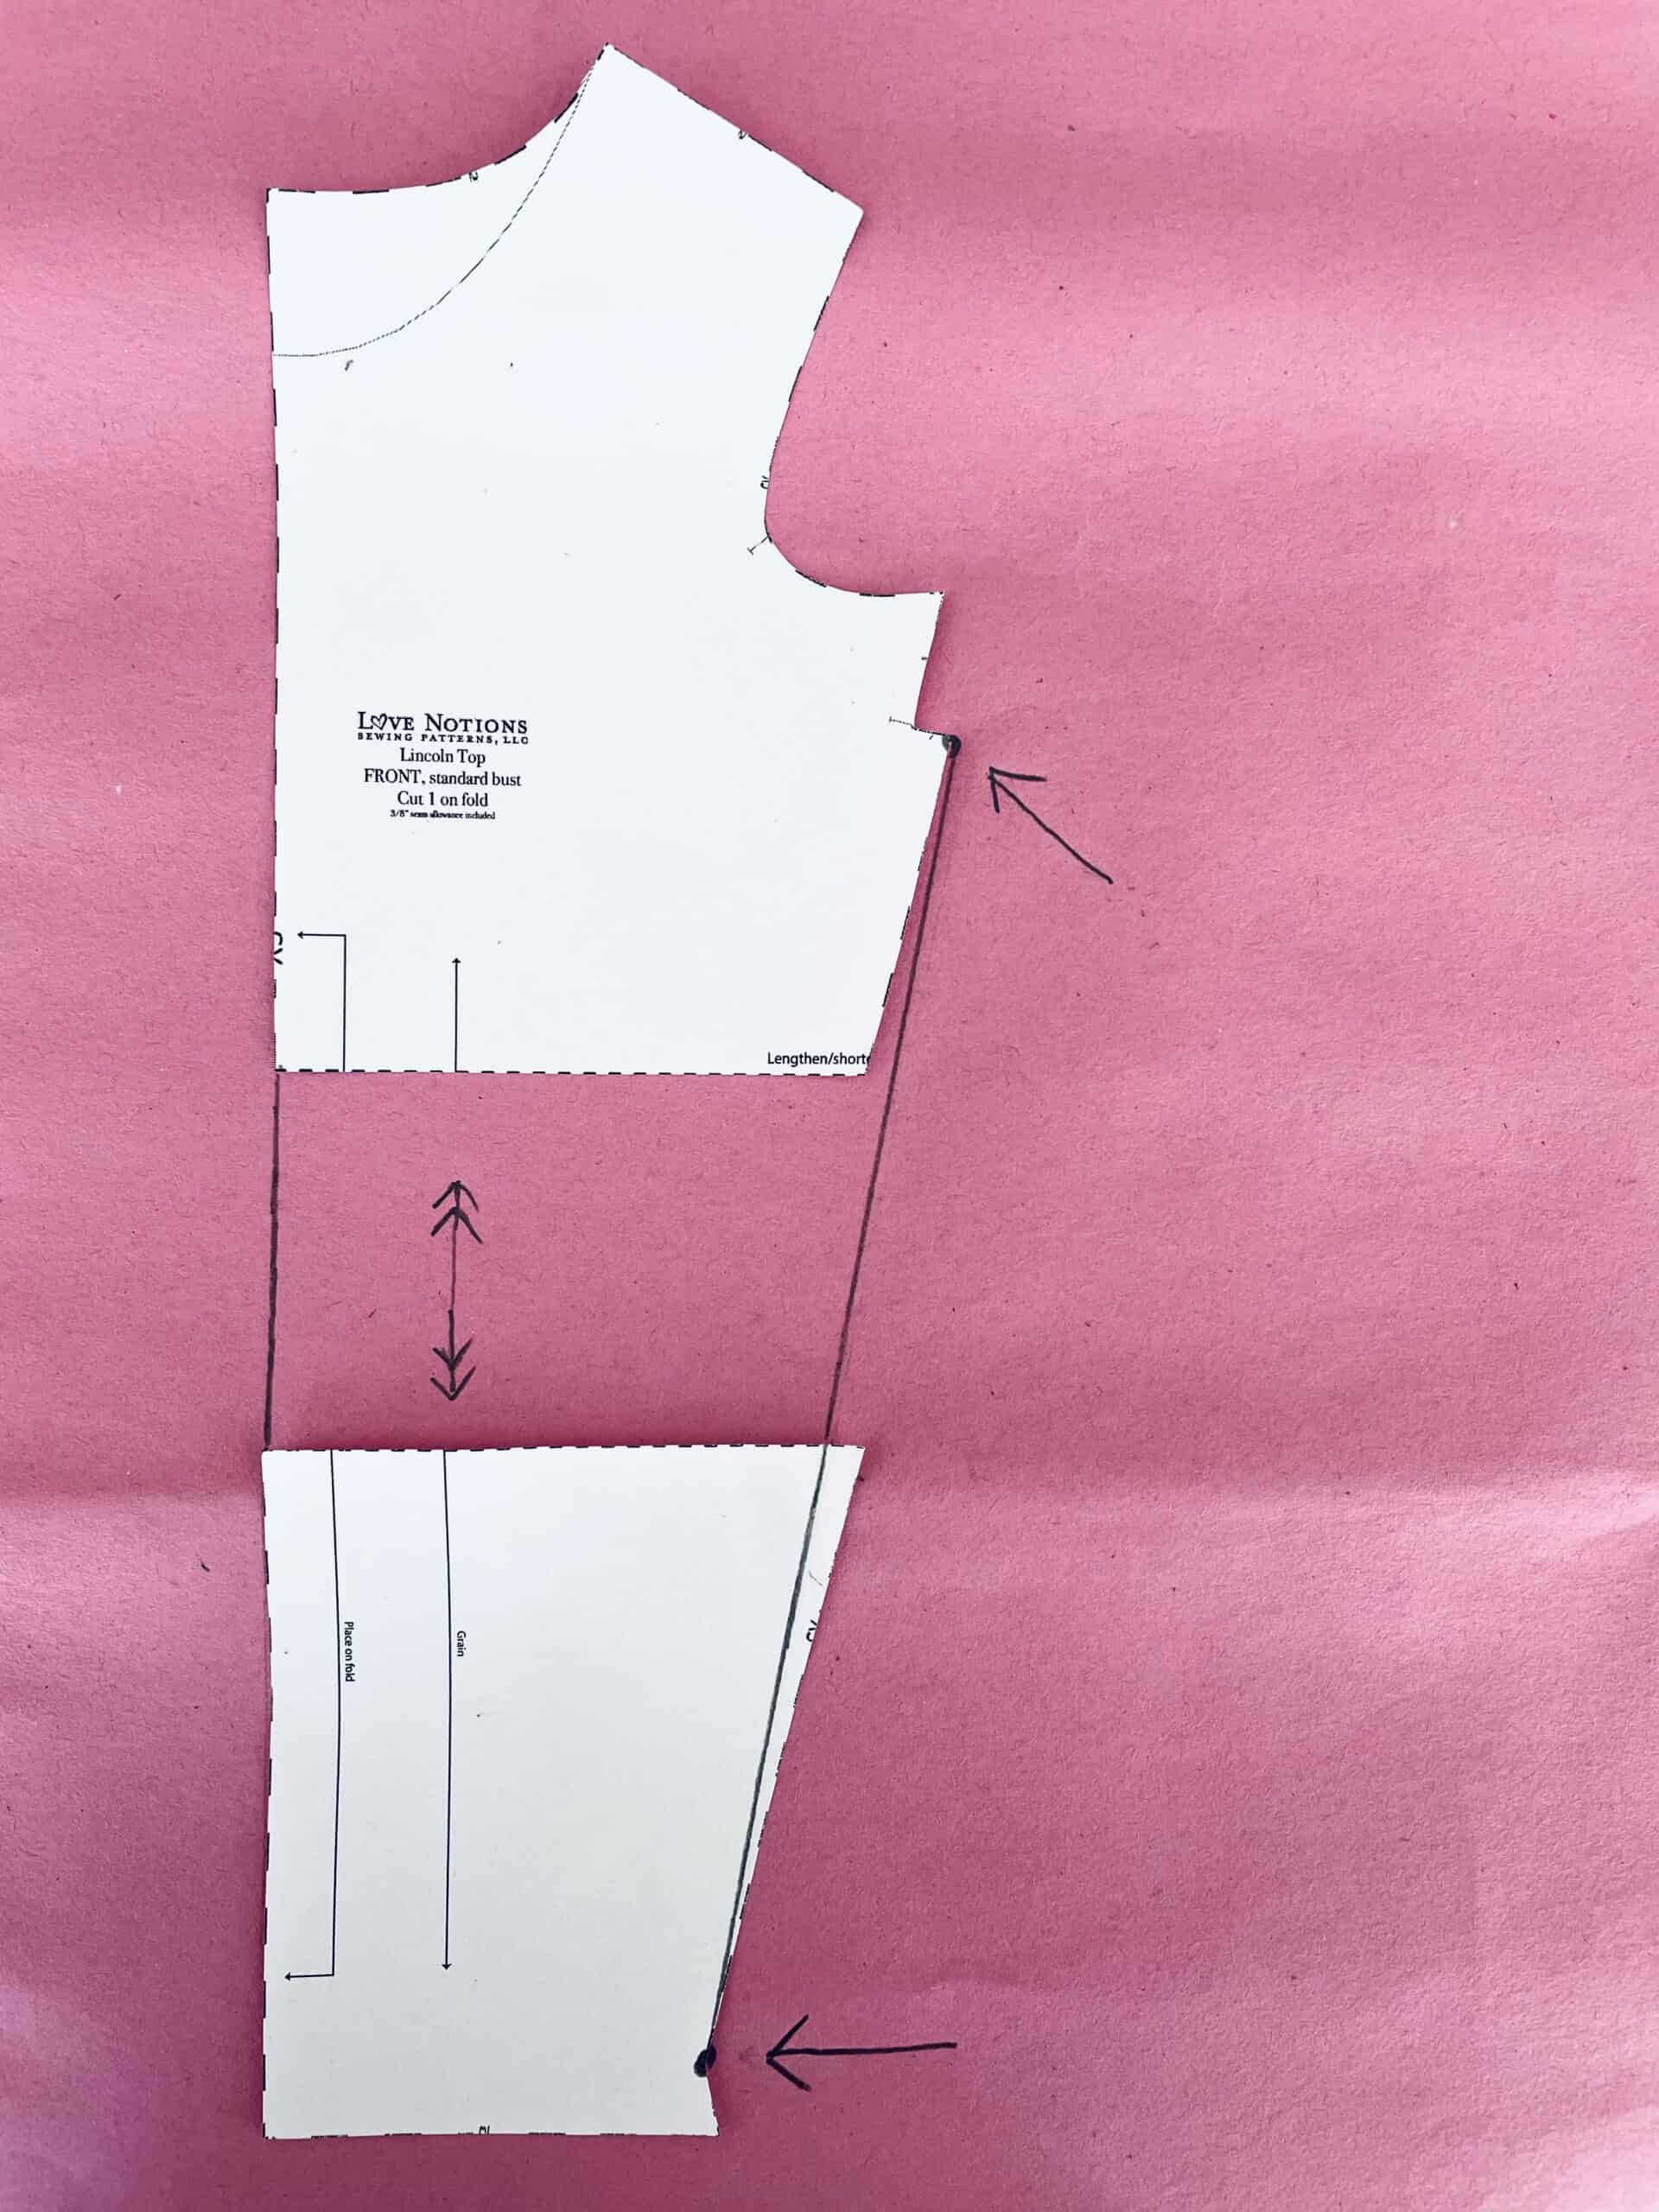
Step 2. Fine-tune the front bodice
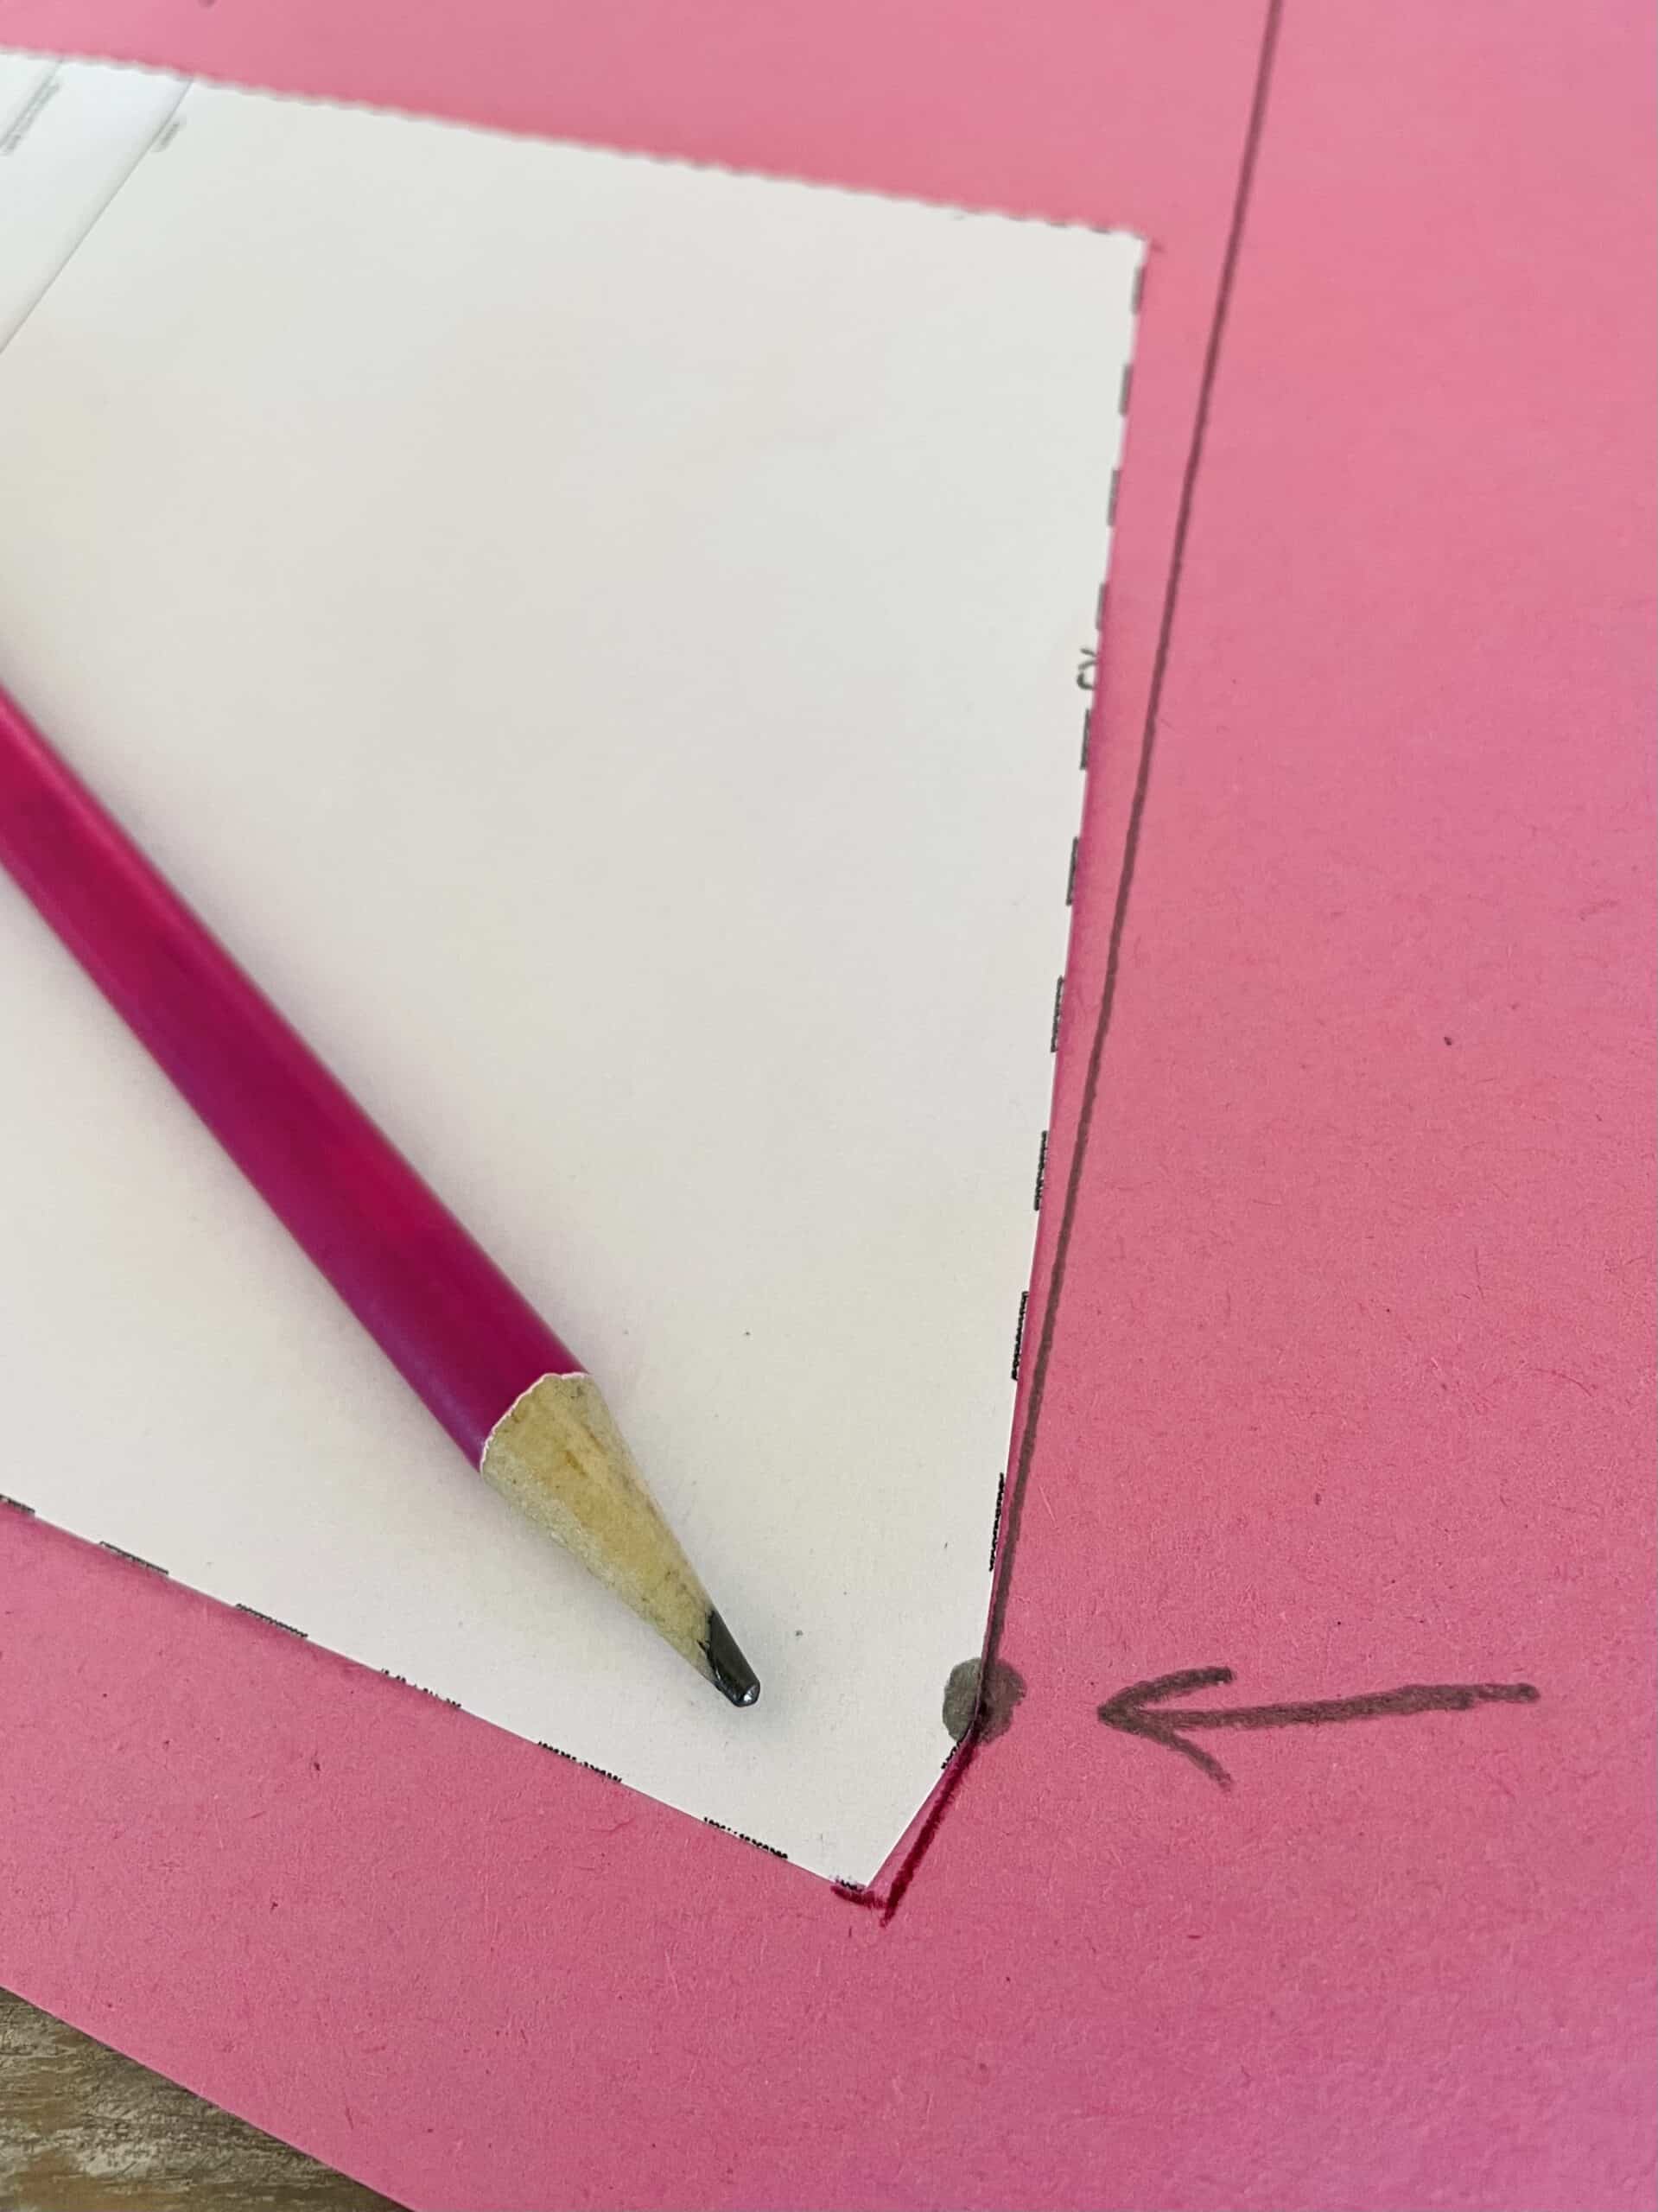
As you can see, the angle of the packet has changed with the lengthening, which has its ripple effect on a few minor details. Just between us girls, you can blissfully ignore this step and rely on the forgiveness of knit fabrics to achieve great results nonetheless. But the perfectionist in me has to get this straight – literally. We are talking about 2 very small areas as shown in the photos:


– The short section of side seam just below the armscye and above the button placket. It should be parallel to the new side seam
– The side seam of the hem allowance. It should be a mirror image of the new side seam.
You will want to go in there and tweak them to reflect the new angle created by the lengthening. The more length you add, the bigger the change in angle. You can see the new lines shown in red in my photos above, with the pencil tip pointing at them.
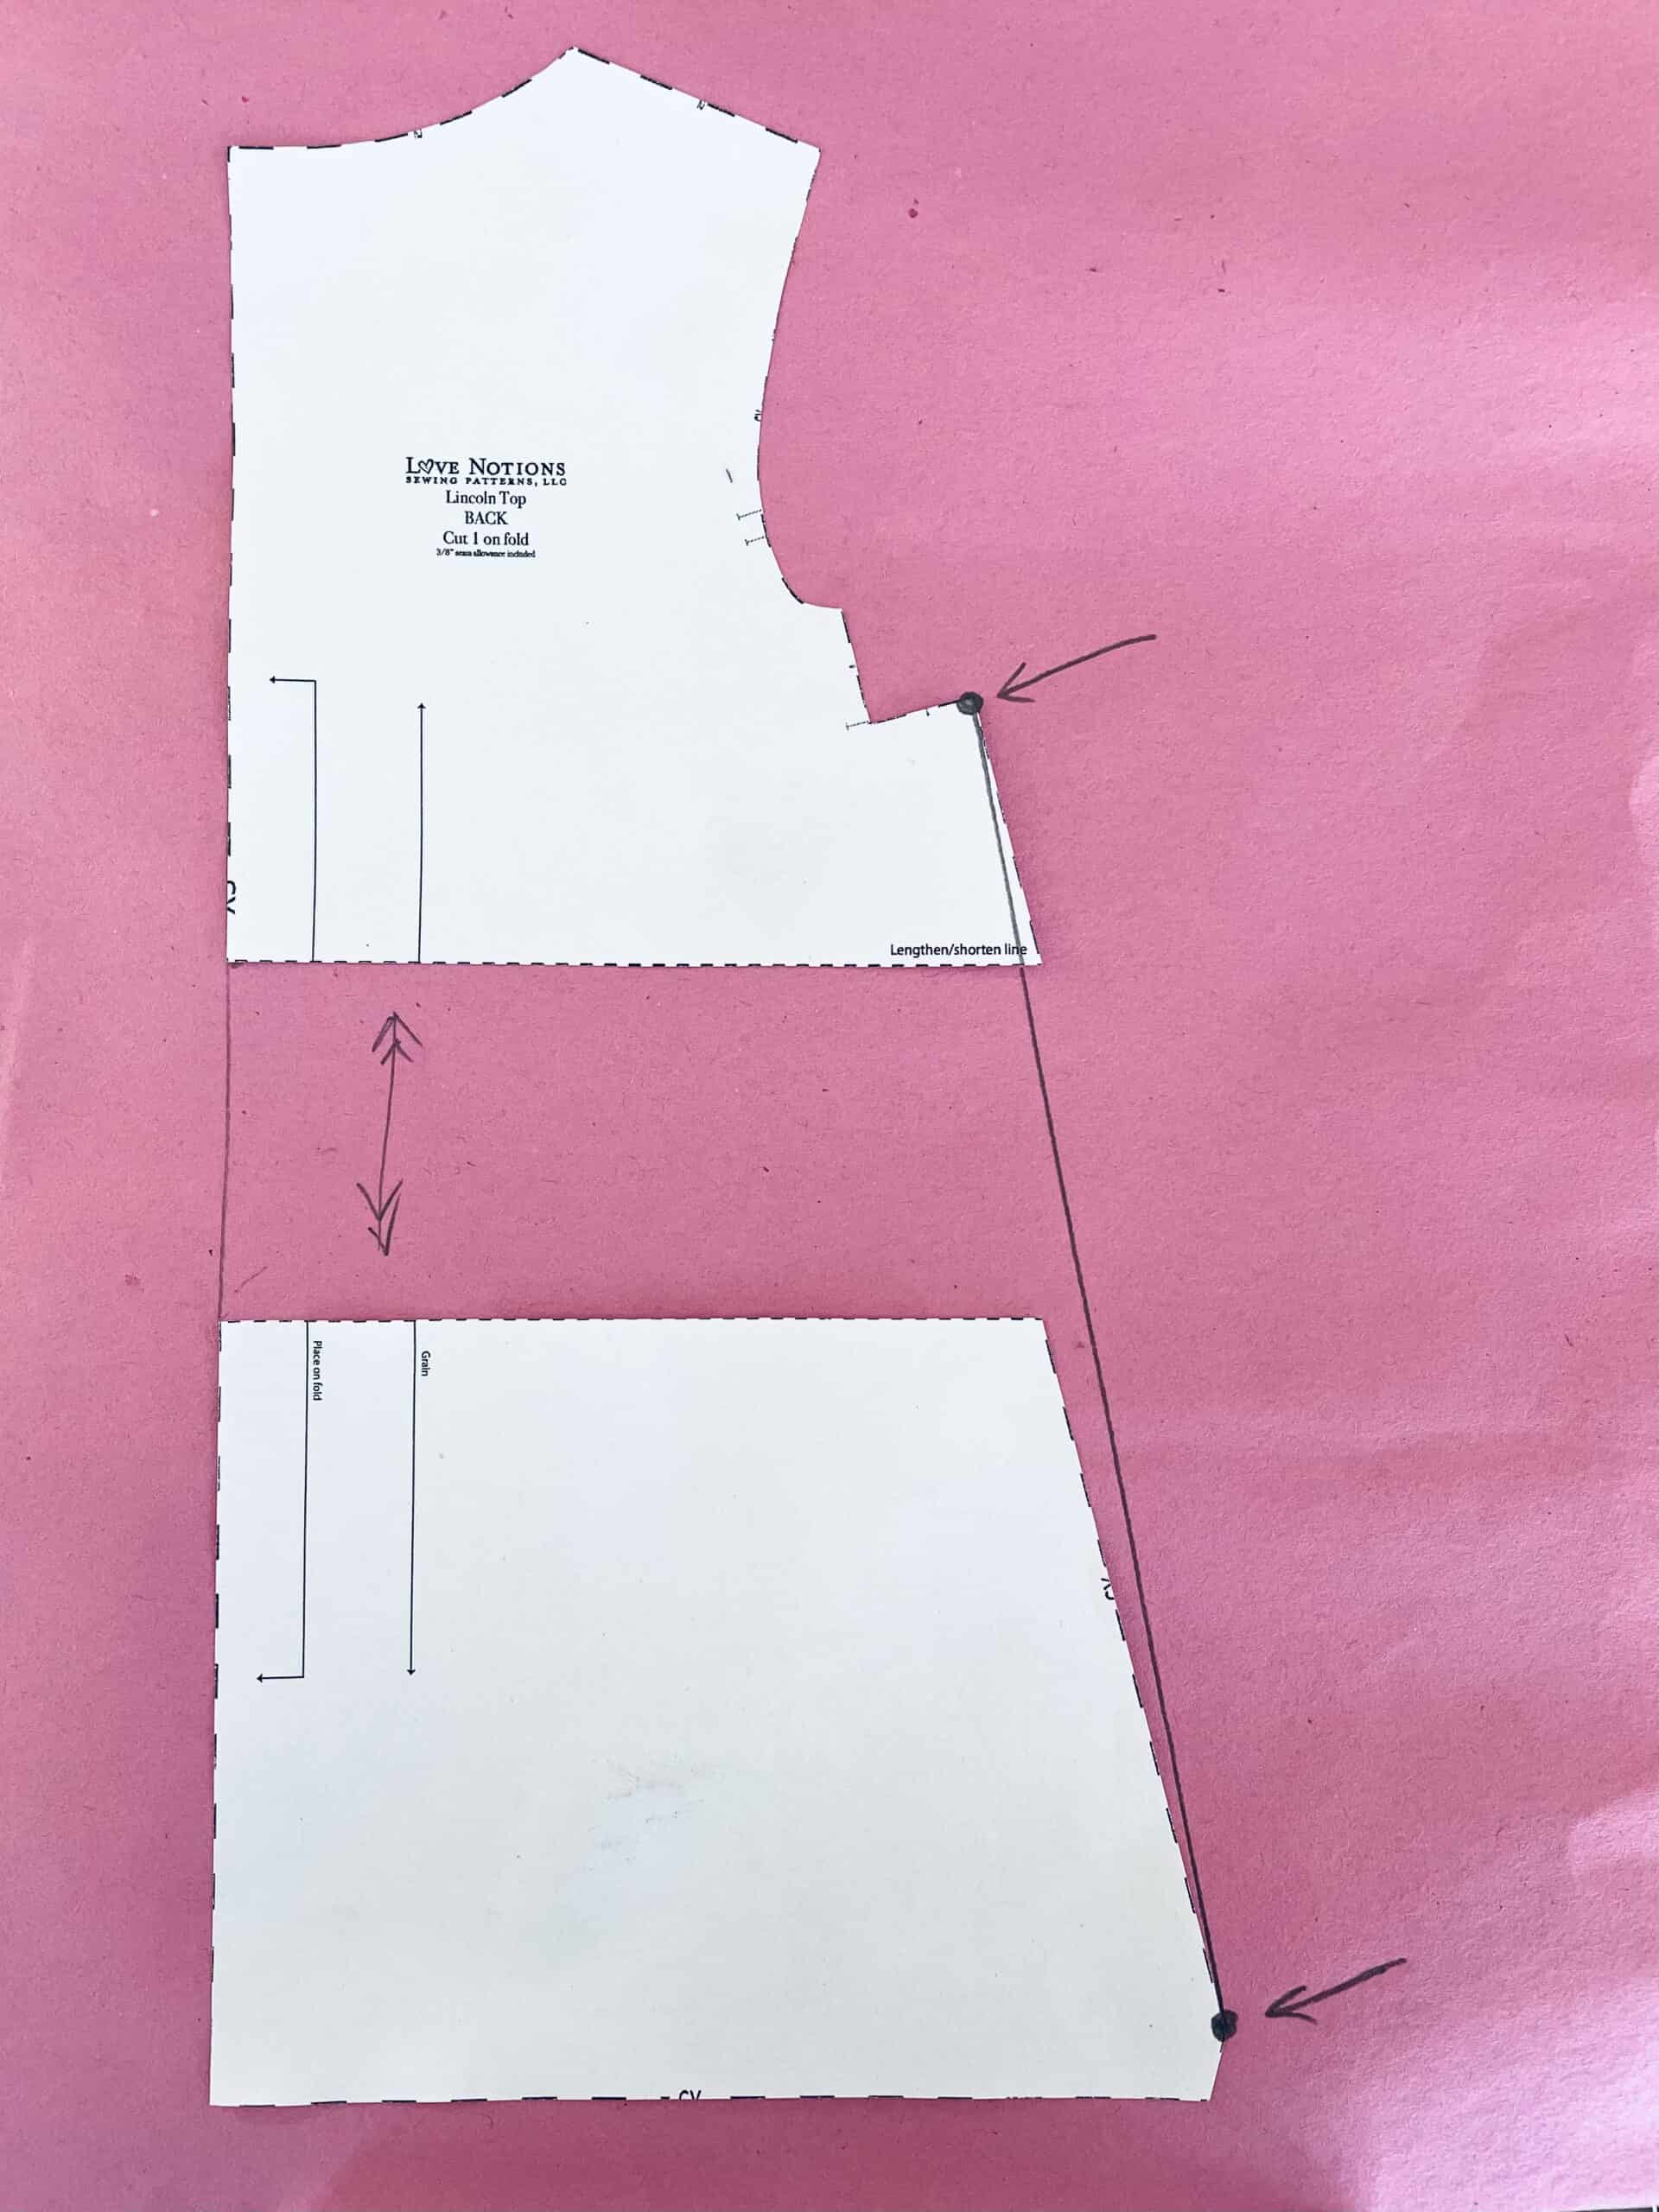
Step 3. Lengthen and fine-tune the back bodice
Now lengthen then back bodice by the same amount of length as the front, in the same way. The new angle of the side placket will match that of the front when sewn.
If you have fine-tuned the 2 small areas on the front bodice, do the same with the back.

Step 4. Sew your dress exactly the same way as a Lincoln top!
Your new side seam angles should match beautifully!
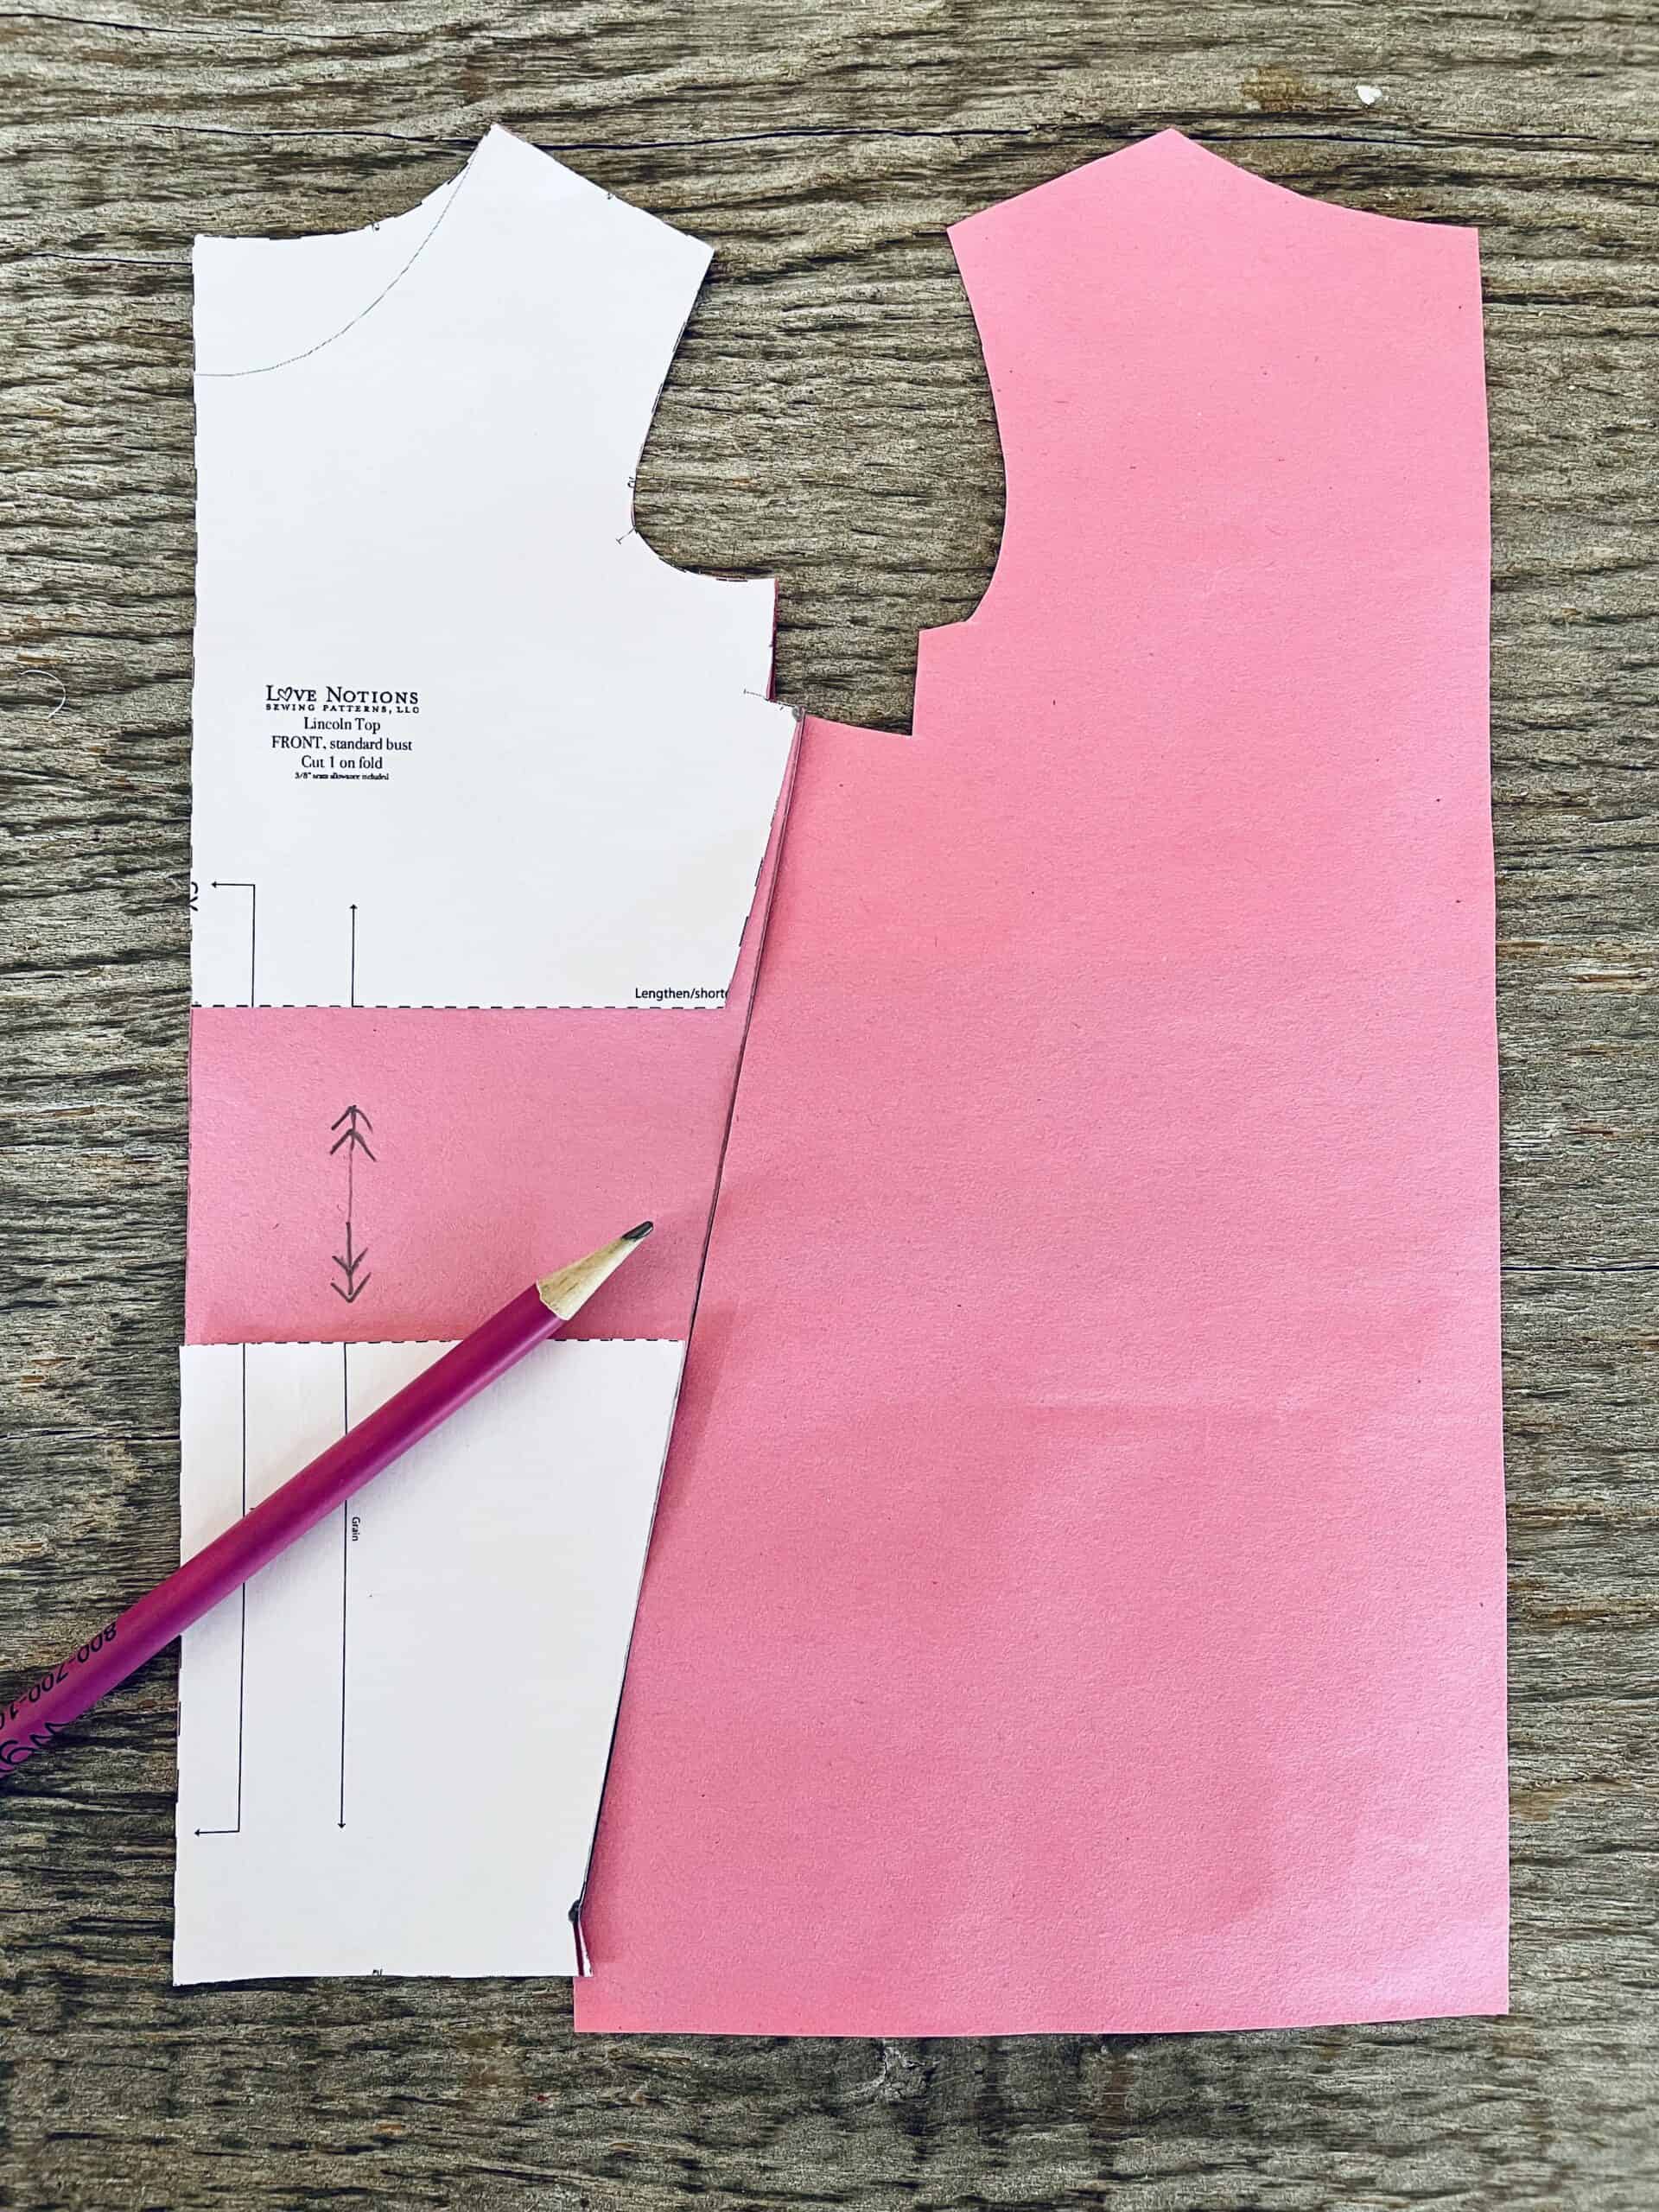
Tada!
That wasn’t too hard at all, right? In essence it’s really just a knee length Lincoln with some changed angles. It does make you better appreciate the great drafting in the original pattern!
I love how fresh and effortless my new shirt dress feels on! Although it’s a straight up and down boxy shape, it drapes around the body beautifully and creates a lovely, almost cocoon shape thanks to the slanted side seams and hi-low hem. I made the long sleeved view but prefer to wear it with the sleeves rolled up to 3/4 length. The white looped underside of the French Terry looks like a cuff to echo my white buttons. I think I’ve got me my Easter dress this year sorted?!


Dress 2 – A-line fit
But before I get ahead of myself, we still have quite a bit of winter ahead of us and this is where my Hacci sweater dress comes in. Hacci knit has more drape and less structure than the French Terry and feels like a warm cozy blanket. I want more of it around me naturally. Let’s continue the hack to add a little bit of swish with an A-line shape!
Step 5. Slash and spread the front bodice
Divide both the neckline and hem of your front bodice piece into 4 equal parts, and connect them lengthwise. Cut along the 3 vertical lines and spread them out evenly in a fan-shape, pivoting at the neckline.
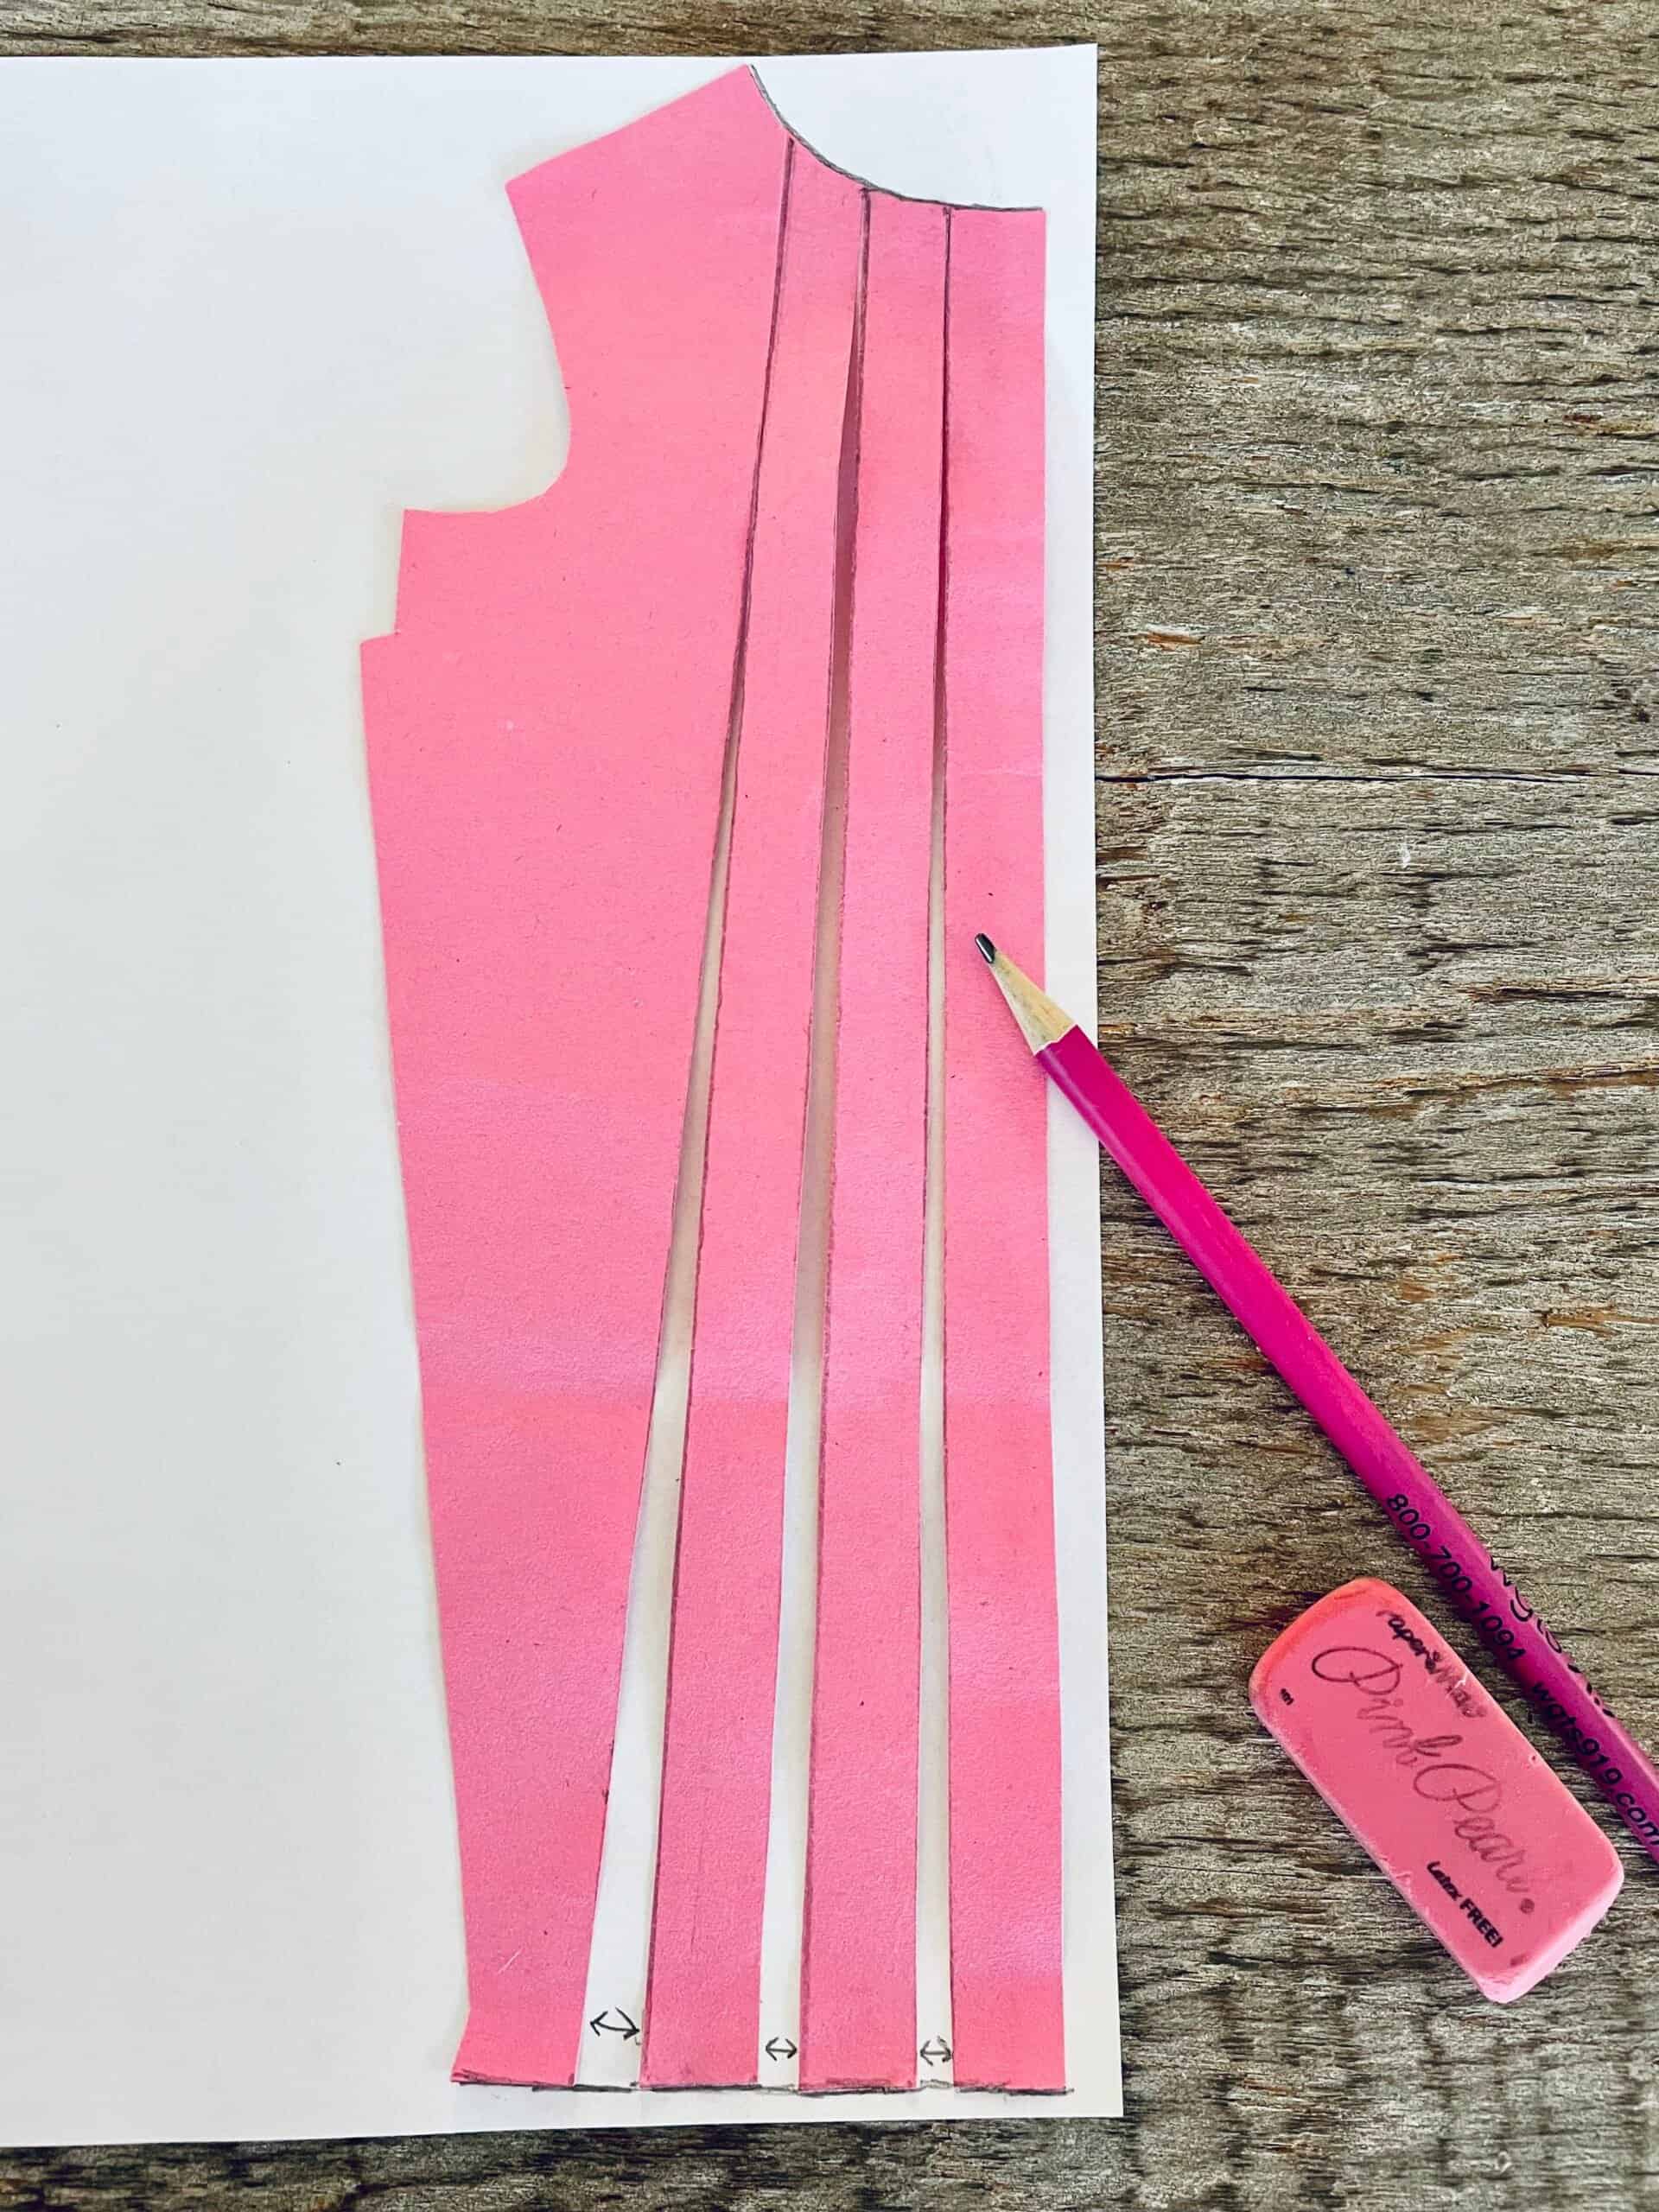
This will add extra width to the hem, creating a subtle A-line shape (when sewn with back bodice). The amount to add is up to you, but you will want the new width at the hem to still be less than the width at the chest, to keep the lovely converging side seams of Lincoln. For example, the XS standard bust front bodice piece has about a 3” difference between the chest and hem. I decided to add 1½” over the 3 slash and spreads, which comes to 1½” / 3 = ½” between each spread. The more width you add, the more substantial your A-line shape will be. Just make sure to keep the new hem width smaller than the chest width!
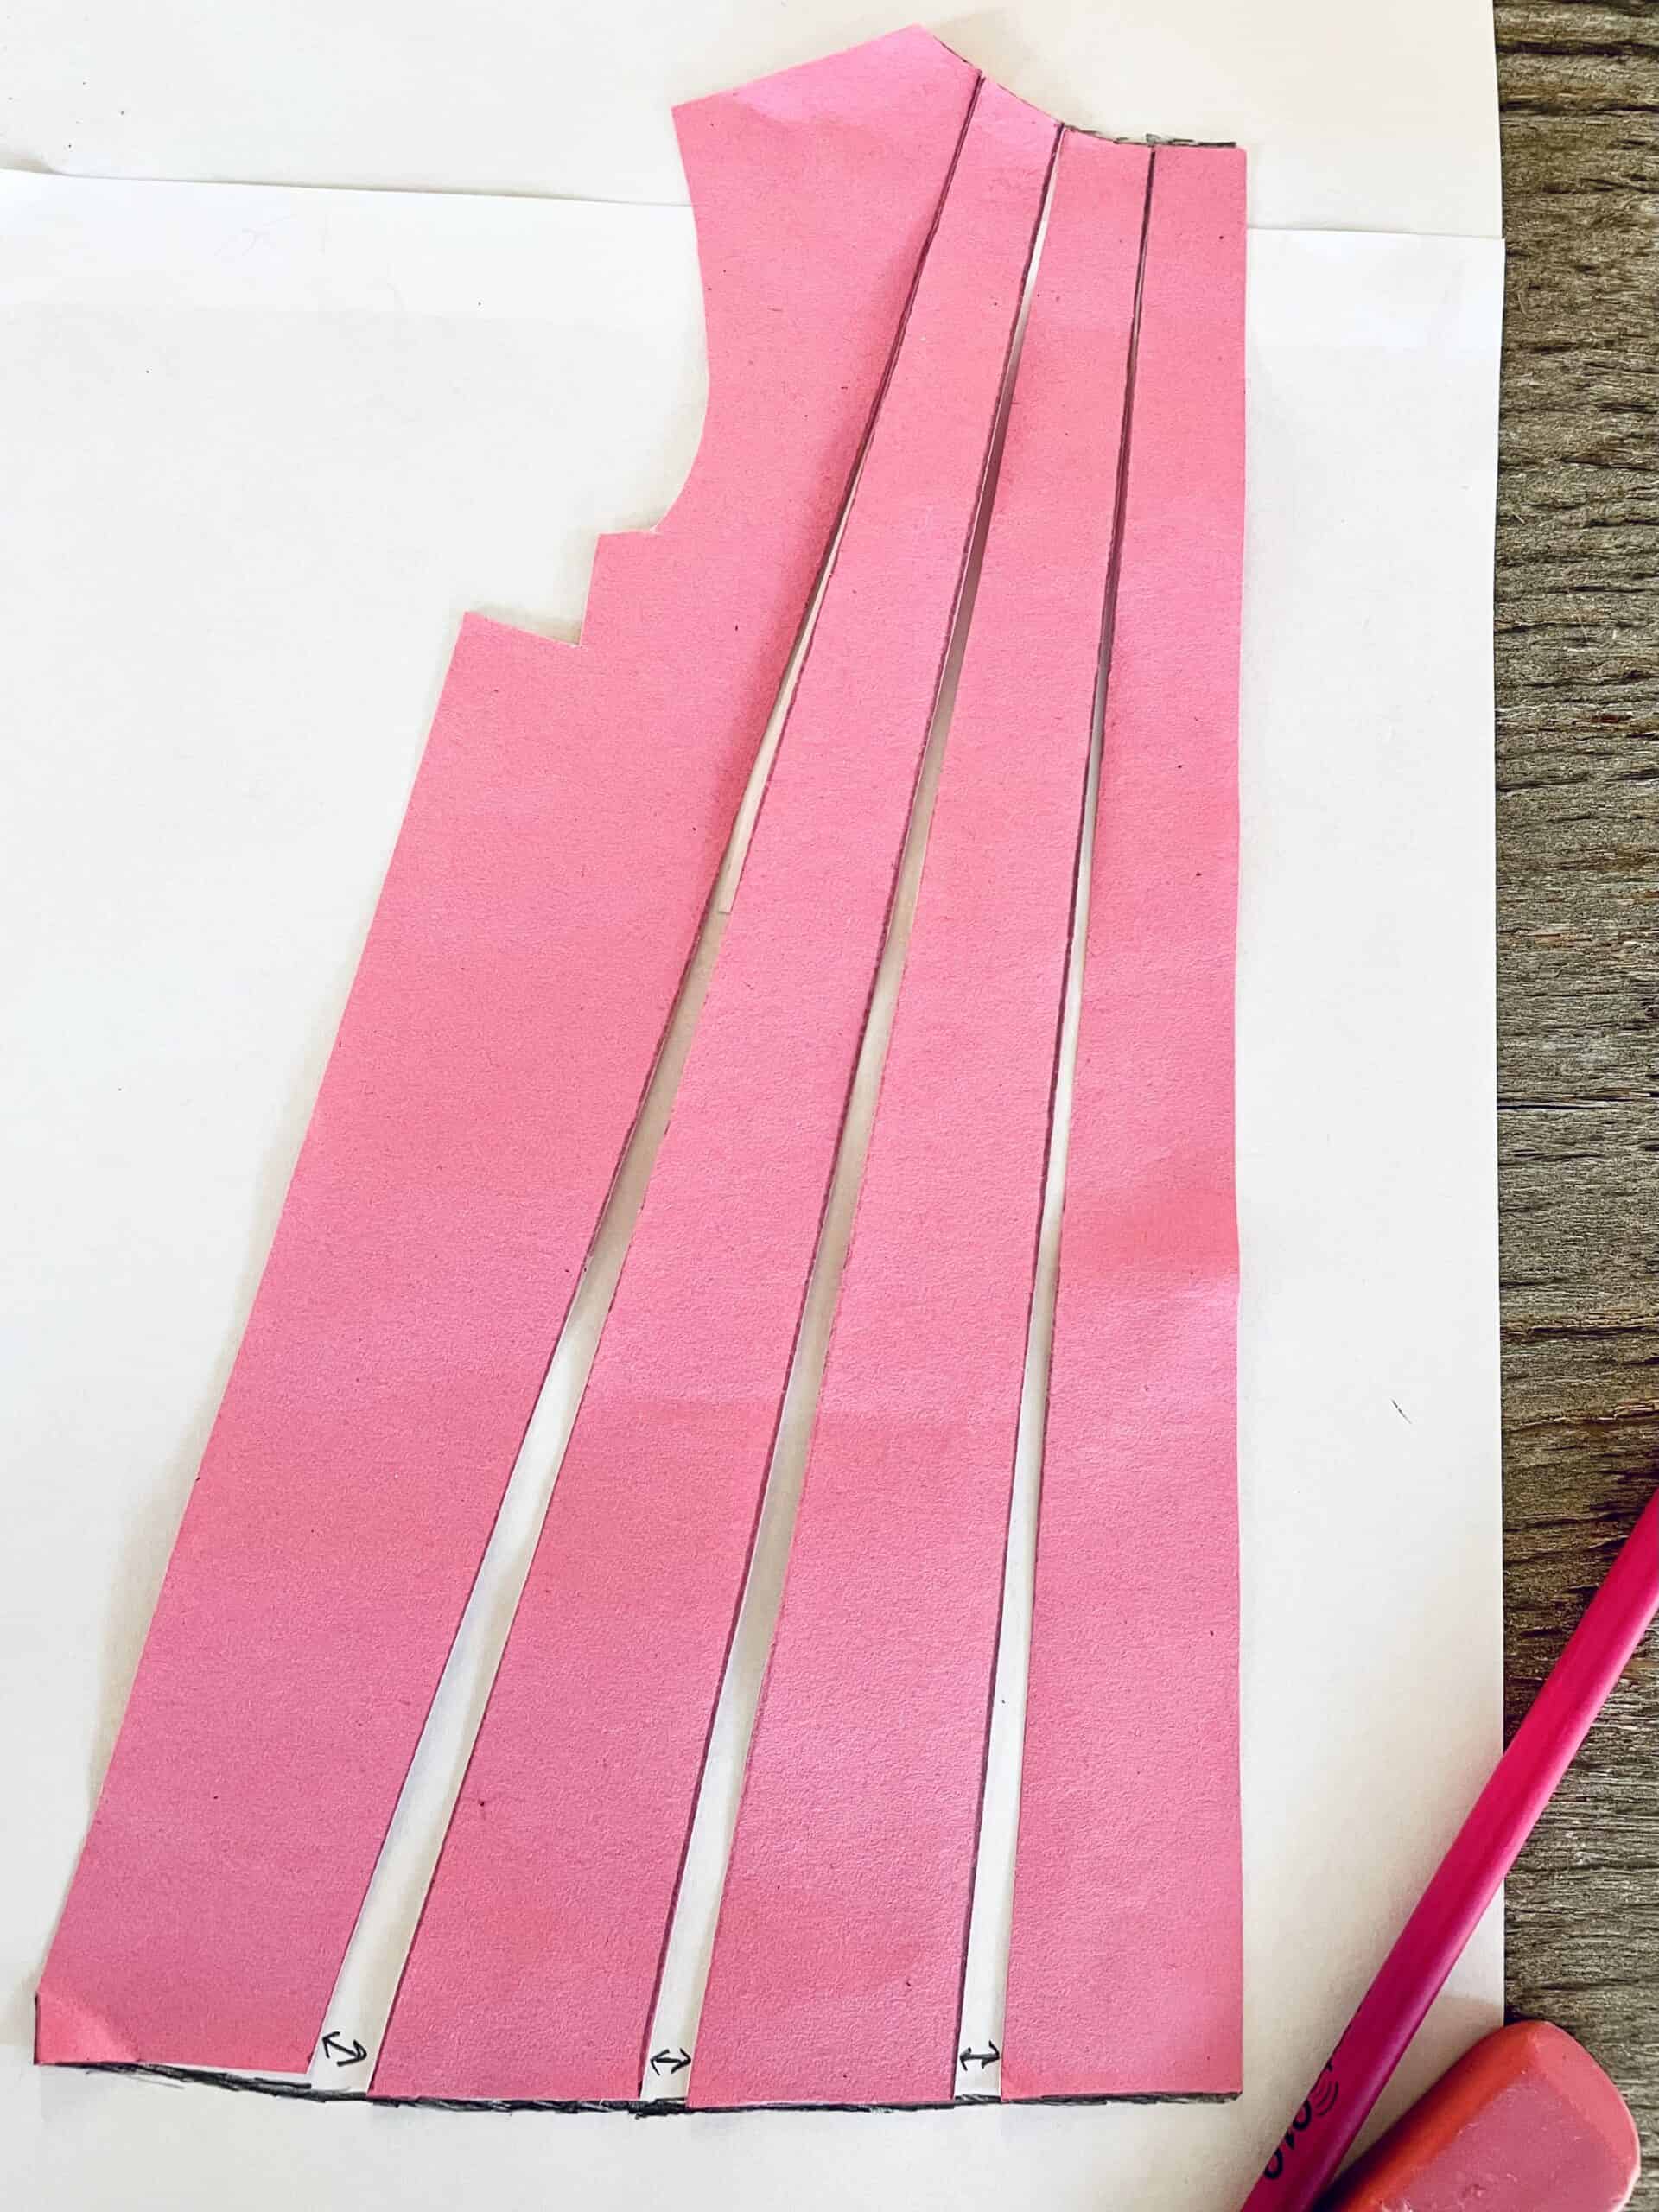
Step 6. Slash and spread the back bodice
Now do the exact same slash and spread to your back bodice. In my case, I added ½” in each of the 3 slash and spreads, which equals a total of 1½”. Note that for both the front and back bodices, the angle of the placket relative to the armscye doesn’t change.

Step 7. Sew up the dress as instructed!
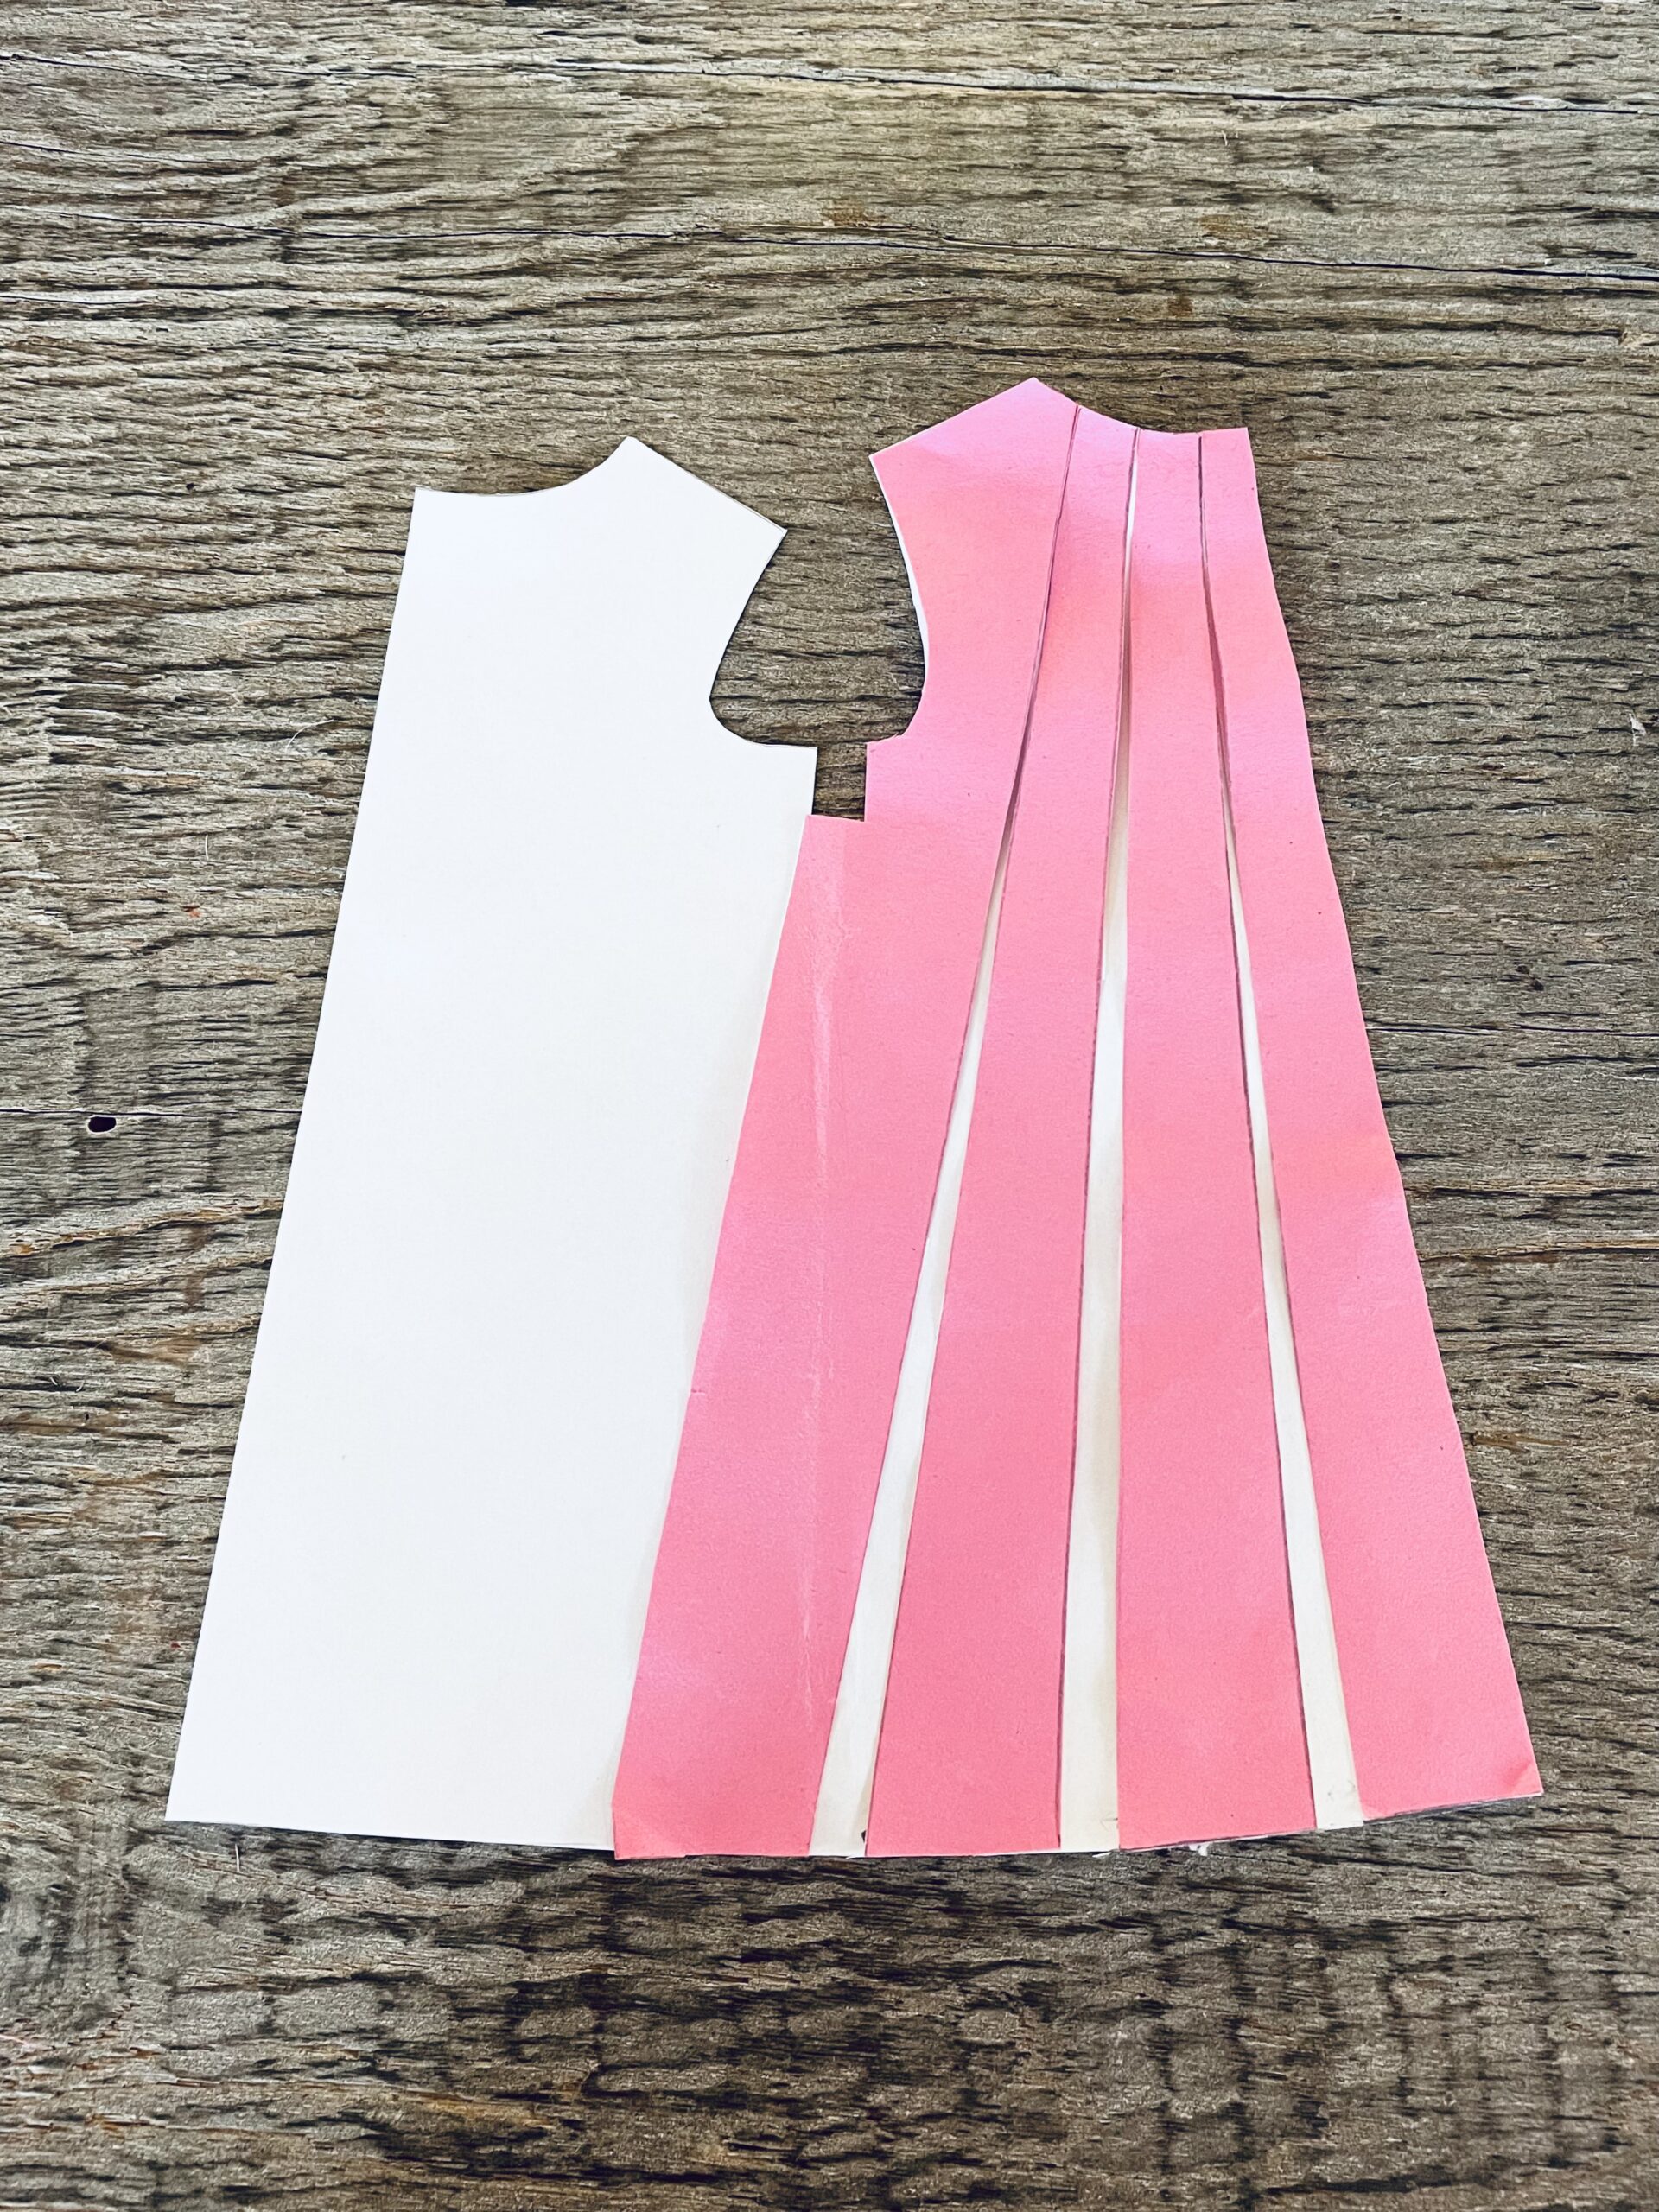
See how the front and back pieces matched up at the side placket gives a gentle A-line shape? Since we added 1½” to each half of the front and back bodices, the total circumference of the hem is increased by 1½” x 4 = 6”. This added ease is great for curvier and pear-shaped body types. It also gives the skirt a little more swish!


Once I tried on my squishy and fluffy Hacci Lincoln dress for fit, I couldn’t help but hack a higher neck for extra cozy factor. The original boat neckline curve is scooped in every so slightly by the slash and spread method, which actually made it really easy to add a funnel/turtle/cowl neck. I looked through my favorite Notions patterns and found that the Terra Tunic funnel neck piece matches pretty much perfectly! If you’d like to draft your own instead, it’s super easy too. Cut a rectangle with the length = your neckline circumference, and height = double the desired height of funnel. Sew it onto your Lincoln neckline the same way you would a regular knit neckband and so satisfying!

Back to the Faux-placket – some final thoughts…
Now that we have done our Lincoln hack, let’s quickly chat about the faux-placket option. Everything has its place and faux-plackets are great if:
- You prefer non-functional and decorative only side plackets/buttons
- You prefer a silhouette other than boxy or subtle A-line. For example, sheath or flare.
Love notions has a variety of knit top/dresses that are great for adding decorate side plackets and buttons to. There’s the Tessa Sheath, Terra Tunic, Arlington Sweater and Laundry Day Tee to name a few! You can even do partial plackets and buttons at either the top or bottom only. Here’s some RTW inspirations again if you are interested:

I hope you enjoyed today’s hacks and ideas all around Lincoln! To see my Lincoln dresses in action, find me on Instagram @no.idle.hands for twirl videos, along with my Love Notions Ambassador promo code. Meanwhile, grab your copy of Lincoln Top pattern for $5 today and enjoy sewing – either straight up or hacked!
Until next time,
Chloe @no.idle.hands

Save this article to your sewing Pinterest board