Love Notions patterns are drafted for the 5’5″ woman. Pattern altering is easy even if you are shorter or taller than that standard. Ladies patterns include a lengthen/short line. Additionally, bust, waist and hip lines are also marked to make it even easier and more exact to adjust for height.
A good rule of thumb for adding or removing length is to add/subtract one half inch for every one inch over or under the given height.
Pattern altering for adding length
This example uses a 5’8″ women where extra length is needed for the legs.
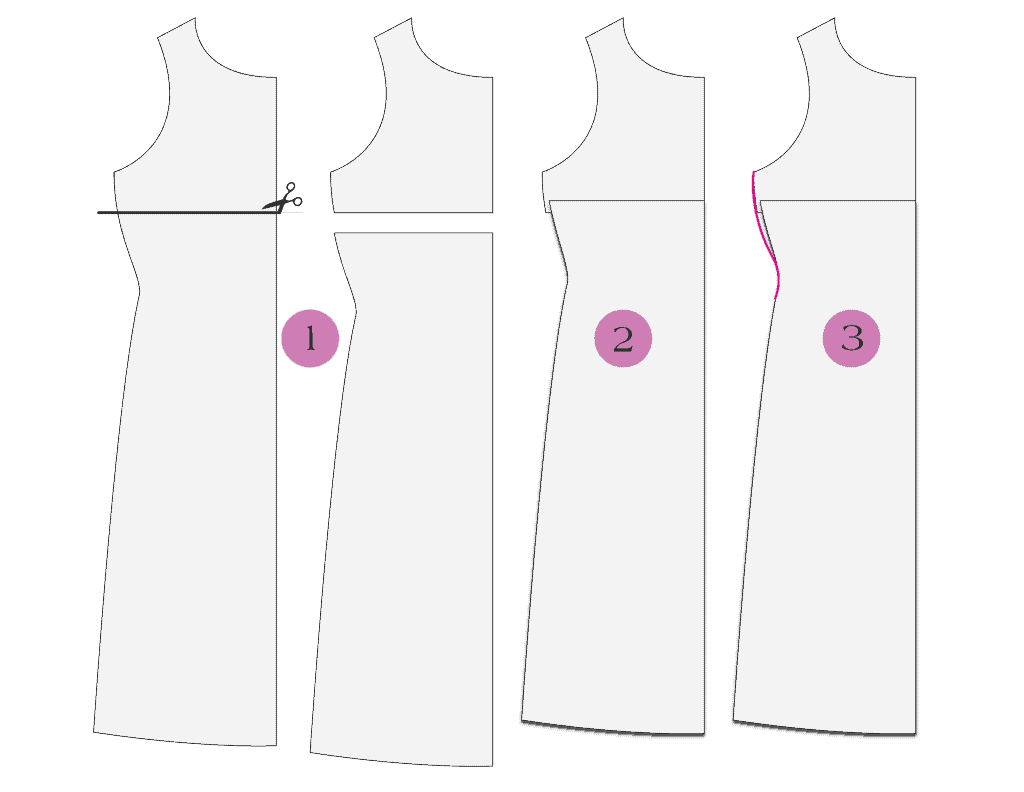
- Cut on the lengthen/shorten line.
- Spread the piece apart the desired additional length needed. For this example our height is 5’8″. Using the rule of thumb above we’ll spread the pieces 1.5″ (.5″ x 3) apart.
- Place a piece of paper underneath the two pieces and tape in place.
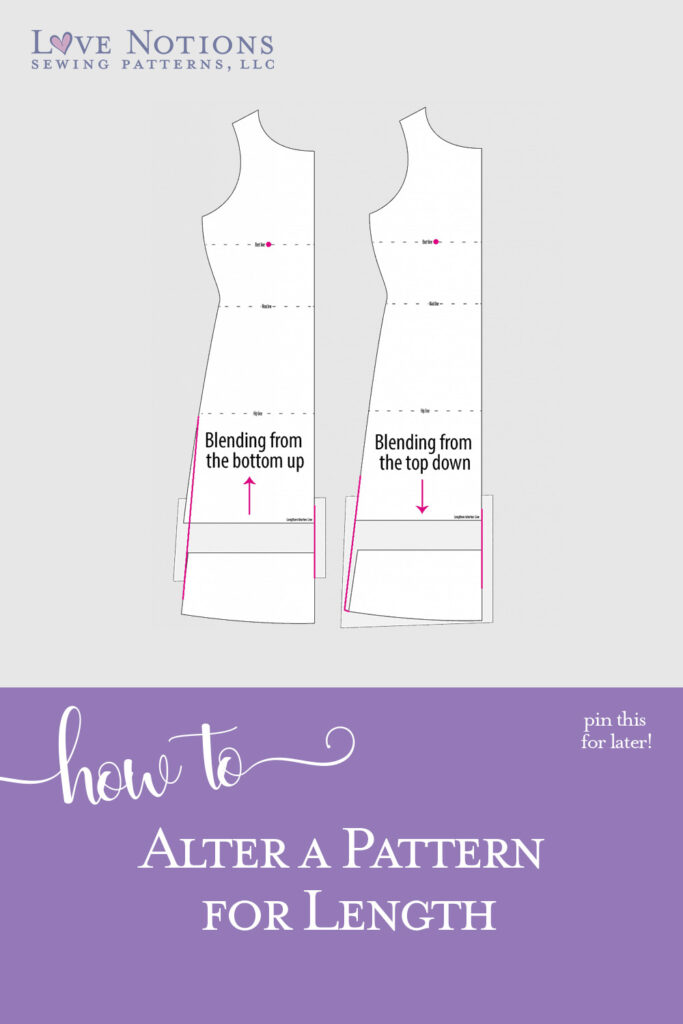
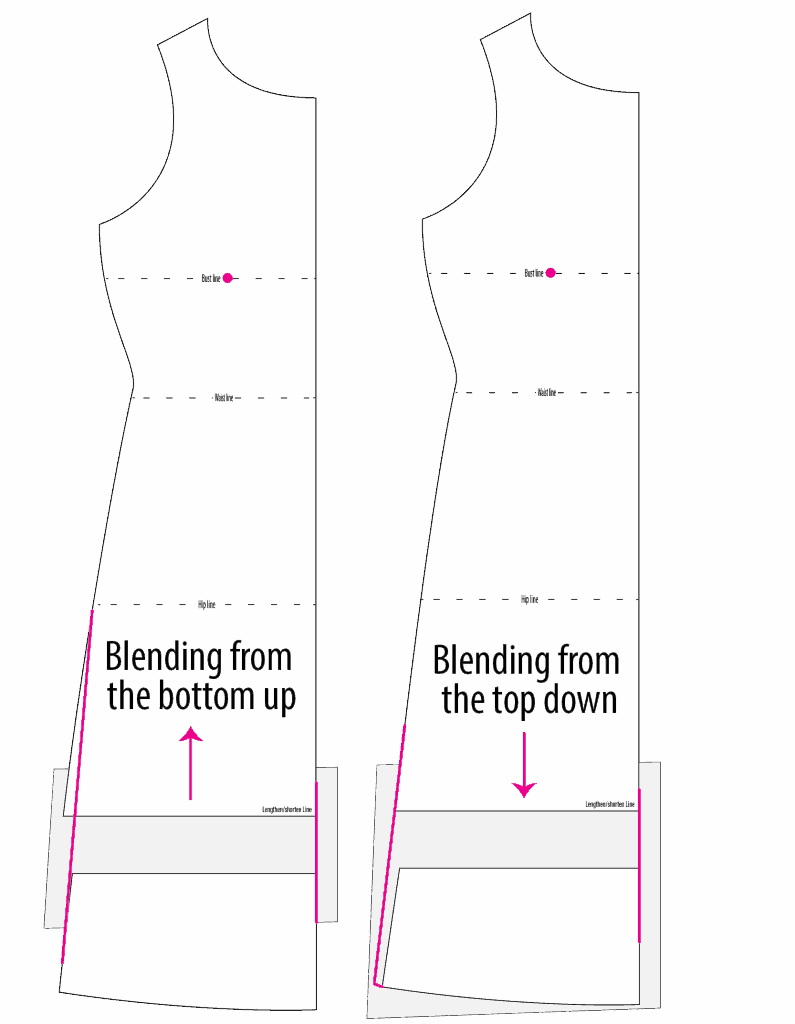
- Our final step is to blend the side seam since adding that length causes a jump. There are two ways you can do this. Either blend from the top down, which will add some ease to the bottom and at the hem, or blend from the bottom up, which will remove ease from the area where you cut the original piece. This is pretty much a personal preference. For a top like the Laundry Day Tee you’d probably want to blend from the bottom up because there is already plenty of ease in the waist and hips. For a dress like the Tessa Sheath Dress you’d probably want to blend from the top down since there isn’t very much ease to begin with.
Pattern altering for removing length
This example uses a 5’4″ woman with a bust that is one inch higher than the marked bust line.
- Cut on the bust line.
- Overlap the pieces the desired amount needed to subtract. For this example we’ll overlap the pieces one inch. Place a piece of paper underneath the two pieces and tape the pattern pieces in place.
- Our final step is to blend the side seam to smooth out any jumps created. Again, depending on the fit of the garment you may want to blend up to keep the ease or down to remove extra ease. For this example we’re working with a fitted dress so we’ll blend down. Just smooth out the curve of the bust.
-
Tessa Sheath Dress
$12.50 -
Sale!
Laundry Day Tee
$5.00
hello Tami . It’s very useful for me to length the Mid section of my daughter frock. Thanks
Hi Tami! I just wanted to make a suggestion. Could you please add these instructions to the patterns? I have just spent the last half hour looking for them :(. I found the lengthen/shorten line on the pattern but the instructions don’t seem to even mention what height the patterns are drafted for. I was specifically working on the Rockland Ragland but I did check a few other patterns I own, the pattern purchase page, tutorials, & the engine on the page until finally I found this, I think blog post?, it was really hard to find. PS I really love your patterns otherwise so I hope I haven’t made you feel bad-definitely not my intention! In fact my favorite pattern of all my patterns is the La Bella Donna <3
Can I ask why you reduce the amount lengthened by half?
I’m 5ft 7 so 2 inches difference, but you advise the alteration amount should be 1inch. I’m confused as to why this should be the case.
the 1/2″ for every 1″ over 5’5″ is just a general rule. To get the best fit, try holding the pattern as-is up to yourself (folding back the seam allowance at the shoulder) and see what you think. You want the apex on the pattern (this is marked with a circle with a plus sign inside of it and the dart points to it) to line up with the fullest part of your bust.
Harmony Blouse
I read your “Pattern altering for adding length” but it still way short for my 5’10.5″ heights.
I cut the Harmony Blouse pattern out, could you please advise how to go from the 5’5″ the pattern is to the needed added 5.5″? Where do I add them precisely?
And is this something I can than implement for your other tops and dresses patterns?
thank you
Maria
Hi Maria,
As a general rule, you’ll add a 1/2″ for every 1″ you’re taller than the pattern. So for you that would be 2.5″. However, if you want to get the very best fit, try holding the pattern as-is up to yourself (folding back the seam allowance at the shoulder) and see what you think. You want the apex on the pattern (this is marked with a circle with a plus sign inside of it and the dart points to it) to line up with the fullest part of your bust. Once you see how much length you need you’d cut on the lengthen/shorten line and add there or above the bust if you see that is where the extra length is needed.
This process is the same for all patterns. 🙂
Hi, I’d like to know what is the waist side length for the bodice piece of the Sunday Romper.
Thanks,
Manon
The easiest way to know this is to measure the pattern piece and subtract the seam allowances.
What height are your mens patterns drafted for?
5’8″
I’m 5’2” these days. However, since forever, I have learned that I split, not exactly in half though, the amount needed to shorten the back-waist measurement. It is important for a nicer fit that I shorten between the shoulder and lower armscye as well as between the bottom of the armscye and the waist. If you are not providing such a potential shortening line, perhaps your tutorial might suggest that this is another possible area to consider making a length adjustment. Tops/bodices look much nicer without that extra tiny fold above the bust.