Karina is taking a break from her amazing You Tube channel, liftingpinsandneedles, in order to provide Love Notions blog readers with an inspiring twist on the Constellation Hoodie and Pullover. Typically, the Constellation is meant for stable knits like French Terry, ponte, or even sweater knit. On this post, Karina shows us how to get creative with all sorts of different types of beautiful fabric for the Constellation! Be sure to snag the pattern for just $5, today only!
Looking to sew a full zipper front jacket? How about trying one in an unusual fabric choice?
Hi, my name is Karina from the YouTube channel Lifting Pins and Needles and today I’m going to show you an unusual fabric choice. A type that wouldn’t normally be the first, second or third in our minds.
Today is Friday, an Love Notions is featuring the Constellation Pullover and Hoodie as the pattern on sale today for only $5.
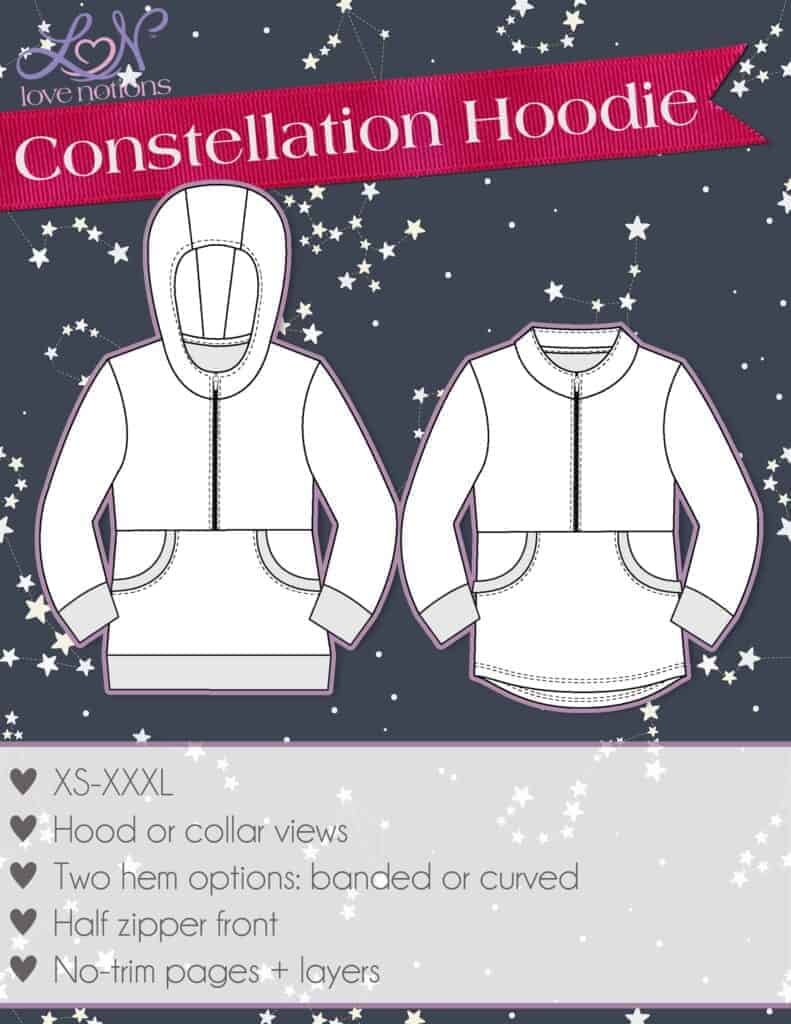
CONSTELLATION PULLOVER AND HOODIE
The Constellation Pullover and Hoodie PDF pattern has a collar and hood option, a curved or banded hem, kangaroo pocket option, a half zipper, binding on the collar and hem, cuffs with thumbhole option….a full bust option….. So many features and options. The design facilitates color blocking and for the nursing mums, the zipper is super helpful. This pattern has been re-released today with two more sizes included! 4XL and 5XL are now available, which is great news!!
FABRIC CHOICES
About the fabric choices recommended, stable knits such as Ponte, French terry, Sweater knits and sweat-shirting would be the obvious choices. They would be my choices too if I had proper cold climate in my country of residence. The truth is, even thinking about the cozy warm fabrics makes me melt.
I live in Brazil where the southern hemisphere spring feels like summer and temperatures in the high 90s and 100s are common daily. All day! During the night too! So, how to make the Constellation work for me? There is always a way. Fabric recommendations can be slightly interpreted. The pattern is designed to have some positive ease at the bust, waist and hips. This opens the possibility of use stretch fabric with slightly less stretch.
BOLD FABRIC
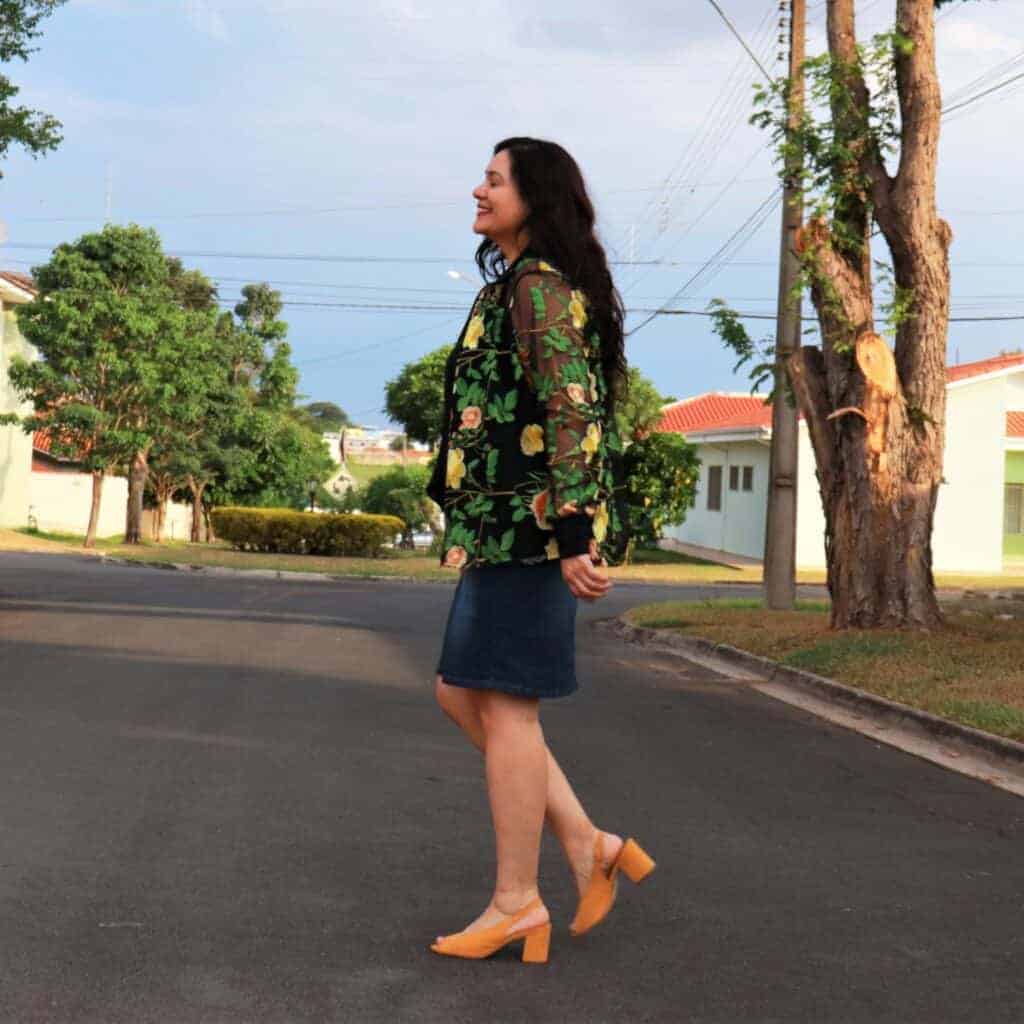
I have had embroidered stretch mesh tucked away in my stash for over a year waiting for the right project. I always had some type of zip up jacket in mind. When I chose the Constellation Pullover and Hoodie months ago to blog about, I knew this was the perfect pairing! Due to the nature of the fabric, a full zip up feature hack was more adequate, as was the collar and the curved hem option. This fabric is not too delicate, but the embroidery on it is. Less seams…. Better. Plus, such a bold looking fabric benefits from simple design lines.
HOW TO REMOVE THE HORIZONTAL SEAM + ADD A FULL ZIPPER FRONT
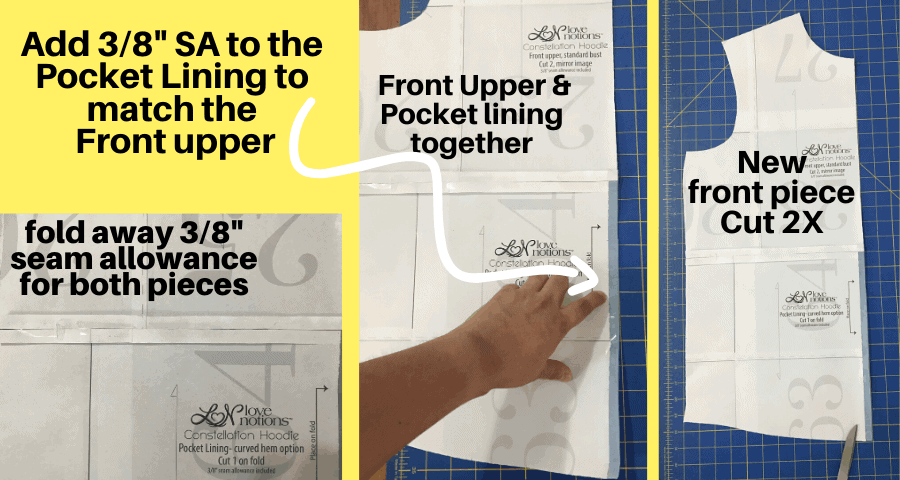
To turn the front into one piece without the horizontal seam and have a full zipper front instead, the front upper and pocket lining pieces need to be placed together, removing the 3/8” seam allowance as shown below. In light blue, you can see where 3/8” has been added to the pocket lining piece to match the same width of the front upper piece. The front upper has seam allowance in the center for the half zipper installation. This seam allowance is required for the whole front now, to allow for a long zipper.
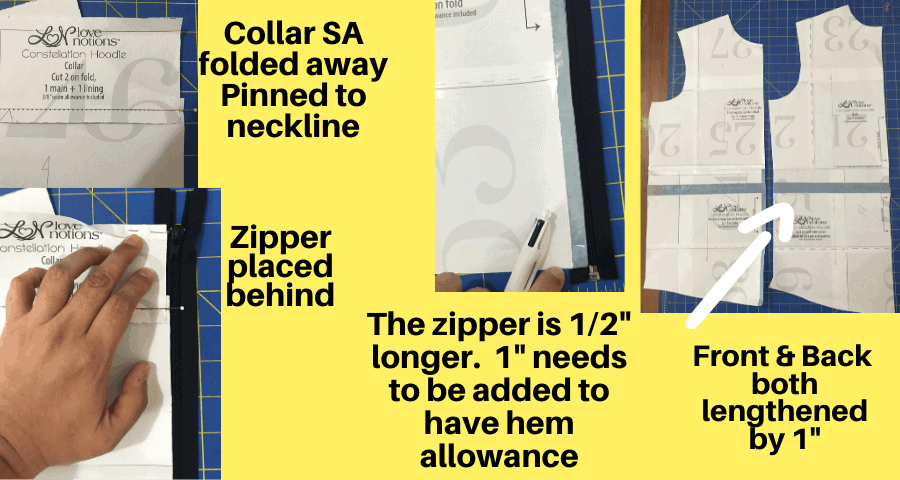
Depending on size chosen to sew, the zipper length required will vary. This is where flexibility comes to play with us in our sewing. I have a 27.5” zipper (from the top metal to the bottom stop). By folding away the seam allowances of the collar piece and pinning it onto the top of the neckline (pretending it’s been sewn on), we can measure down to the hem. This pattern has 1” hem allowance included for the curved hem version. I prefer to use ½” hem allowance for my curved hems. My zipper is 1” too long! I have no desire to trim it. I added a shorten/lengthen line 1.5” below the area where the upper front and pocket lining meet. I cut and added 1”. The same is replicated to the back piece. I needed this length adjustment anyway, since I am taller than the drafted height of the pattern. All this is shown below.
WORKING WITH MESH FABRIC
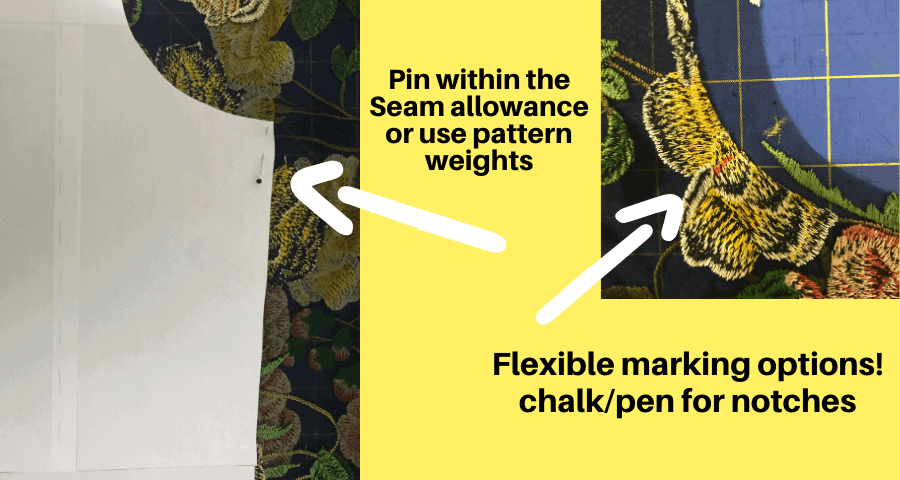
Mesh is not too different from working with a knit fabric, although some precautions apply, especially this one as the embroidery is delicate. Sharp new pins within the seam allowance and a rotary cutter assist in protecting the fabric. I’ve never warmed up to pattern weights though they would be ideal. To mark references (aka notches), different items were utilized depending on the area needing to be marked. Below you can see the front armscye notches marked with chalk for one side (mesh) and with a pen on the other (embroidery there). Whatever works so that they can be seen. My preference is not to snip notches in order to protect the fabric.
FINISHING THE SEAMS
I have opted to bias bind all the seams together. This served three purposes:
- Finish the raw edges due to the delicate embroidery that unravels
- Actually, sew the seams at the same time
- Provide a clean look as all the seams are visible through the fabric
Below you can see that the bias tape (satin tape 25mm double fold) has been hand basted on first and then sewn on the edge with an edge foot. This has been done for the shoulder seams, side seams, center front edges and sleeve seams. If you are wondering…. What about a stretch stitch? These seams don’t need to stretch at all, and the pattern has positive ease in the design. There is no need for the side seams to stretch at all. I must mention the following aspects: use a ballpoint needle or stretch needle, polyester thread and when pressing the seams, use a cloth to protect the fabric.
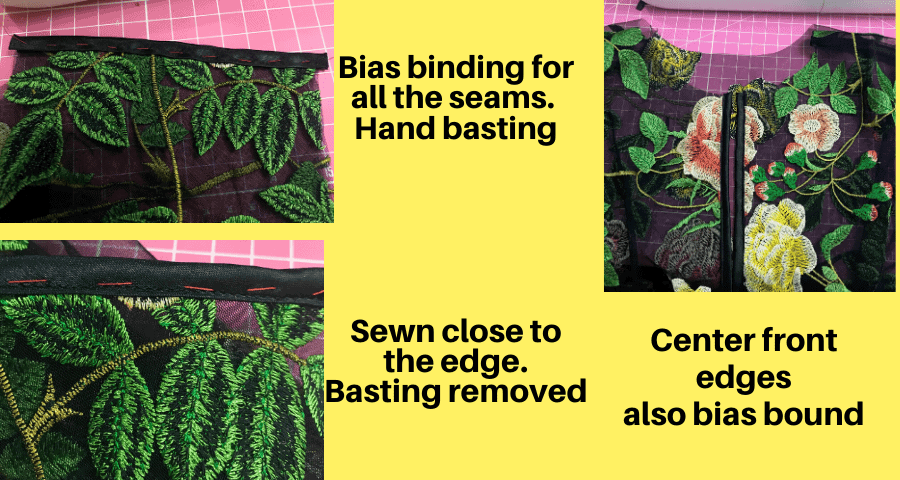
Before the zipper installation, the main collar is sewn onto the neckline as per instructions and the edge will meet the bias bound center edges. Nothing deviates from the pattern at this point. The raw edges of the bottom need to be finished before attaching the zipper. I have overlocked mine. See below.
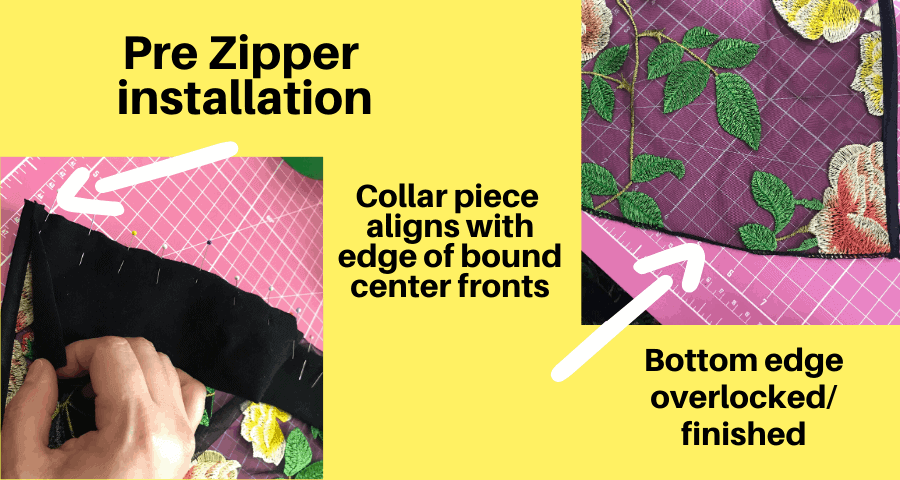
FULL ZIPPER FRONT INSTALLATION
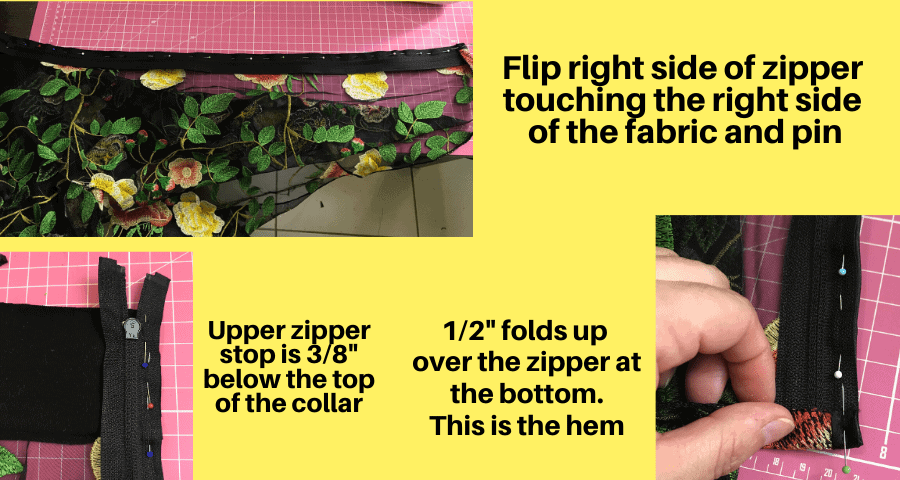
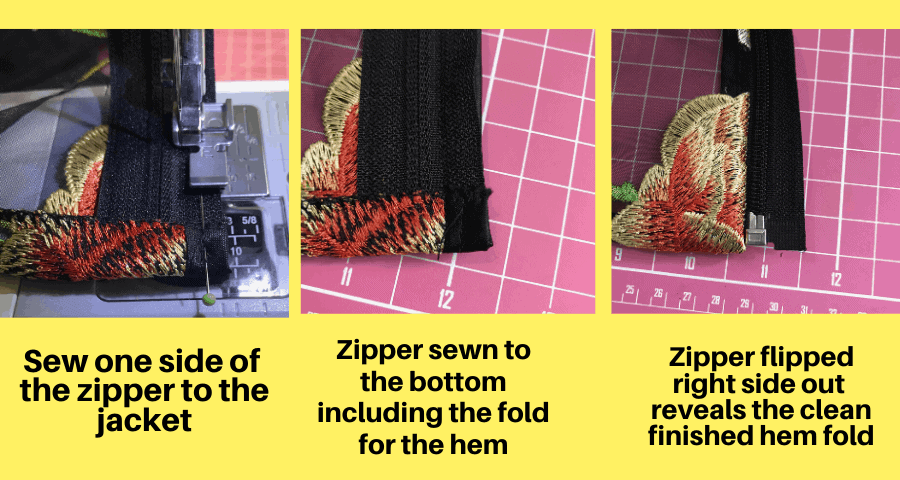
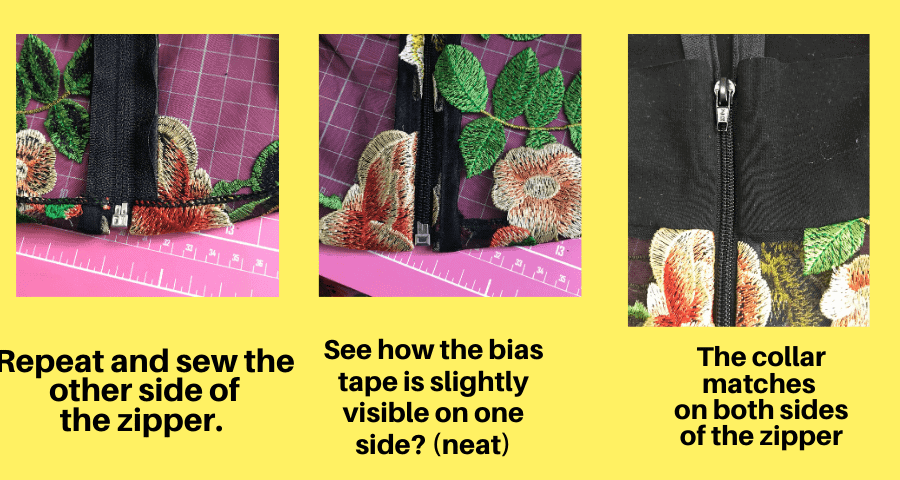
Pin the zipper right side of the zipper to the right side of the fabric and meet the upper zipper stop at the top of the collar, 3/8” below the top edge of the collar. Pin all the way down the center front and at the bottom, fold ½” over onto the zipper. This leaves the bottom of the zipper sandwiched between two layers. Sew as per usual. Then the zipper is flipped right side out to reveal a clean finished fold for the hem. Repeat on the other side. It is not necessary to separate the zipper. I recommend against. Leaving it together always facilitates it meeting perfectly at the bottom, collar union and the top. See the following three photos that illustrate this process.
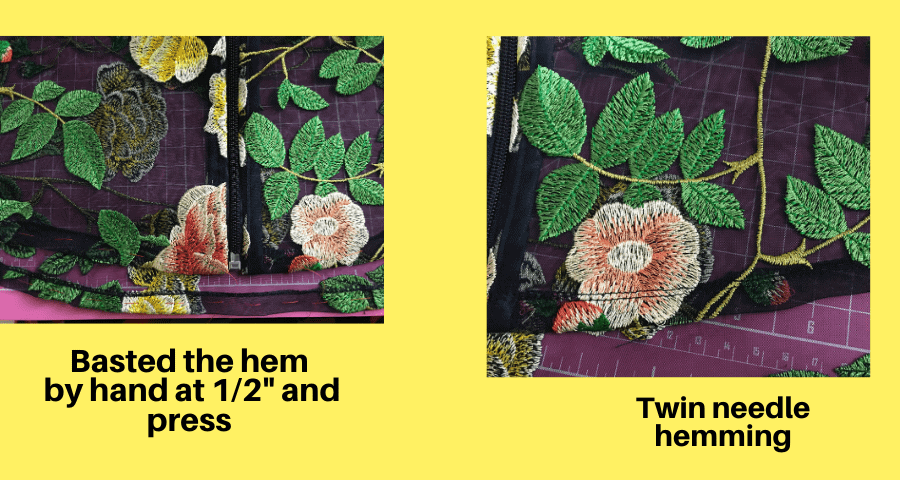
Lastly, the hem has been hand-basted, folded up by ½” and then sewn with a twin needle. Remember that the hem was already folded and finished neatly where it meets the zipper in a previous step.
I preferred to set in the sleeve traditionally, not on the flat. The reason: I prefer separate seams for the sleeve and the side seam. The side seam pressed towards the back and the sleeve seam pressed towards the front. When they meet at the underarm, it’s less bulky. All this due to the finishing technique chosen due to the nature of the fabric (The bias bound seams).
The sleeve was sewn with a narrow zig zag stitch and the edges overlocked. This seam does need to stretch as we move our arms. This is the reason this seam was not bias bound like the rest. To allow freedom of movement.
EVEN MORE OPTIONS = A PIECE TO BE PROUD OF
This was fun! A full zipper front is a simple pattern modification that can give this pattern even more options than it already has. Choosing this fabric was a challenge. The construction took a tad longer than usual (I still LOVE hand basting — he he) and the little details that needed to be changed due to the nature of the fabric make this an accomplishment.
Now to wear this embroidered mesh jacket in all occasions! I will take advantage of the fact that colors and prints that seem a little “extra” aren’t really “extra” here in Brazil. I’ll just be one more person dressed colorfully in the supermarket, mall and even church.
GET YOURS TODAY
Get the amazing Constellation Pullover and Hoodie pattern today for only $5! Any zipper queries can be solved in the amazing pattern support group on facebook. If you purchase the pattern from the links in this post, I will receive a small commission from the sale, at no cost to you ?.
Have a look at the fun photos.