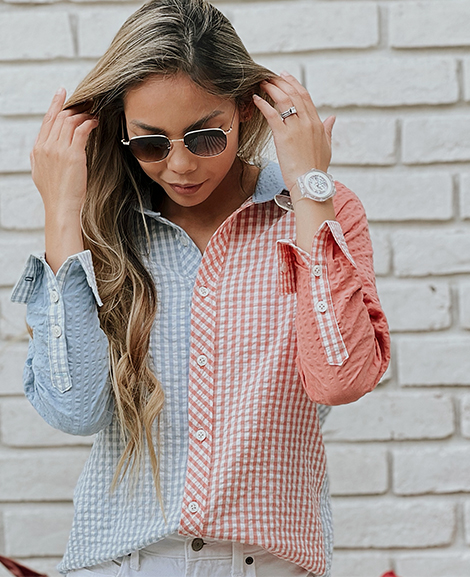
[vc_row type=”in_container” full_screen_row_position=”middle” column_margin=”default” column_direction=”default” column_direction_tablet=”default” column_direction_phone=”default” scene_position=”center” text_color=”dark” text_align=”left” row_border_radius=”none” row_border_radius_applies=”bg” overflow=”visible” overlay_strength=”0.3″ gradient_direction=”left_to_right” shape_divider_position=”bottom” bg_image_animation=”none”][vc_column column_padding=”no-extra-padding” column_padding_tablet=”inherit” column_padding_phone=”inherit” column_padding_position=”all” column_element_direction_desktop=”default” column_element_spacing=”default” desktop_text_alignment=”default” tablet_text_alignment=”default” phone_text_alignment=”default” background_color_opacity=”1″ background_hover_color_opacity=”1″ column_backdrop_filter=”none” column_shadow=”none” column_border_radius=”none” column_link_target=”_self” column_position=”default” gradient_direction=”left_to_right” overlay_strength=”0.3″ width=”1/1″ tablet_width_inherit=”default” animation_type=”default” bg_image_animation=”none” border_type=”simple” column_border_width=”none” column_border_style=”solid”][split_line_heading animation_type=”line-reveal-by-space” font_style=”h3″ text_color=”#7e86ab” line_reveal_by_space_text_effect=”default” content_alignment=”default” mobile_content_alignment=”inherit” link_target=”_self” text_content=”Three ways to crop Canyon Cardigan”][/split_line_heading][image_with_animation image_url=”702651″ image_size=”full” animation_type=”entrance” animation=”None” animation_movement_type=”transform_y” hover_animation=”none” alignment=”” border_radius=”none” box_shadow=”none” image_loading=”default” max_width=”100%” max_width_mobile=”default”][vc_column_text]Hi everyone, Kelly from sunny California on the blog today. With the weather finally cooling down, I find myself reaching for cardigans in the morning more and more. While I love my longer length cardigans, sometimes I just need a little warmth on my arms, so a cropped cardigan is great to have on hand. I also really enjoy having a cropped cardigan to go with special occasion outfits as well.
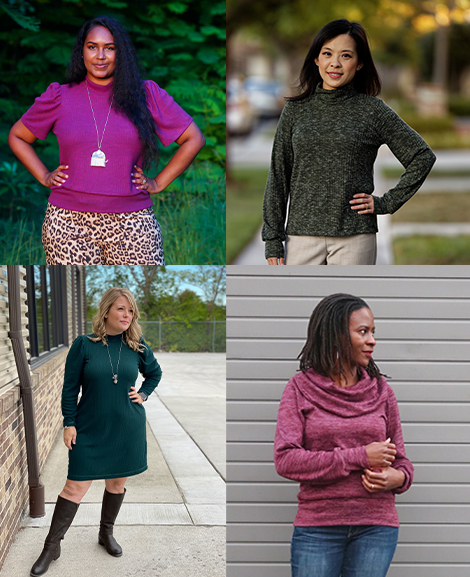
I’ve come up with a hack for the Canyon Cardigan to create a cropped version, with 3 different ways to apply the neckband.
[/vc_column_text][vc_gallery type=”image_grid” images=”702652,702653,702656″ image_grid_loading=”default” layout=”3″ item_spacing=”default” gallery_style=”7″ load_in_animation=”none” img_size=”500×500″][vc_column_text]Want to join me in making a Cropped Canyon Cardi? Let’s do this![/vc_column_text][vc_column_text]
- My first version is a simple hack of shortening the neckband to fit the front bodice with no skirt
attached. - My second version adds a band along the bottom of the cardigan instead of hemming the bottom.
- My third version lengthens the neckband to fit around the front and back bodices.
For all three versions we will be using the same pattern pieces.[/vc_column_text][vc_column_text]
Pattern pieces you will need:
- Bodice Front – cut 2 mirrored (make sure to mark the front neckline notches)
- Bodice Back – cut 2 mirrored
- Sleeve – cut 2 mirrored (your choice of length)
- Neckband (we will be altering the length of this piece, do not cut fabric until instructed)
[/vc_column_text][vc_gallery type=”flickity_style” images=”702657″ flickity_spacing=”default” flickity_controls=”none” flickity_overflow=”visible” flickity_wrap_around=”wrap” flickity_desktop_columns=”1″ flickity_small_desktop_columns=”1″ flickity_tablet_columns=”1″ flickity_phone_columns=”1″ flickity_box_shadow=”none” image_loading=”default” onclick=”link_no”][divider line_type=”Full Width Line” line_thickness=”4″ divider_color=”accent-color”][vc_column_text]Check out Canyon Cardigan Sewing Pattern – just re-released with updated sizing, fully retested on the current pattern block, and now includes a done-for-you FBA. shop here[/vc_column_text][image_with_animation image_url=”703644″ image_size=”full” animation_type=”entrance” animation=”None” animation_movement_type=”transform_y” hover_animation=”none” alignment=”” border_radius=”none” box_shadow=”none” image_loading=”default” max_width=”100%” max_width_mobile=”default”][divider line_type=”Full Width Line” line_thickness=”4″ divider_color=”accent-color”][nectar_gradient_text heading_tag=”h2″ color=”extra-color-gradient-1″ gradient_direction=”horizontal” text=”For all Crop Cardigan versions:”][vc_column_text]So, if you have not made a Canyon Cardigan already, you will want to hold the front bodice pattern piece up to your body and determine where you want the bottom to land on your body. If you want to add or subtract length, simply measure how much you want to add or subtract. Don’t forget to consider the added length from the bottom band, if you are doing version 2 or 3.[/vc_column_text][vc_gallery type=”image_grid” images=”702658,702659″ image_grid_loading=”default” layout=”2″ item_spacing=”default” gallery_style=”7″ load_in_animation=”none” img_size=”500×500″][vc_column_text]Follow the tutorial from steps 1 – 3 to sew together the back bodice pieces, and then the front pieces to the back. Skip steps 4 – 6. Follow steps 7 – 9 to sew in the sleeves and to sew the side seams. Turn the sleeve hem up 1” to the wrong side and hem.[/vc_column_text][nectar_gradient_text heading_tag=”h2″ color=”extra-color-gradient-1″ gradient_direction=”horizontal” text=”Continue Crop Cardigan Version 1 Here:”][vc_column_text]Finish the bottom of the cardigan by folding the bottom up 1” to the wrong side and hemming. Next, we will need to measure half of the neckline length. Using a flexible tape measure, measure along the neckline, starting at the top of the back bodice, middle seam, and down to the bottom front corner of the front bodice.[/vc_column_text][image_with_animation image_url=”702660″ image_size=”custom” animation_type=”entrance” animation=”None” animation_movement_type=”transform_y” hover_animation=”none” alignment=”” border_radius=”none” box_shadow=”none” image_loading=”default” max_width=”100%” max_width_mobile=”default” custom_image_size=”400×200″][vc_column_text]We’re measuring half so we can easily use the neckband pattern piece and notches already given. Take your measurement and subtract 2” (this is the ease built in to gently pull the back of the neckline in to avoid gaping). Using your neckband pattern piece, measure from the end with the notch to the distance of your final neckband measurement and mark it on your pattern. This is where you will cut your 2 neckband pieces to for length. Be sure to mark the notches from the pattern onto your fabric.[/vc_column_text][vc_gallery type=”image_grid” images=”702661,702662″ image_grid_loading=”default” layout=”2″ item_spacing=”default” gallery_style=”7″ load_in_animation=”none” img_size=”500×200″][vc_column_text]Follow steps 3-7 from the finishing section on pages 14/15 of the tutorial. Your cropped cardigan is
finished![/vc_column_text][vc_gallery type=”image_grid” images=”702664,702663,702665″ image_grid_loading=”default” layout=”3″ item_spacing=”default” gallery_style=”7″ load_in_animation=”none” img_size=”500×500″][divider line_type=”No Line”][nectar_gradient_text heading_tag=”h2″ color=”extra-color-gradient-1″ gradient_direction=”horizontal” text=”Continue Crop Cardigan Version 2 Here:”][vc_column_text]Measure along the bottom of the bodice first, from front bodice corner to the opposite front bodice corner. Cut a band the length you need in the same width as the neckband. Fold the band lengthwise with wrong sides together and sew it to the bottom of your cardigan 1:1 with raw edges matching.[/vc_column_text][vc_gallery type=”image_grid” images=”702682″ image_grid_loading=”default” layout=”constrained_fullwidth” item_spacing=”default” gallery_style=”7″ load_in_animation=”none” img_size=”500×300″][vc_column_text]Next you will measure out the length needed for your front neckband. Start at the top of the back bodice, middle seam. Measure down one side to the bottom corner of the front bodice. Take your measurement and subtract 2” (this is the ease built in to gently pull the back of the neckline in to avoid gaping). Using your neckband pattern piece, measure from the end with the notch to the distance of your final neckband measurement and mark it on your pattern. This is where you will cut your 2 neckband pieces to for length. Be sure to mark the notches from the pattern onto your fabric.
[/vc_column_text][vc_gallery type=”image_grid” images=”702683″ image_grid_loading=”default” layout=”constrained_fullwidth” item_spacing=”default” gallery_style=”7″ load_in_animation=”none” img_size=”500×400″][vc_column_text]Follow steps 3-7 from the finishing section on pages 14/15 of the tutorial to attach the neckband and
finish your cardigan![/vc_column_text][vc_gallery type=”image_grid” images=”702684,702685,702686″ image_grid_loading=”default” layout=”3″ item_spacing=”default” gallery_style=”7″ load_in_animation=”none” img_size=”400×600″][divider line_type=”No Line”][nectar_gradient_text heading_tag=”h2″ color=”extra-color-gradient-1″ gradient_direction=”horizontal” text=”Continue Crop Cardigan Version 3 Here:”][vc_column_text]For this version I wanted to create a gentle curve at the front of my bodice and use a continuous neckband along the entire bodice edge. (I also cut the sleeve to short-sleeve length.)
First, I cut off the bottom corner edge with a freehanded curve.[/vc_column_text][vc_gallery type=”image_grid” images=”702687,702688″ image_grid_loading=”default” layout=”2″ item_spacing=”default” gallery_style=”7″ load_in_animation=”none” img_size=”400×600″][vc_column_text]We will need the neckband to go around the length of the entire cardigan’s raw edge. We’ll use 2 neckband pieces to accomplish this. Measure the front neckline starting from top back, middle seam, and going down along the curve to the bottom back, middle seam.
[/vc_column_text][image_with_animation image_url=”702689″ image_size=”custom” animation_type=”entrance” animation=”None” animation_movement_type=”transform_y” hover_animation=”none” alignment=”” border_radius=”none” box_shadow=”none” image_loading=”default” max_width=”100%” max_width_mobile=”default” custom_image_size=”800×400″][vc_column_text]Take this measurement and subtract 2” (this ease helps keep the back of the neck pulled in). Using your neckband pattern piece, measure from the end with the notch to the distance of your final neckband measurement and mark it on your pattern. You may need to extend the neckband piece for this version. Cut your 2 neckband pieces at this new length. Be sure to mark the notches from the pattern onto your fabric. Also be sure to mark the end where the notches are – this end will go at the top of the neckline.[/vc_column_text][image_with_animation image_url=”702690″ image_size=”full” animation_type=”entrance” animation=”None” animation_movement_type=”transform_y” hover_animation=”none” alignment=”” border_radius=”none” box_shadow=”none” image_loading=”default” max_width=”100%” max_width_mobile=”default”][vc_column_text]
Sew together the short ends of your neckband, right sides facing. Turn out and press the neckband together lengthwise with wrong sides facing. Follow step 6 of the finishing section on page 15 of the tutorial for the top of the neckband (we marked which end goes at the top) so that you get the correct ease at the back of your cardigan neckline. The rest of the neckband will fit 1:1 around the remainder of the cardigan’s raw edges, ending with the other seam lining up with the back bottom, middle seam.
[/vc_column_text][image_with_animation image_url=”702691″ image_size=”custom” animation_type=”entrance” animation=”None” animation_movement_type=”transform_y” hover_animation=”none” alignment=”” border_radius=”none” box_shadow=”none” image_loading=”default” max_width=”100%” max_width_mobile=”default” custom_image_size=”500×750″][vc_column_text]
Finish step 7 on page 15 of the tutorial and your cropped cardigan is ready to wear!
[/vc_column_text][vc_gallery type=”image_grid” images=”702692,702693,702694″ image_grid_loading=”default” layout=”3″ item_spacing=”default” gallery_style=”7″ load_in_animation=”none” img_size=”500×750″][image_with_animation image_size=”custom” animation_type=”entrance” animation=”None” animation_movement_type=”transform_y” hover_animation=”none” alignment=”” border_radius=”none” box_shadow=”none” image_loading=”default” max_width=”100%” max_width_mobile=”default” custom_image_size=”500×750″][vc_column_text]I hope you enjoy your cropped Canyon Cardigan(s) as much as I do![/vc_column_text][/vc_column][vc_column column_padding=”no-extra-padding” column_padding_tablet=”inherit” column_padding_phone=”inherit” column_padding_position=”all” column_element_direction_desktop=”default” column_element_spacing=”default” desktop_text_alignment=”default” tablet_text_alignment=”default” phone_text_alignment=”default” background_color_opacity=”1″ background_hover_color_opacity=”1″ column_backdrop_filter=”none” column_shadow=”none” column_border_radius=”none” column_link_target=”_self” column_position=”default” gradient_direction=”left_to_right” overlay_strength=”0.3″ width=”1/1″ tablet_width_inherit=”default” animation_type=”default” bg_image_animation=”none” border_type=”simple” column_border_width=”none” column_border_style=”solid”][/vc_column][/vc_row][vc_row type=”in_container” full_screen_row_position=”middle” column_margin=”default” column_direction=”default” column_direction_tablet=”default” column_direction_phone=”default” scene_position=”center” text_color=”dark” text_align=”left” row_border_radius=”none” row_border_radius_applies=”bg” overflow=”visible” overlay_strength=”0.3″ gradient_direction=”left_to_right” shape_divider_position=”bottom” bg_image_animation=”none”][vc_column column_padding=”no-extra-padding” column_padding_tablet=”inherit” column_padding_phone=”inherit” column_padding_position=”all” column_element_direction_desktop=”default” column_element_spacing=”default” desktop_text_alignment=”default” tablet_text_alignment=”default” phone_text_alignment=”default” background_color_opacity=”1″ background_hover_color_opacity=”1″ column_backdrop_filter=”none” column_shadow=”none” column_border_radius=”none” column_link_target=”_self” column_position=”default” gradient_direction=”left_to_right” overlay_strength=”0.3″ width=”1/1″ tablet_width_inherit=”default” animation_type=”default” bg_image_animation=”none” border_type=”simple” column_border_width=”none” column_border_style=”solid”][divider line_type=”Full Width Line” line_thickness=”4″ divider_color=”accent-color”][/vc_column][/vc_row][vc_row type=”in_container” full_screen_row_position=”middle” column_margin=”default” column_direction=”default” column_direction_tablet=”default” column_direction_phone=”default” scene_position=”center” text_color=”dark” text_align=”left” row_border_radius=”none” row_border_radius_applies=”bg” overflow=”visible” overlay_strength=”0.3″ gradient_direction=”left_to_right” shape_divider_position=”bottom” bg_image_animation=”none”][vc_column column_padding=”no-extra-padding” column_padding_tablet=”inherit” column_padding_phone=”inherit” column_padding_position=”all” column_element_direction_desktop=”default” column_element_spacing=”default” desktop_text_alignment=”default” tablet_text_alignment=”default” phone_text_alignment=”default” background_color_opacity=”1″ background_hover_color_opacity=”1″ column_backdrop_filter=”none” column_shadow=”none” column_border_radius=”none” column_link_target=”_self” column_position=”default” gradient_direction=”left_to_right” overlay_strength=”0.3″ width=”1/1″ tablet_width_inherit=”default” animation_type=”default” bg_image_animation=”none” border_type=”simple” column_border_width=”none” column_border_style=”solid”][vc_column_text]
Save to Pinterest
[/vc_column_text][image_with_animation image_url=”703631″ image_size=”full” animation_type=”entrance” animation=”None” animation_movement_type=”transform_y” hover_animation=”none” alignment=”” border_radius=”none” box_shadow=”none” image_loading=”default” max_width=”100%” max_width_mobile=”default”][/vc_column][/vc_row][vc_row type=”in_container” full_screen_row_position=”middle” column_margin=”default” column_direction=”default” column_direction_tablet=”default” column_direction_phone=”default” scene_position=”center” text_color=”dark” text_align=”left” row_border_radius=”none” row_border_radius_applies=”bg” overflow=”visible” overlay_strength=”0.3″ gradient_direction=”left_to_right” shape_divider_position=”bottom” bg_image_animation=”none”][vc_column column_padding=”no-extra-padding” column_padding_tablet=”inherit” column_padding_phone=”inherit” column_padding_position=”all” column_element_direction_desktop=”default” column_element_spacing=”default” desktop_text_alignment=”default” tablet_text_alignment=”default” phone_text_alignment=”default” background_color_opacity=”1″ background_hover_color_opacity=”1″ column_backdrop_filter=”none” column_shadow=”none” column_border_radius=”none” column_link_target=”_self” column_position=”default” gradient_direction=”left_to_right” overlay_strength=”0.3″ width=”1/1″ tablet_width_inherit=”default” animation_type=”default” bg_image_animation=”none” border_type=”simple” column_border_width=”none” column_border_style=”solid”][vc_column_text]
Shop the Patterns
[/vc_column_text]
[/vc_column][/vc_row]